

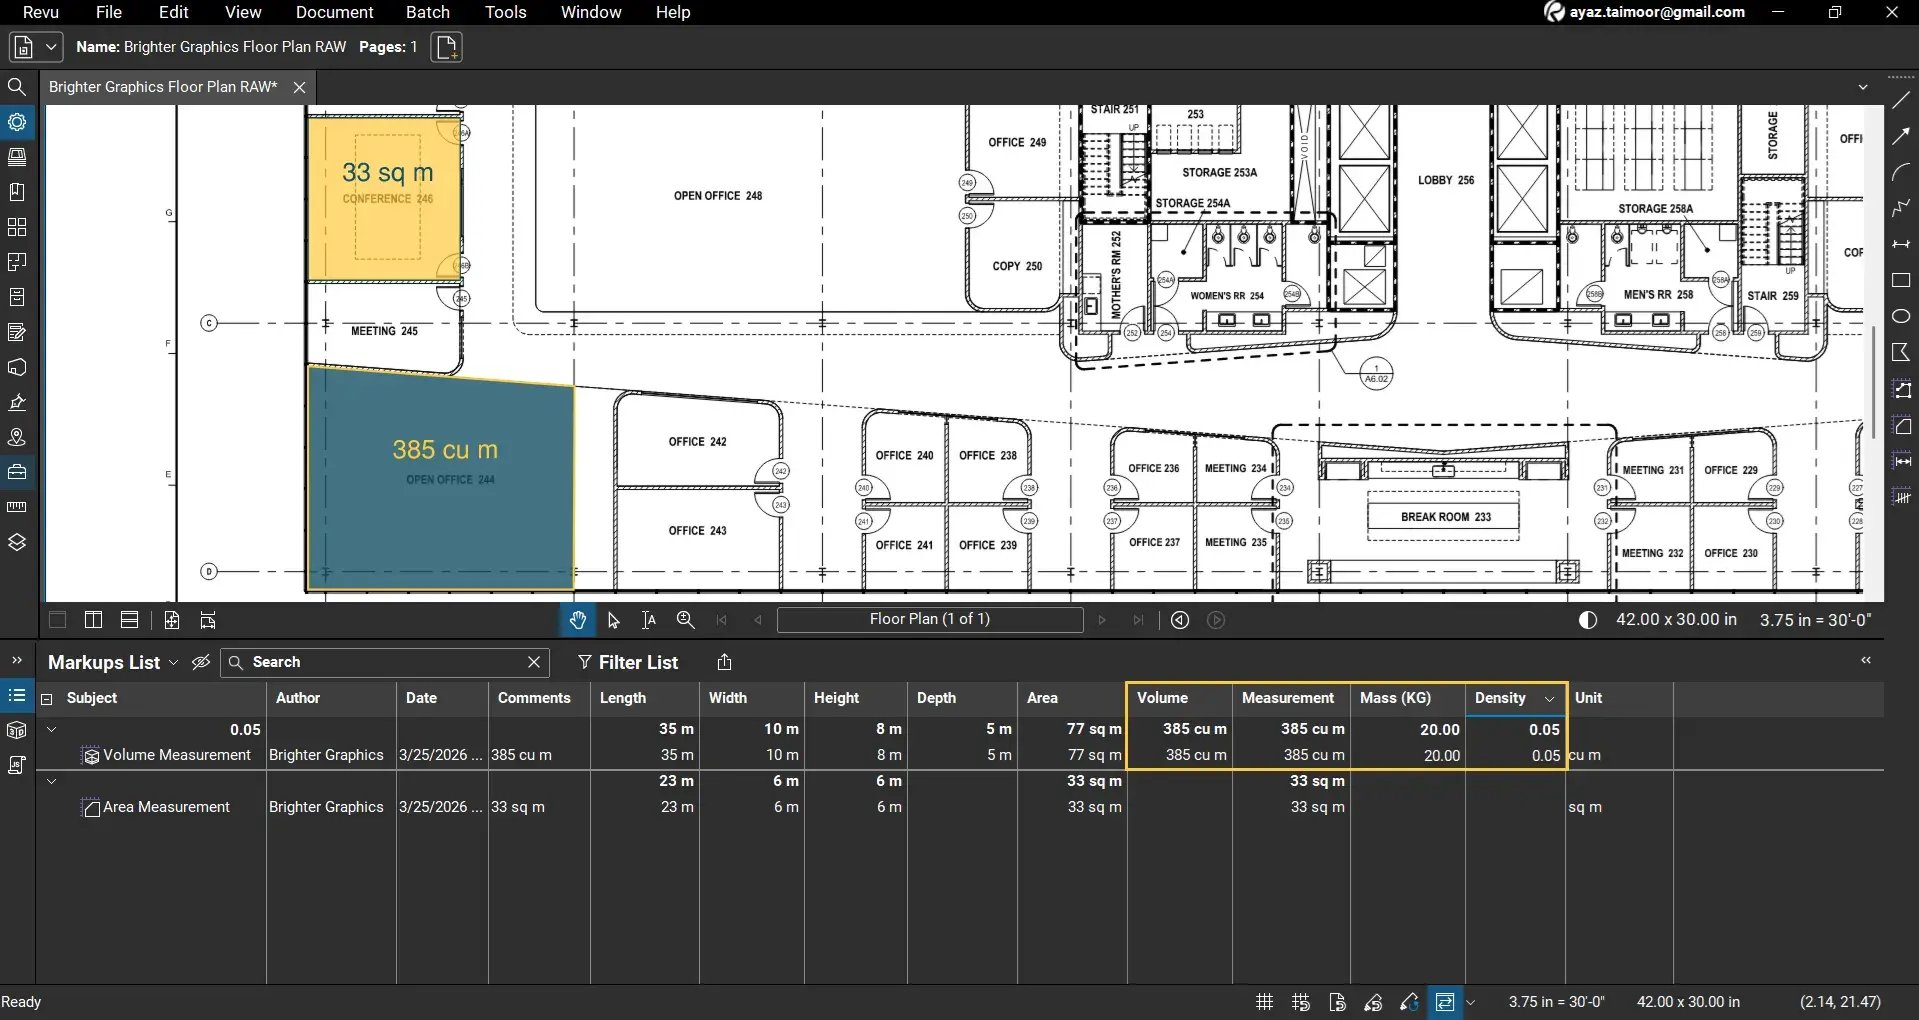
The Markups List in Bluebeam Revu is more than just a record of annotations and measurements. It is a powerful data table that allows you to organise, analyse, and calculate values directly from your PDF markups.
By creating custom columns, you can extend this functionality to perform calculations such as mass, density, cost, and other estimation metrics. This is especially useful in construction workflows where measurement data needs to be converted into quantities for material takeoffs.
In this guide, you will learn how to create and use custom columns in Bluebeam Revu 21, including numeric fields and formula-based calculations using real measurement data.
Understanding the Revu Markups List Data Structure
Before creating custom columns, it is important to understand how the Markups List works.
Each markup or measurement includes:
- Measurement values (e.g., Length, Area, Volume)
- Dimensional properties (Length, Width, Height, Depth)
- Metadata (Author, Date, Subject, Status)
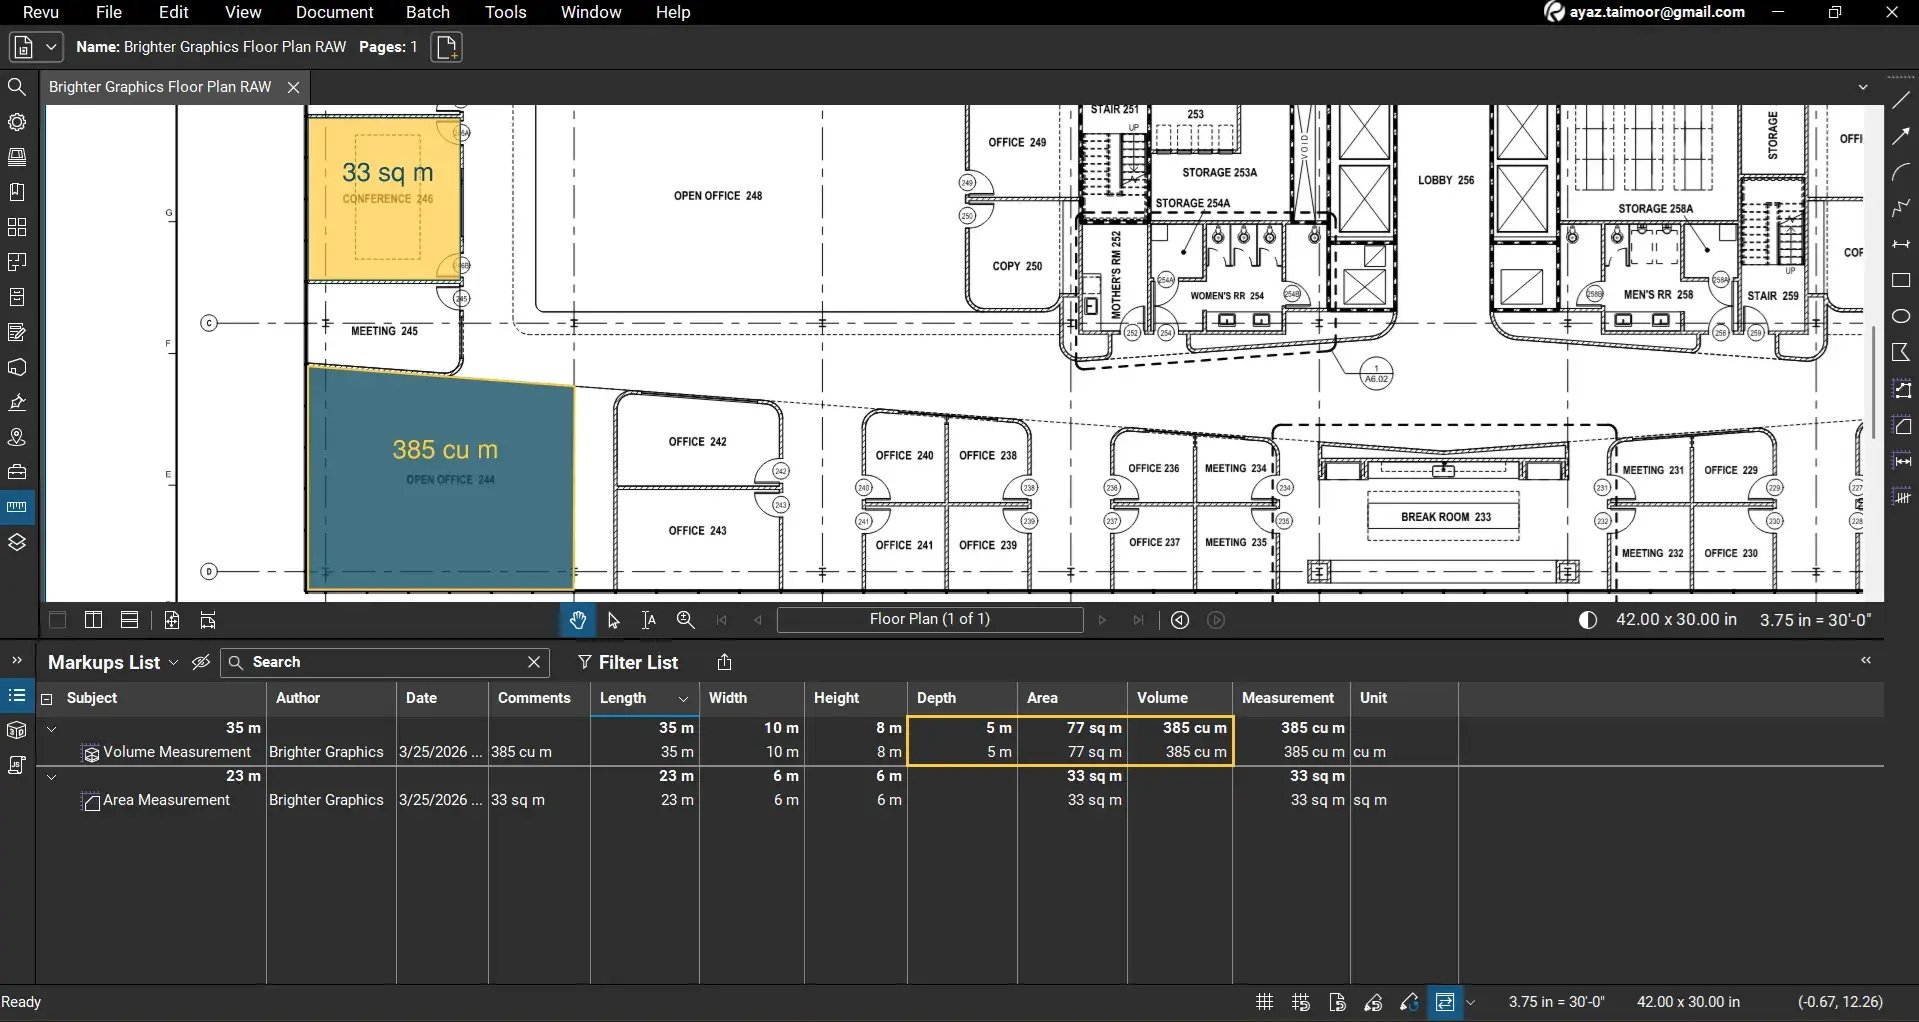
For example, a Volume measurement includes:
- Length (calculated by default),
- Width (calculated by default),
- Height (calculated by default),
- Area (calculated by default),
- Volume (calculated by default),
- Depth (Entered Manually),
- and other metadata fields
The volume of a 2D drawing is calculated as the area of the shape multiplied by the depth.
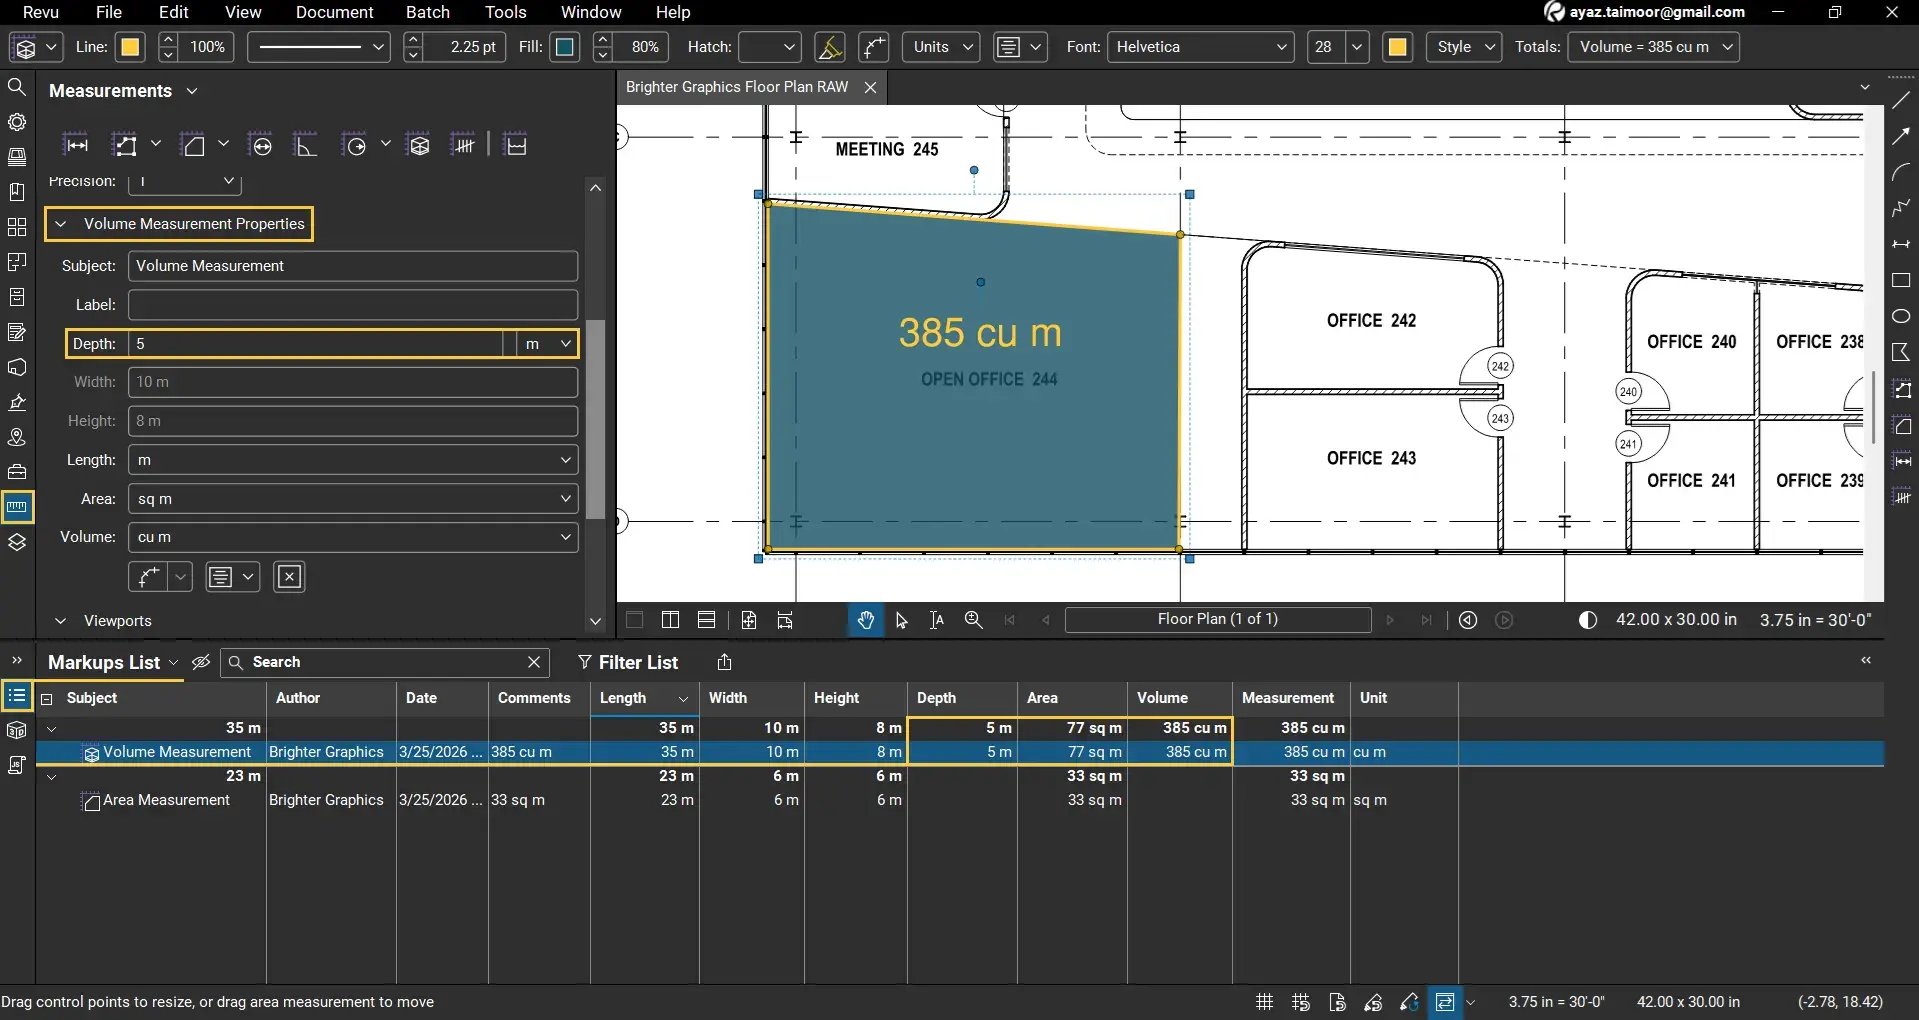
We set the units to SI and entered the Depth manually in the Volume Measurement Properties because our drawings are 2D and we can’t calculate 3rd dimensions, such as depth or elevation, from 2D planes.
Read our separate guide to learn how to calculate volume in Bluebeam Revu 21.
Step-by-Step Guide to Custom Columns in Bluebeam Revu 21
Let's explore how to create custom columns in the Markups List, assign values, and use formulas to perform calculations.
*We will show you a sample workflow for density calculation using volume and mass data, which you can modify to estimate your desired quantities.
Setting Up Revu to Create Custom Columns in Markups List
Step 01: Open a PDF with Markups and Measurements
After opening Bluebeam Revu 21 on your desktop:
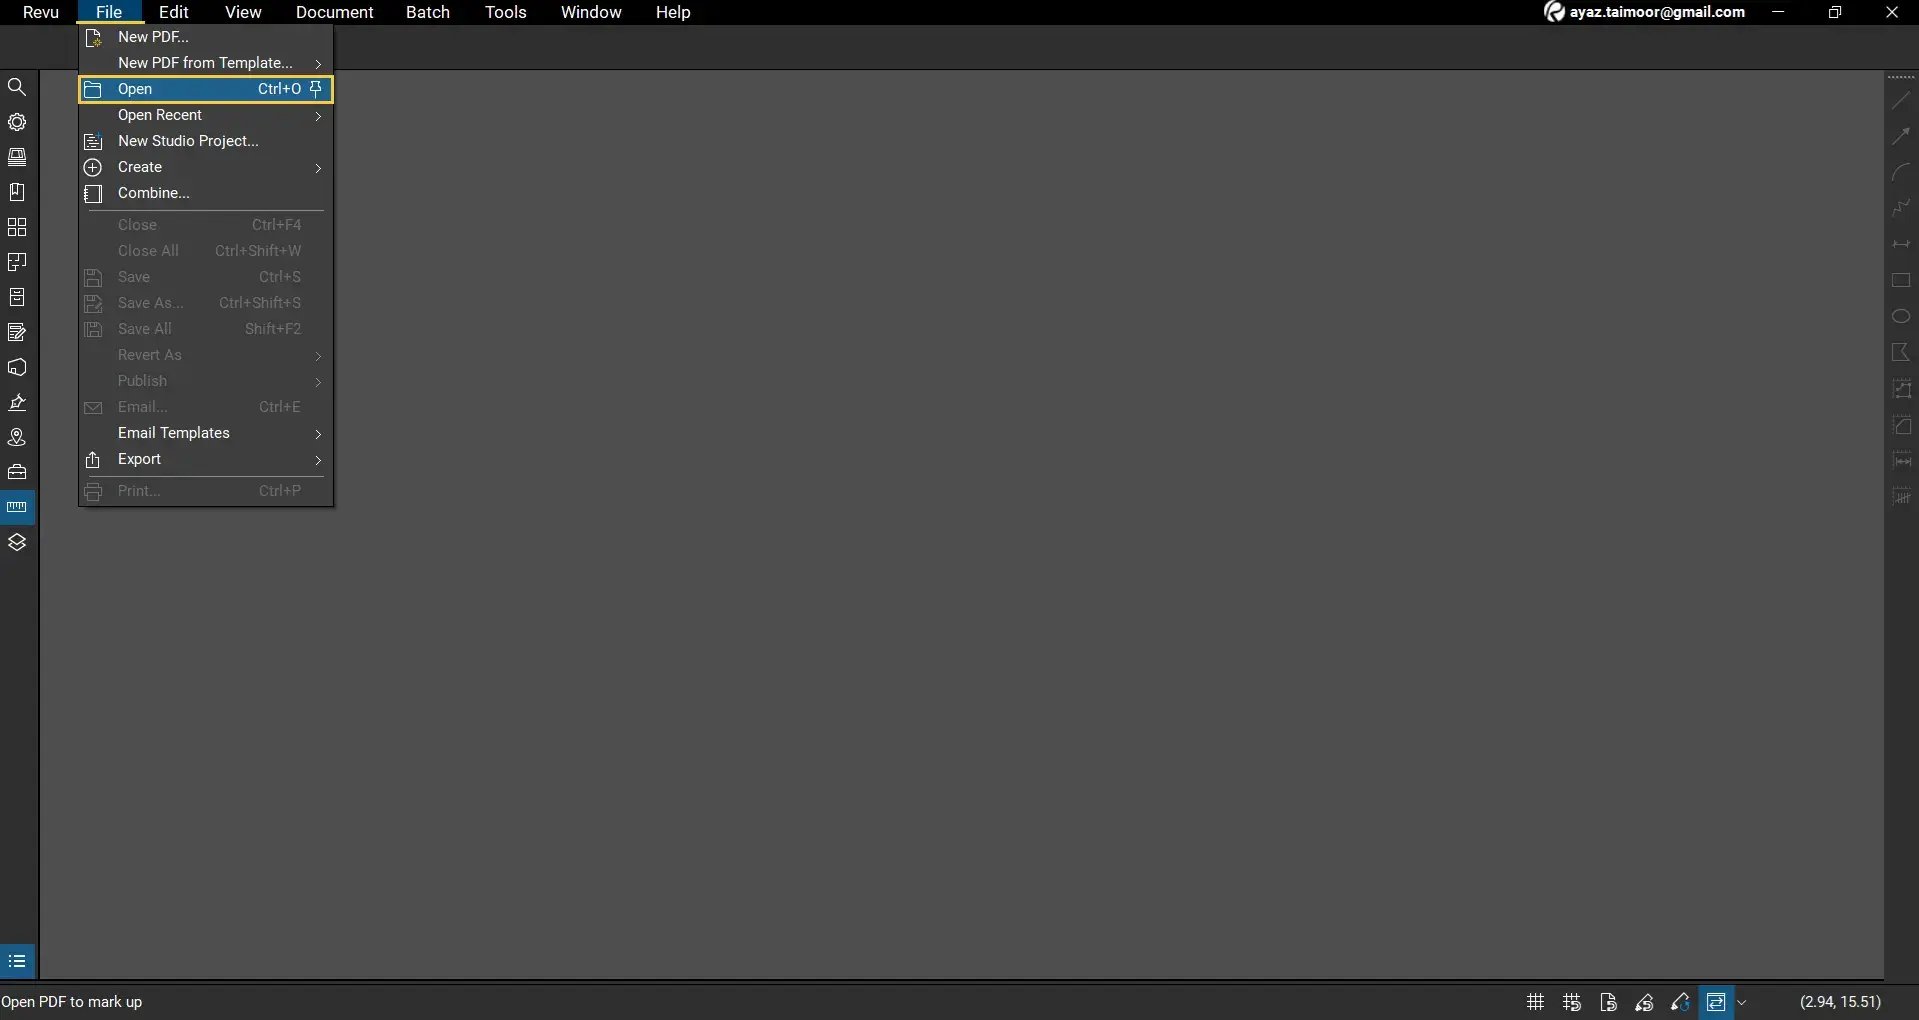
01 A: Go to the File menu and open a PDF drawing from your files or recent documents.
01 B: Open the Markups List panel at the bottom of your workspace.
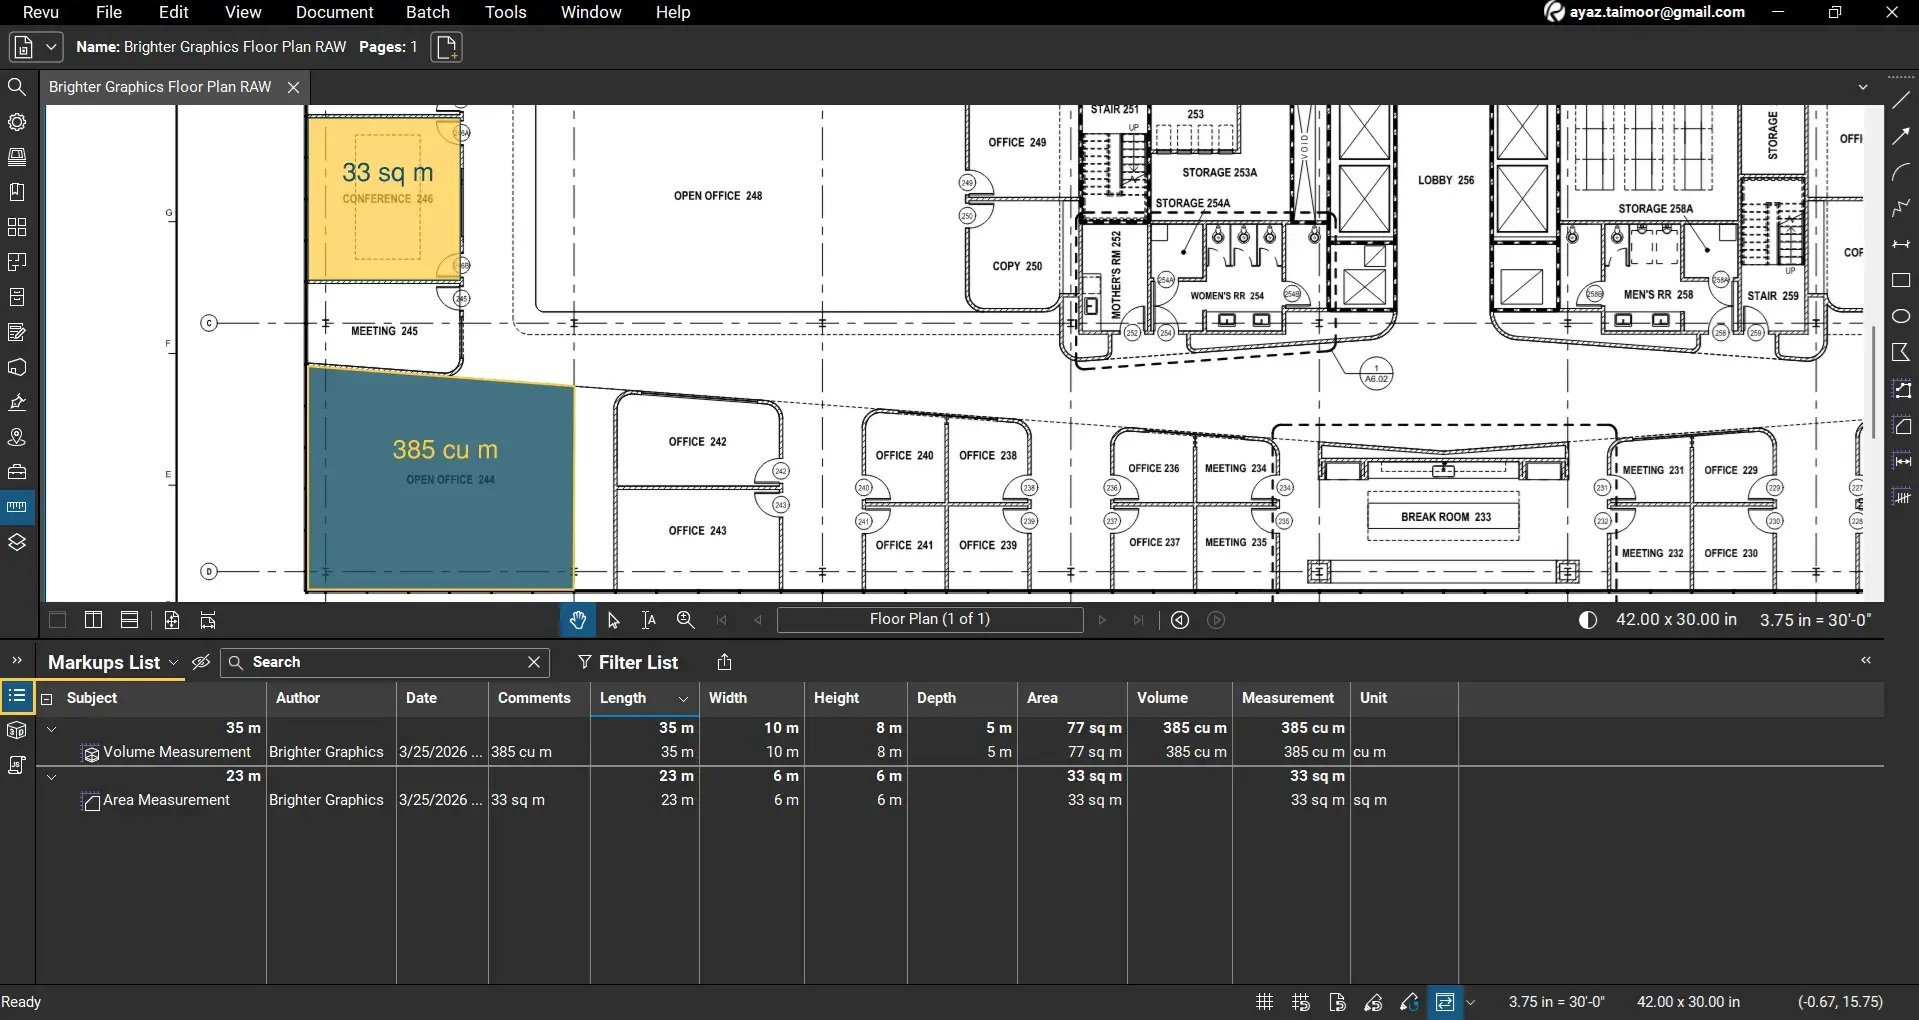
Here you will see all markups and measurements listed along with their properties.
If you open the Markups List without a document, it will appear empty. Once a PDF with markups or measurements is loaded, the Markups List will automatically populate with data.
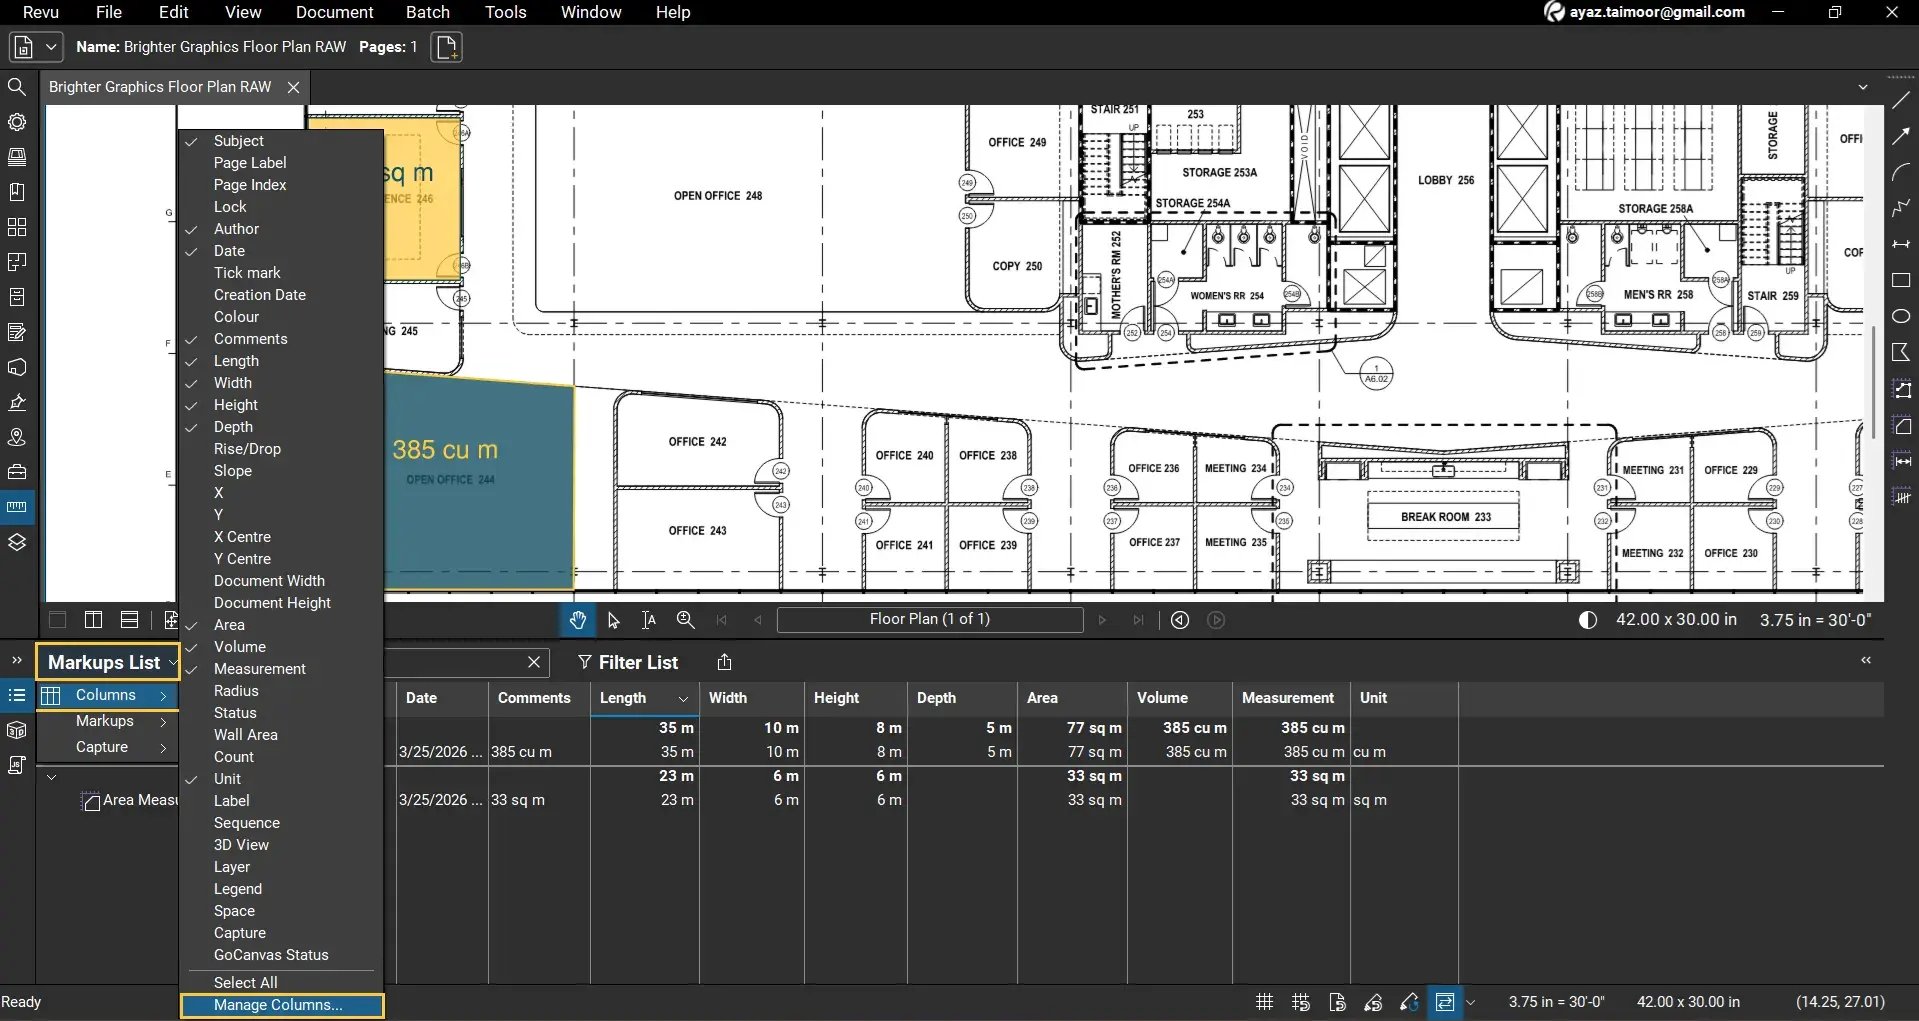
Step 02: Enable Additional Measurement Columns
Some useful columns and data fields (columns) may not be visible by default.
02 A: In the Markups List dropdown, click the Markups List dropdown and go to Columns.
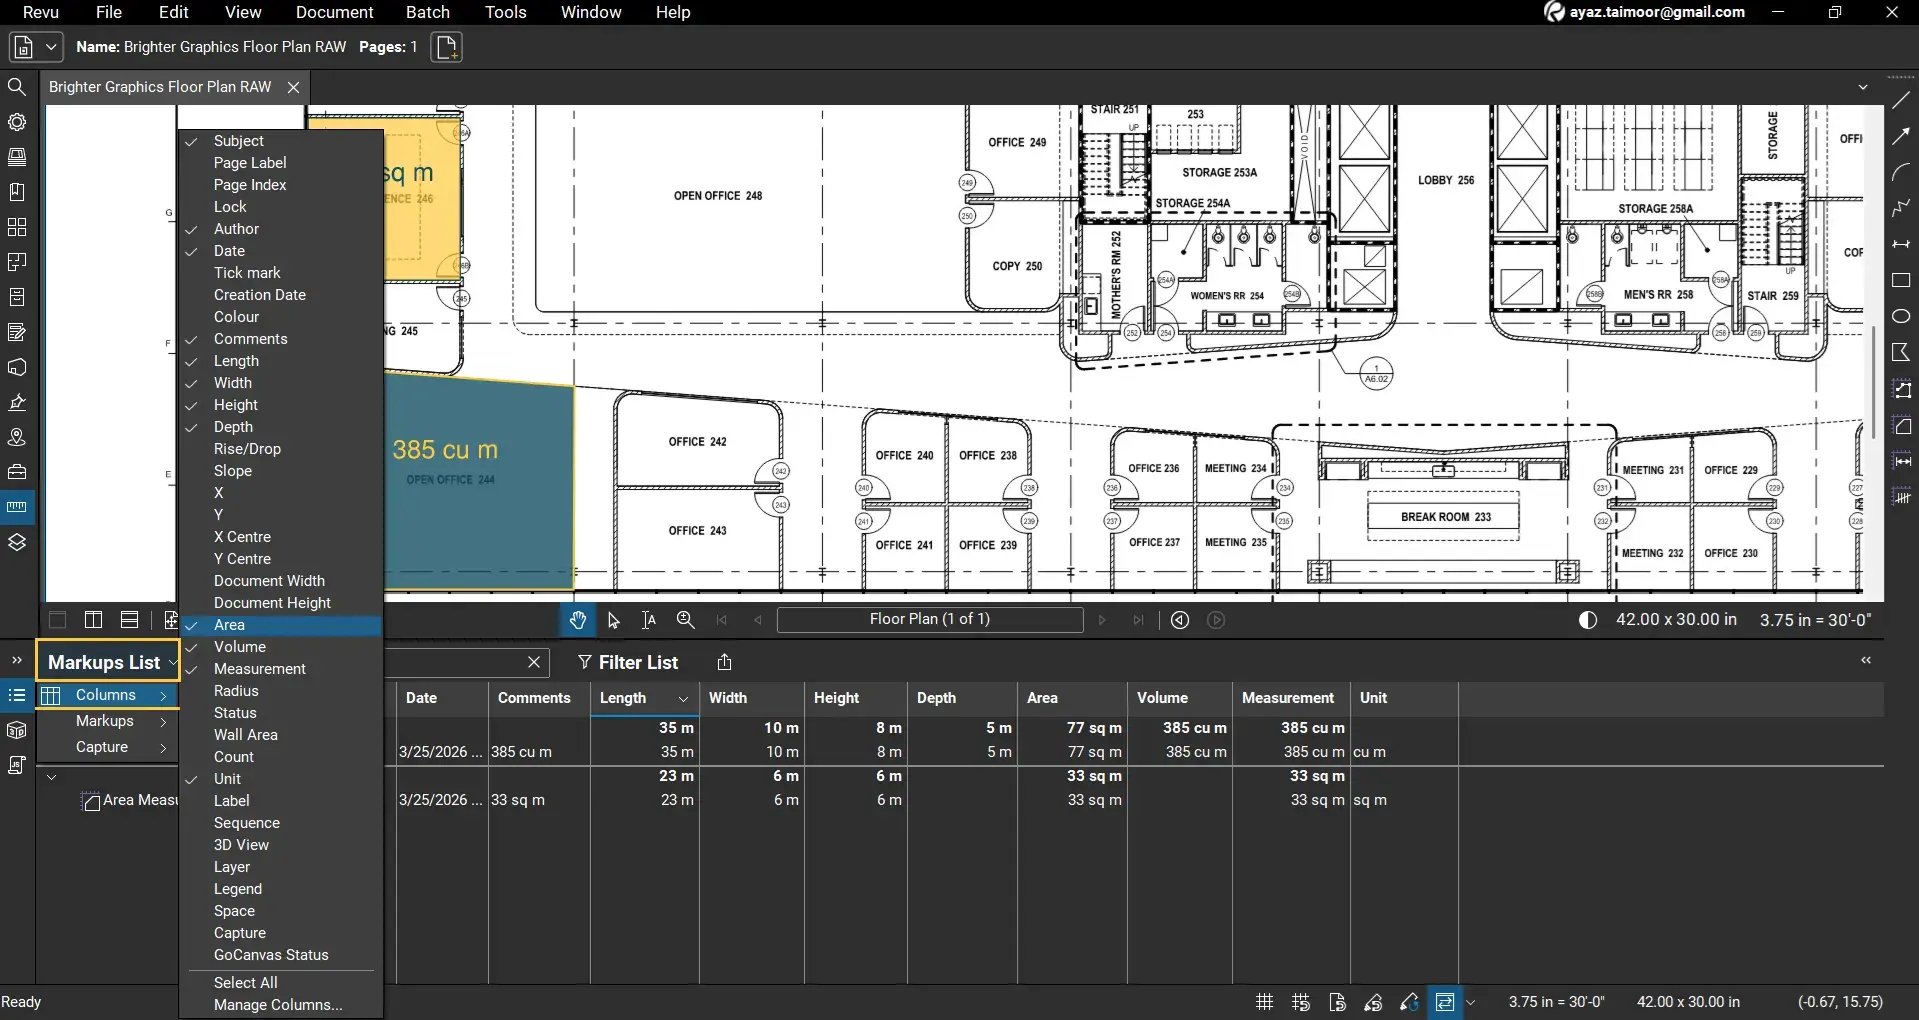
02 B: Click to enable required fields such as Area, Volume, etc.
This allows you to see how measurements such as volume are derived. For example:
Volume = Area × Depth
Understanding these relationships is important when building custom formulas.
Create a Markups List Custom Column in Revu for Numeric Values
You cannot calculate mass from a PDF document, so we need to manually add a mass column with numerical values. Let's see how.
Step 03: Add a Custom Column for Mass
To perform calculations such as density, let's create a numeric column.
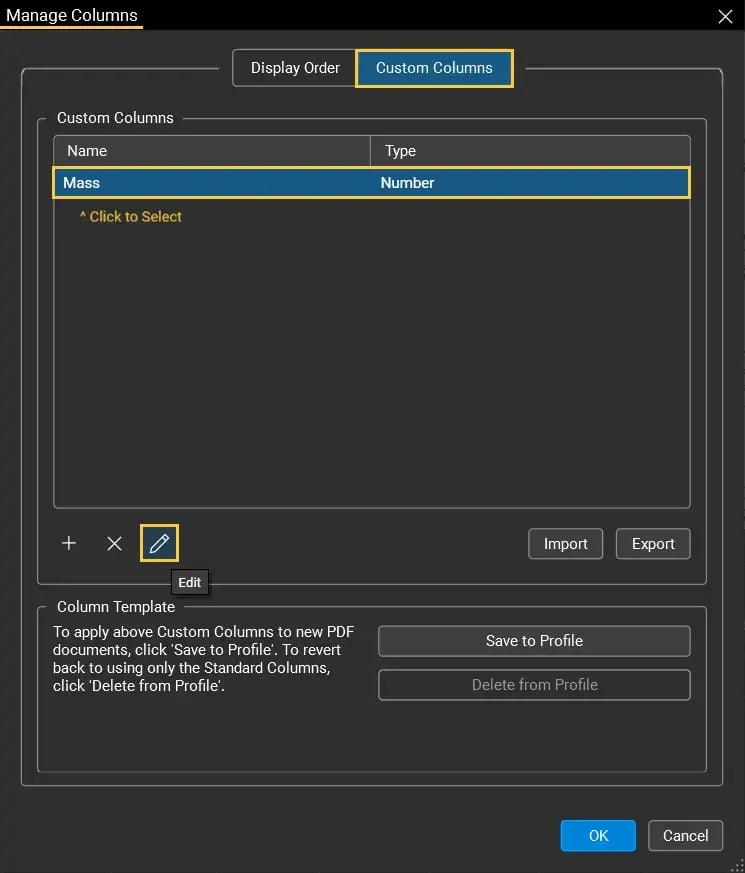
03 A: In the Markups List dropdown, click Columns > Manage Columns.
03 B: In the Manage Columns dialog box, go to the Custom Columns tab and click the Add (+) button.
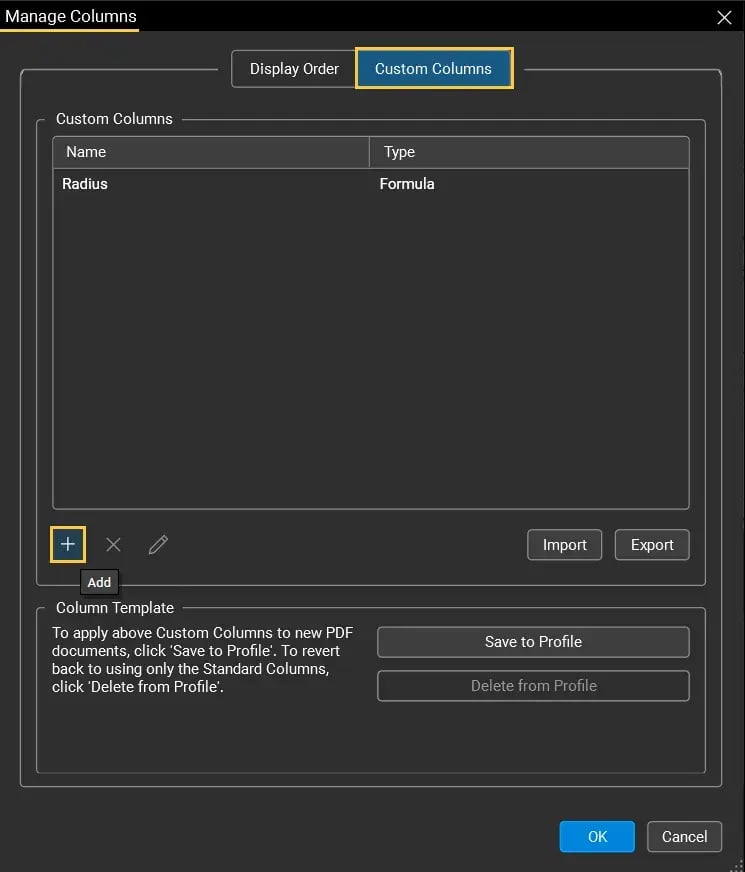
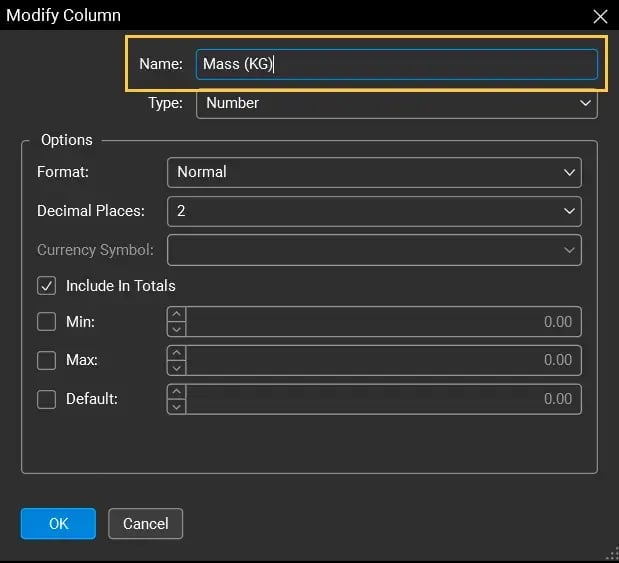
03 C: Another Add Column dialog box will appear. Set the following column properties:
- Column Name: Mass
- Type: Number
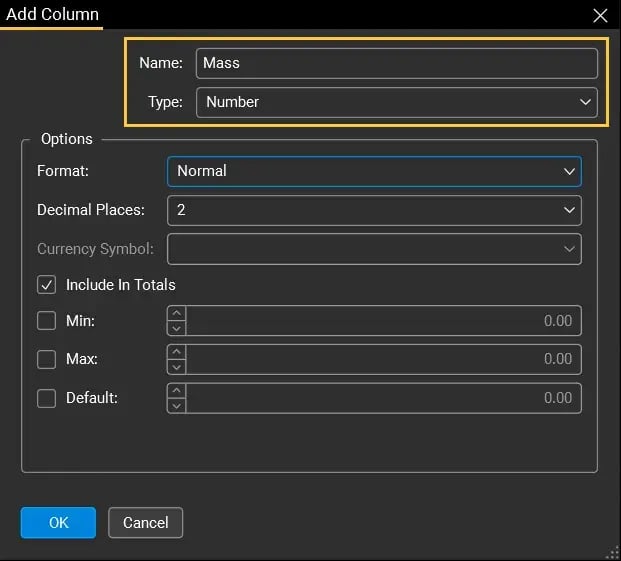
Setting the type to Number ensures that Bluebeam treats the values as numeric data rather than text.
03 D: (Optional) Define limits

You can also set Format (Normal, Percentage, or Currency) and Decimal Places value.
03 E: Once you are done, click OK.
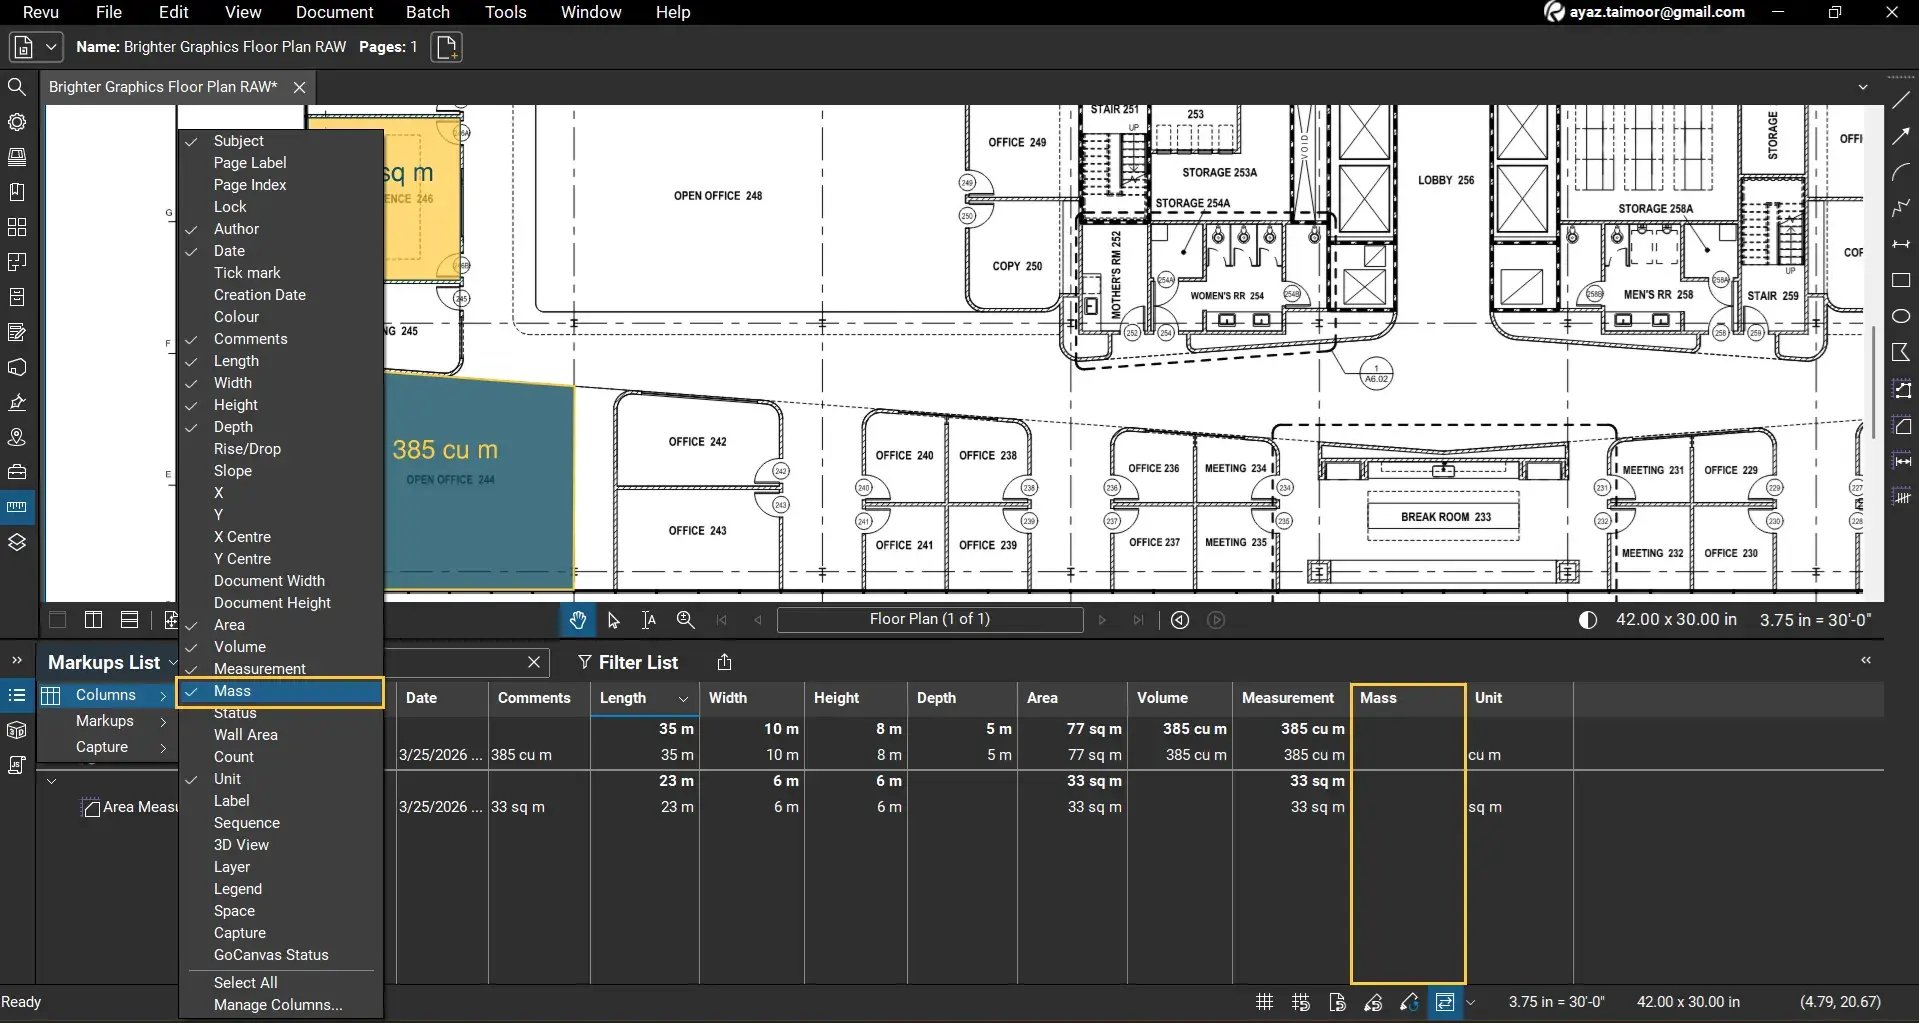
The new Mass column will now appear in the Markups List.
*If the new column doesn't appear automatically, go to the Markups List > Columns and enable it.
Step 04: Add Values to the Custom Column
Once the column is created, you can assign values to individual measurements.
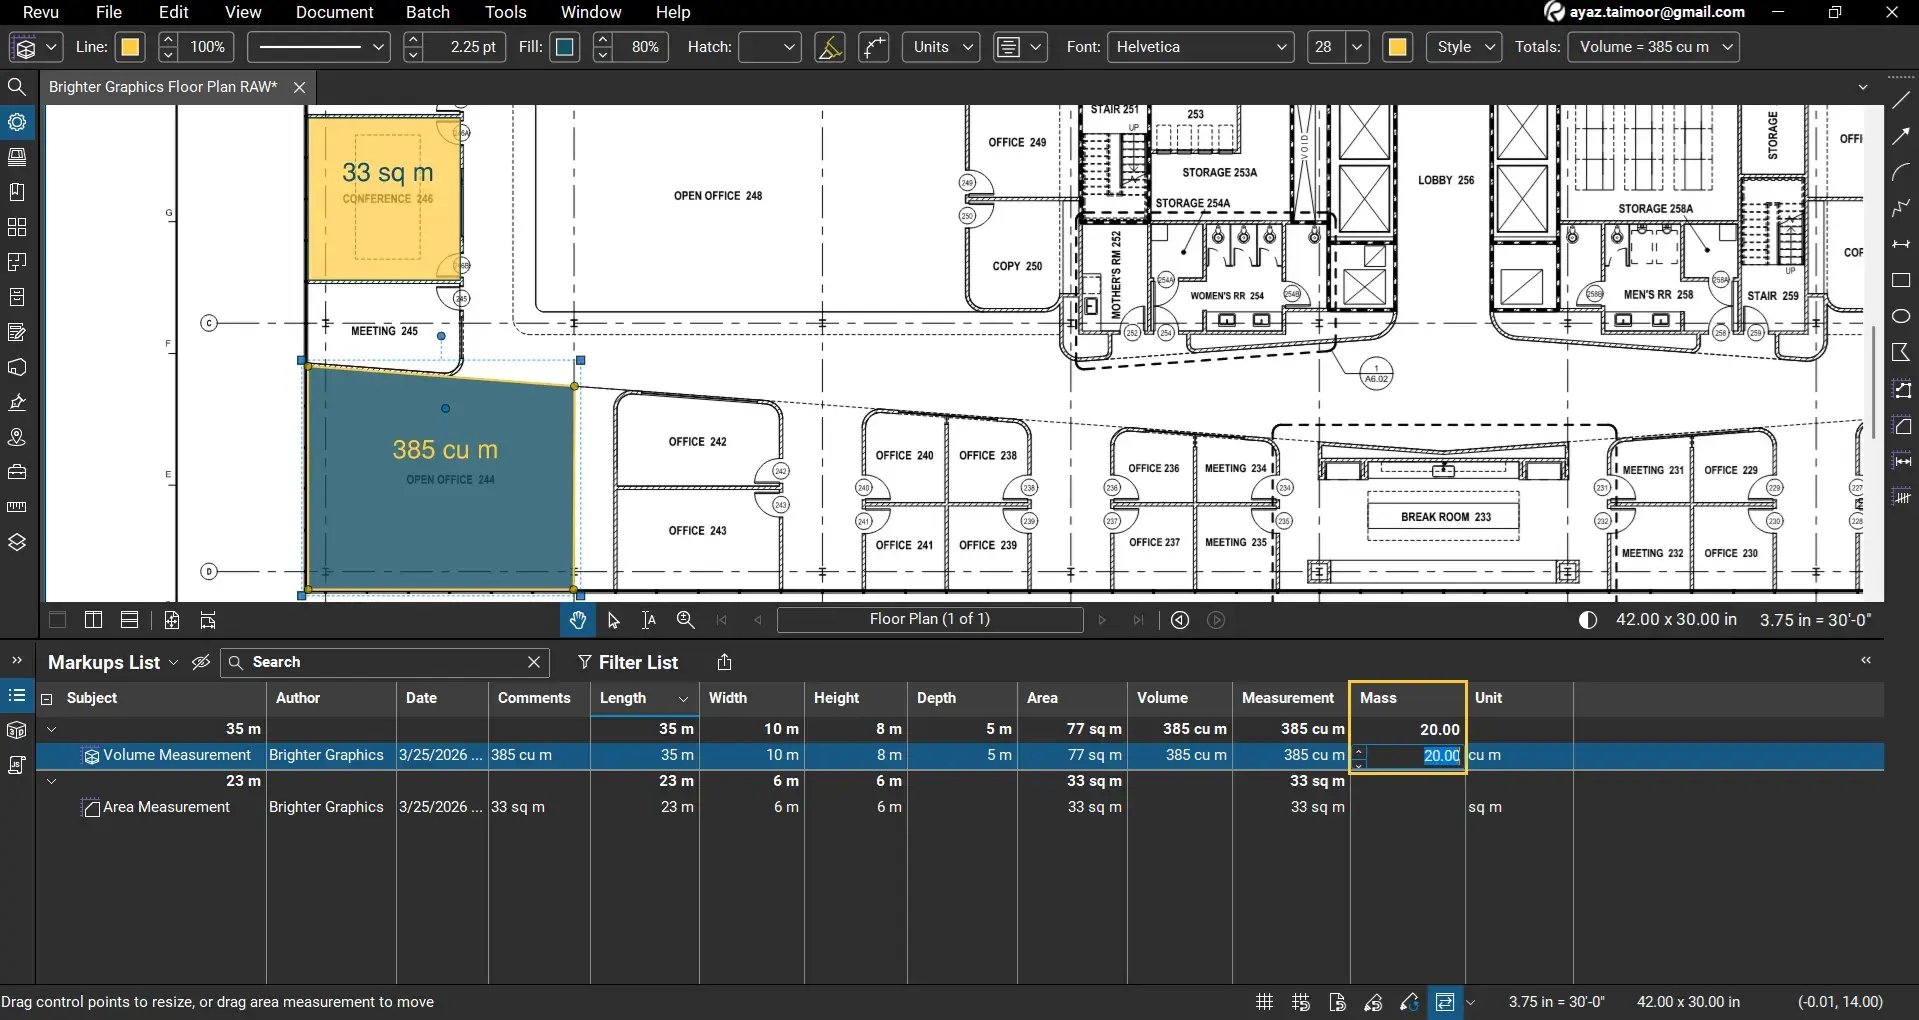
05 A: To add Mass measurement, select the already created volume measurement in the Markups List.
04 B: Open the Properties panel or right-click the markup and access its properties.

04 C: Scroll down to the Custom section.
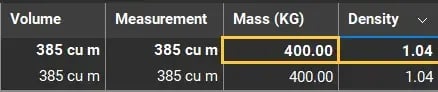
04 D: Enter a value in the Mass field. For example, set the mass value to 20.
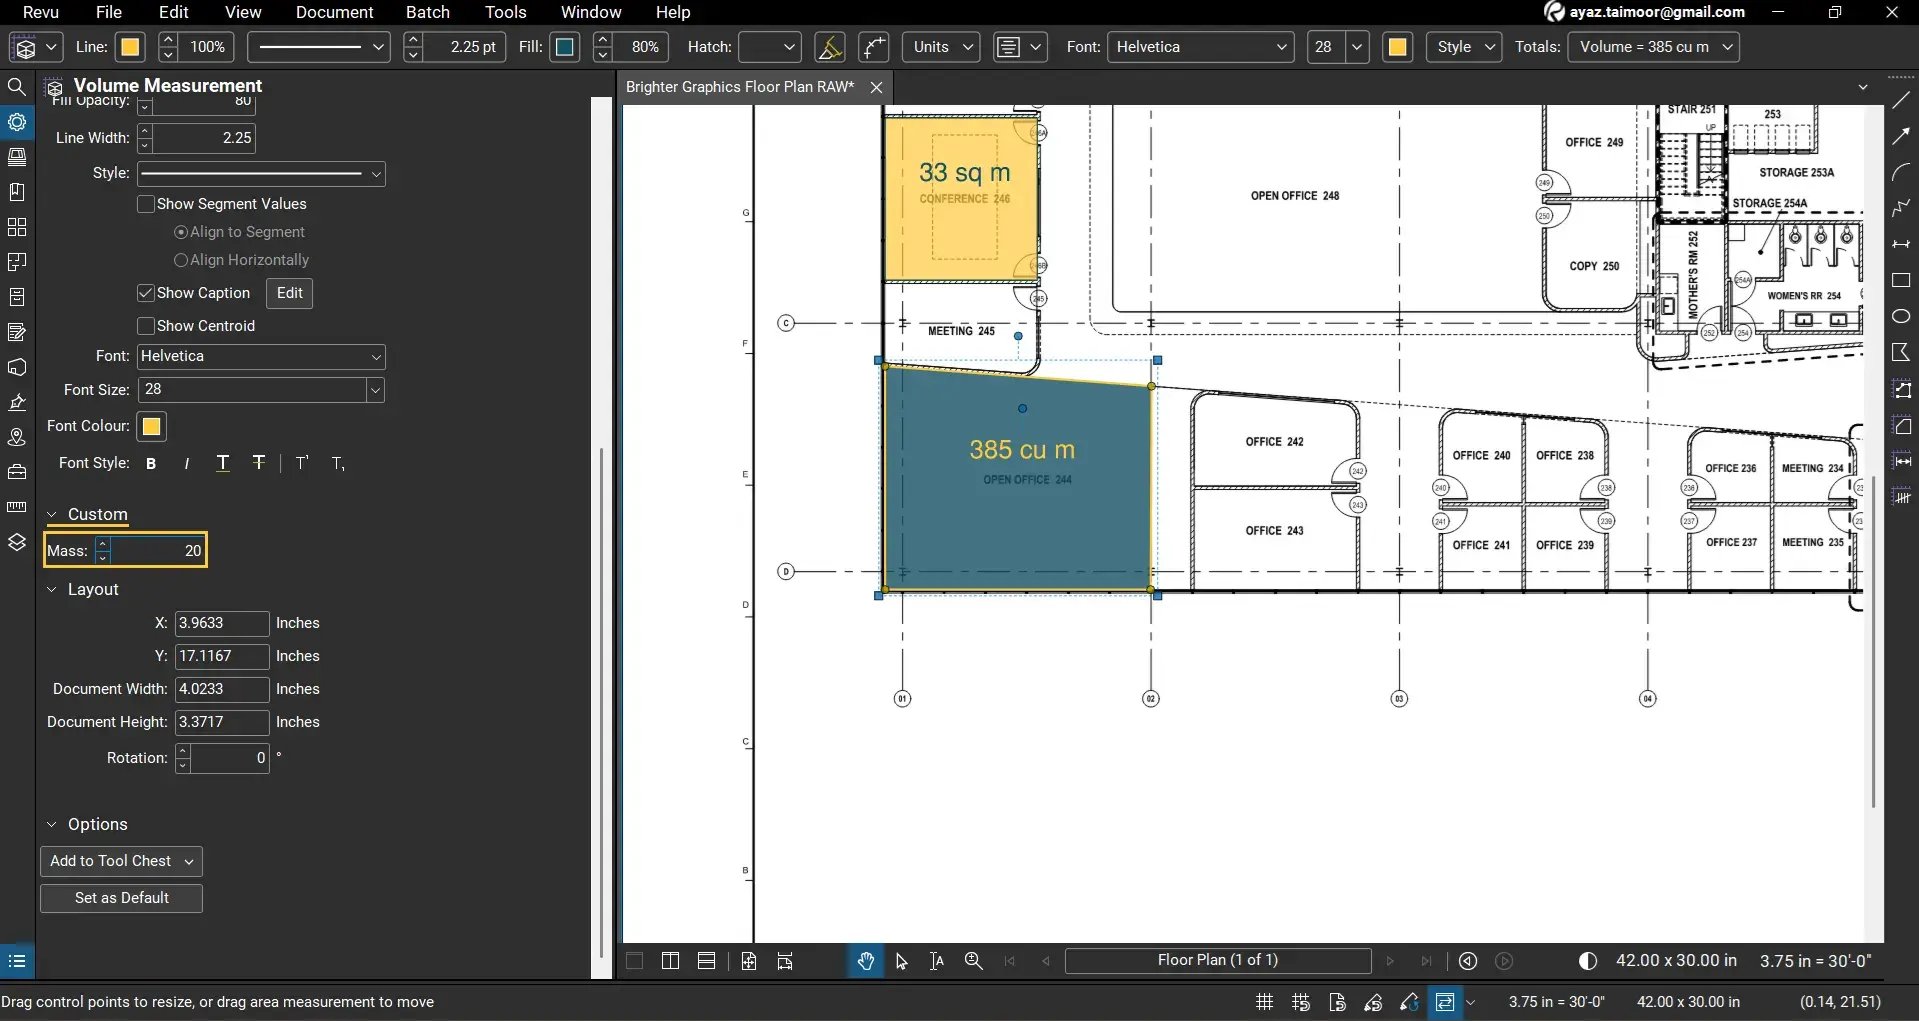
This value will now appear in the Mass column for the selected markup.

Another way to do this is to go to the Markups List and double-click the Mass column for Volume Measurement. Revu will prompt you to add or edit a value.
Step 05: Specify Units to the Column Name
By default, numeric columns do not include units, which may lead to confusion. To improve clarity:
05 A: Go back to Markups List Columns Settings > Manage Columns.
05 B: In the Custom Columns tab, select the Mass column and click the Edit (🖍) button.
05 C: Update the column name to include units.
For example:
Mass (kg)
*In this example, we are following SI units for density calculation as kg/cubic meter
05 D: Once you are done. Click OK.
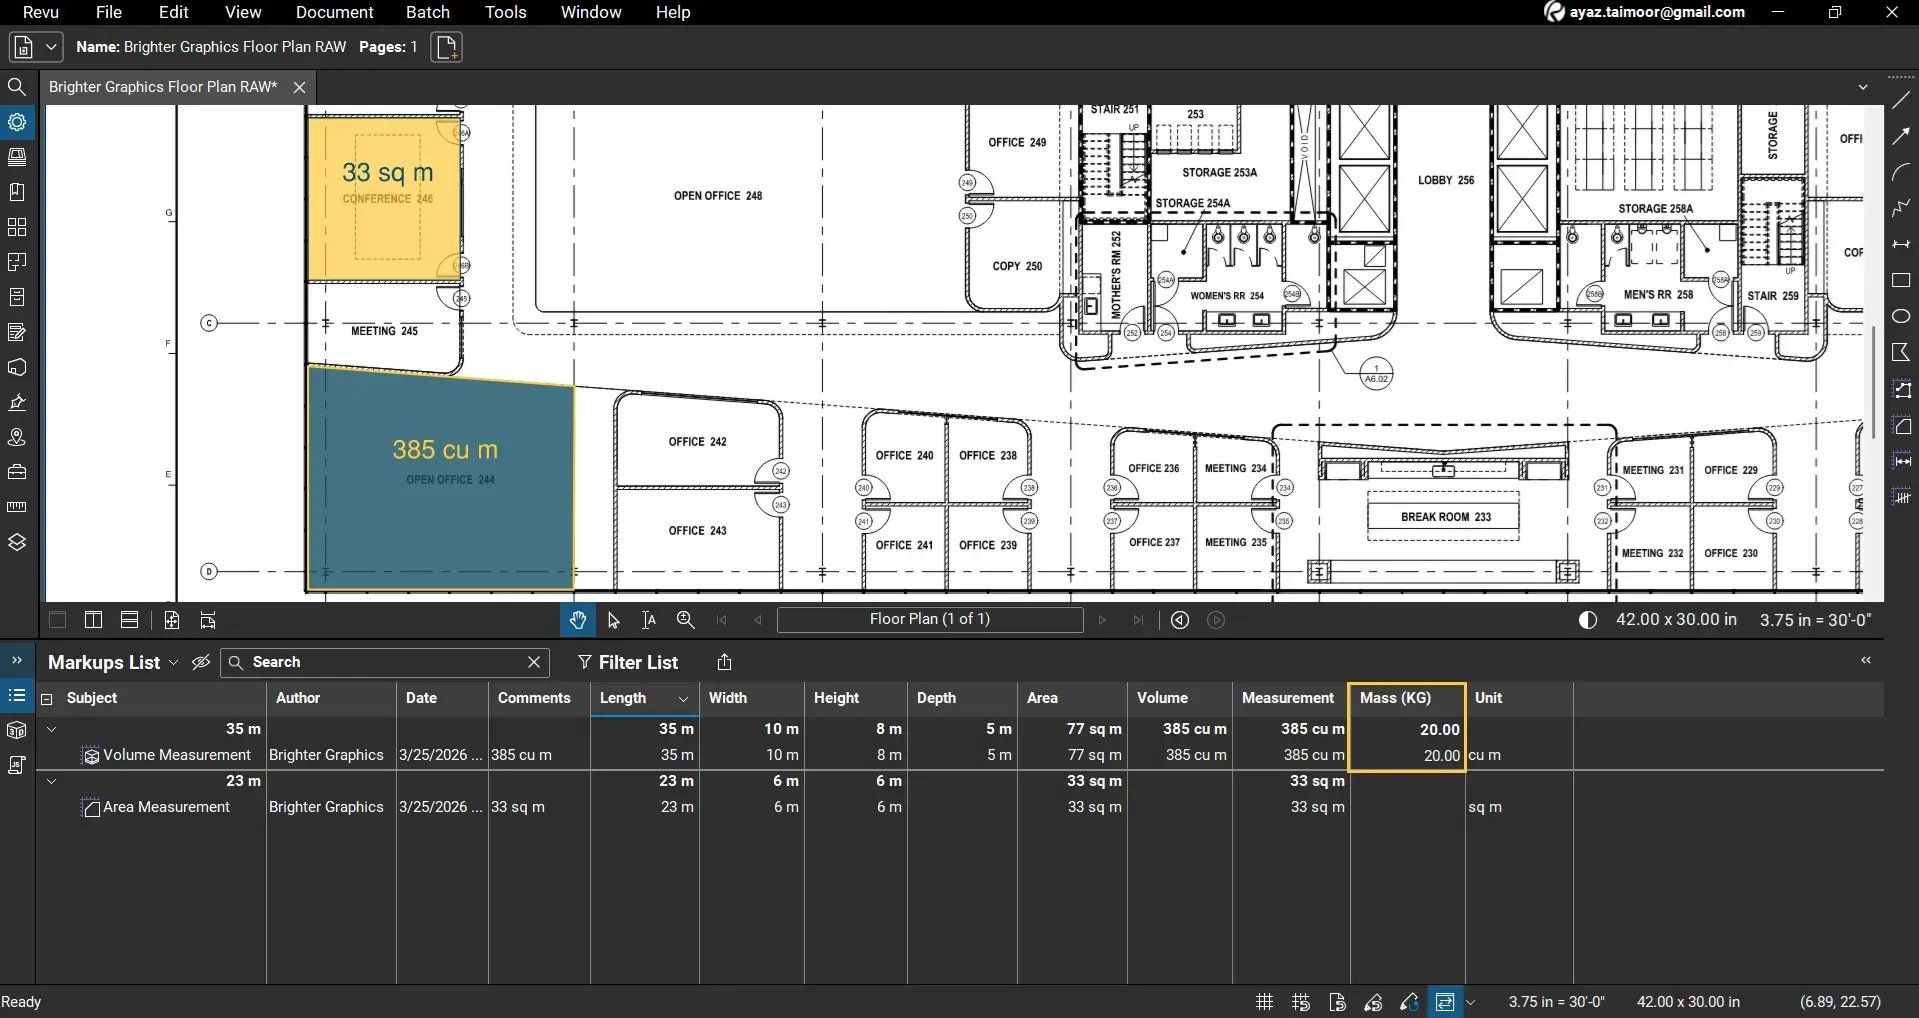
The column will now display as Mass (kg), making it clear what unit is being used.
Create a Formula-Based Custom Column
Since we have both Volume and Mass, you can calculate Density.
Now, to calculate density, we need to create another custom column using a formula that pulls LIVE numerical values from the Volume and Mass columns. To do this:
Step 06: Add a Density Column Using a Formula
06 A: Go to Markups List Columns > Manage Columns.
06 B: In the Custom Columns tab, click Add.
06 C: In the Add Column dialog box, set the following:
- Column Name: Density
- Type: Formula

06 D: A new Expression Field will appear for a Formula-based custom column. In the Expression field, create your formula.
Start by typing: Mass. Press Enter to select the Mass column key from the suggestions below, and your formula will start picking values from the Mass column (or you have to type [Mass (KG)] with square brackets).
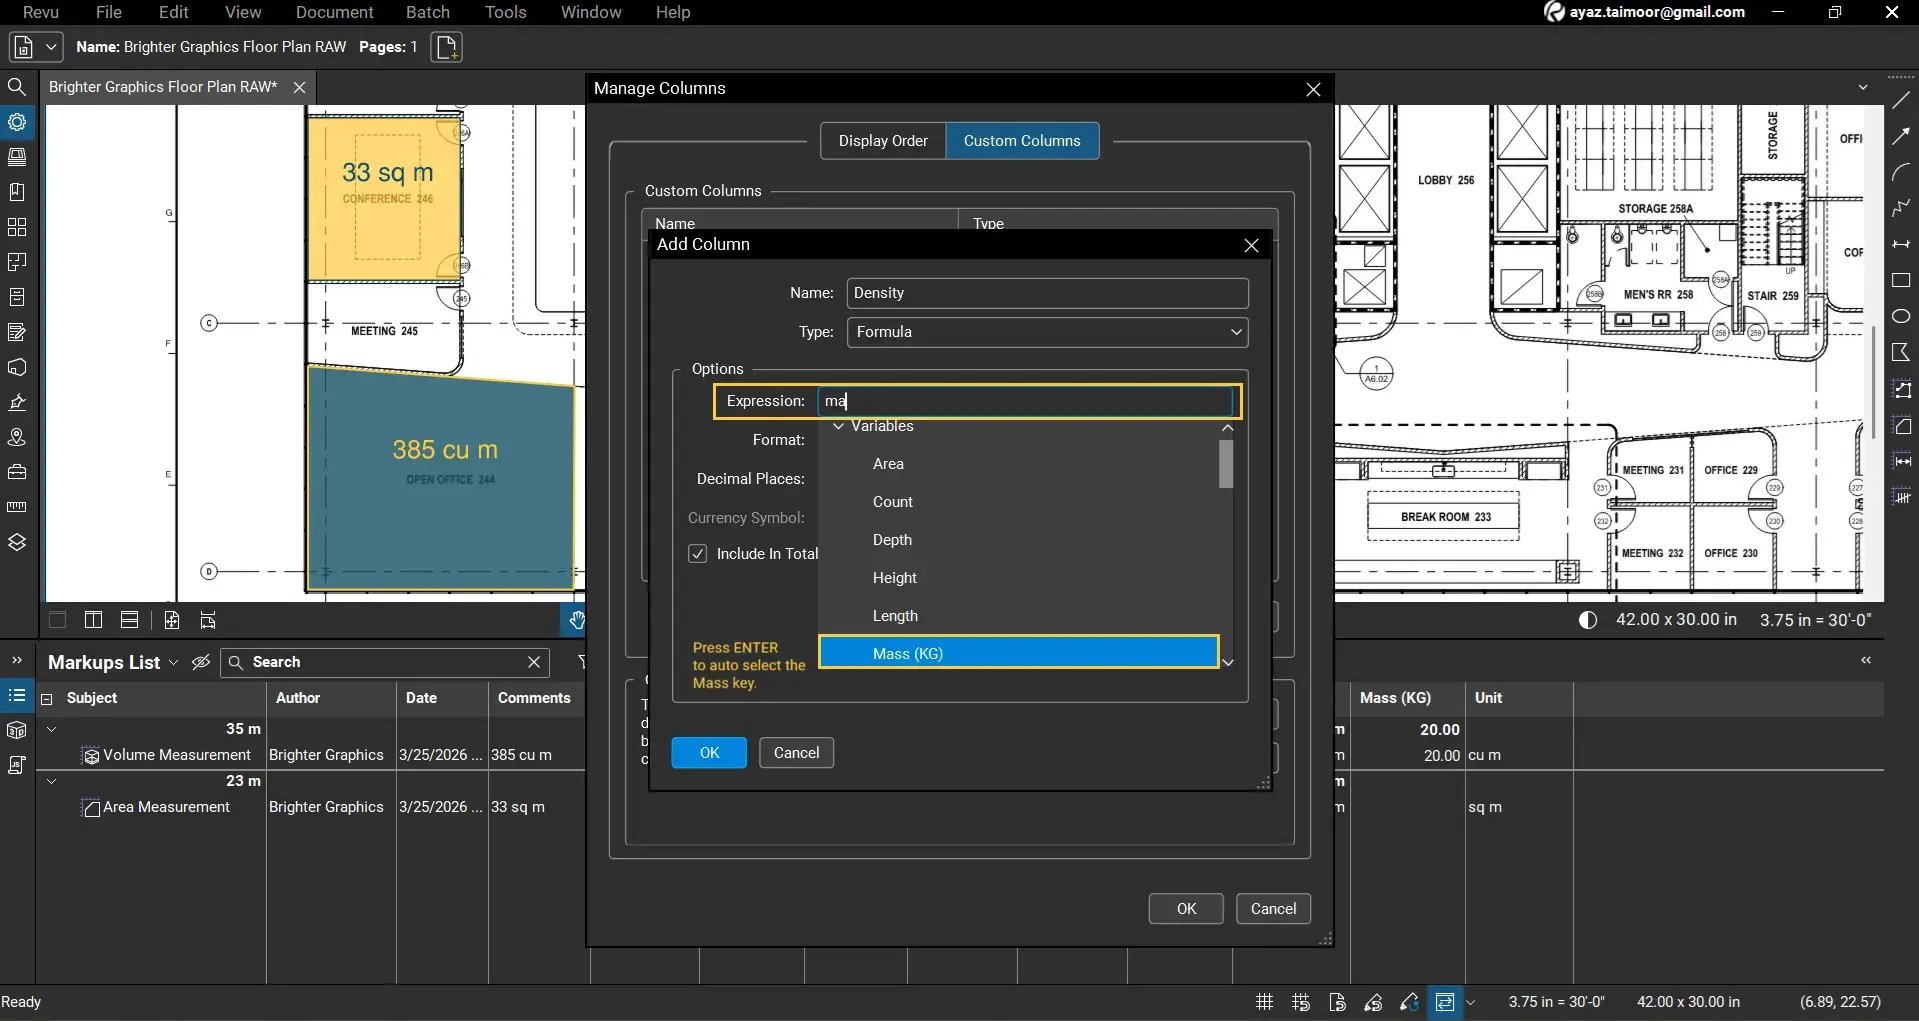
06 E: Add the division operator: /
*For multiplication, we use the star (*) sign.
06 F: Type: Volume. Press Enter to select the Volume column key from the suggestions below,
and your formula will start picking values from the Volume column.

Your formula will calculate Density as: Mass / Volume
Syntax:
- [Column Name] <Mathematical Operator> [Column Name]
- [Mass (KG)] / [Volume])
06 G: Once you are done. Click OK.
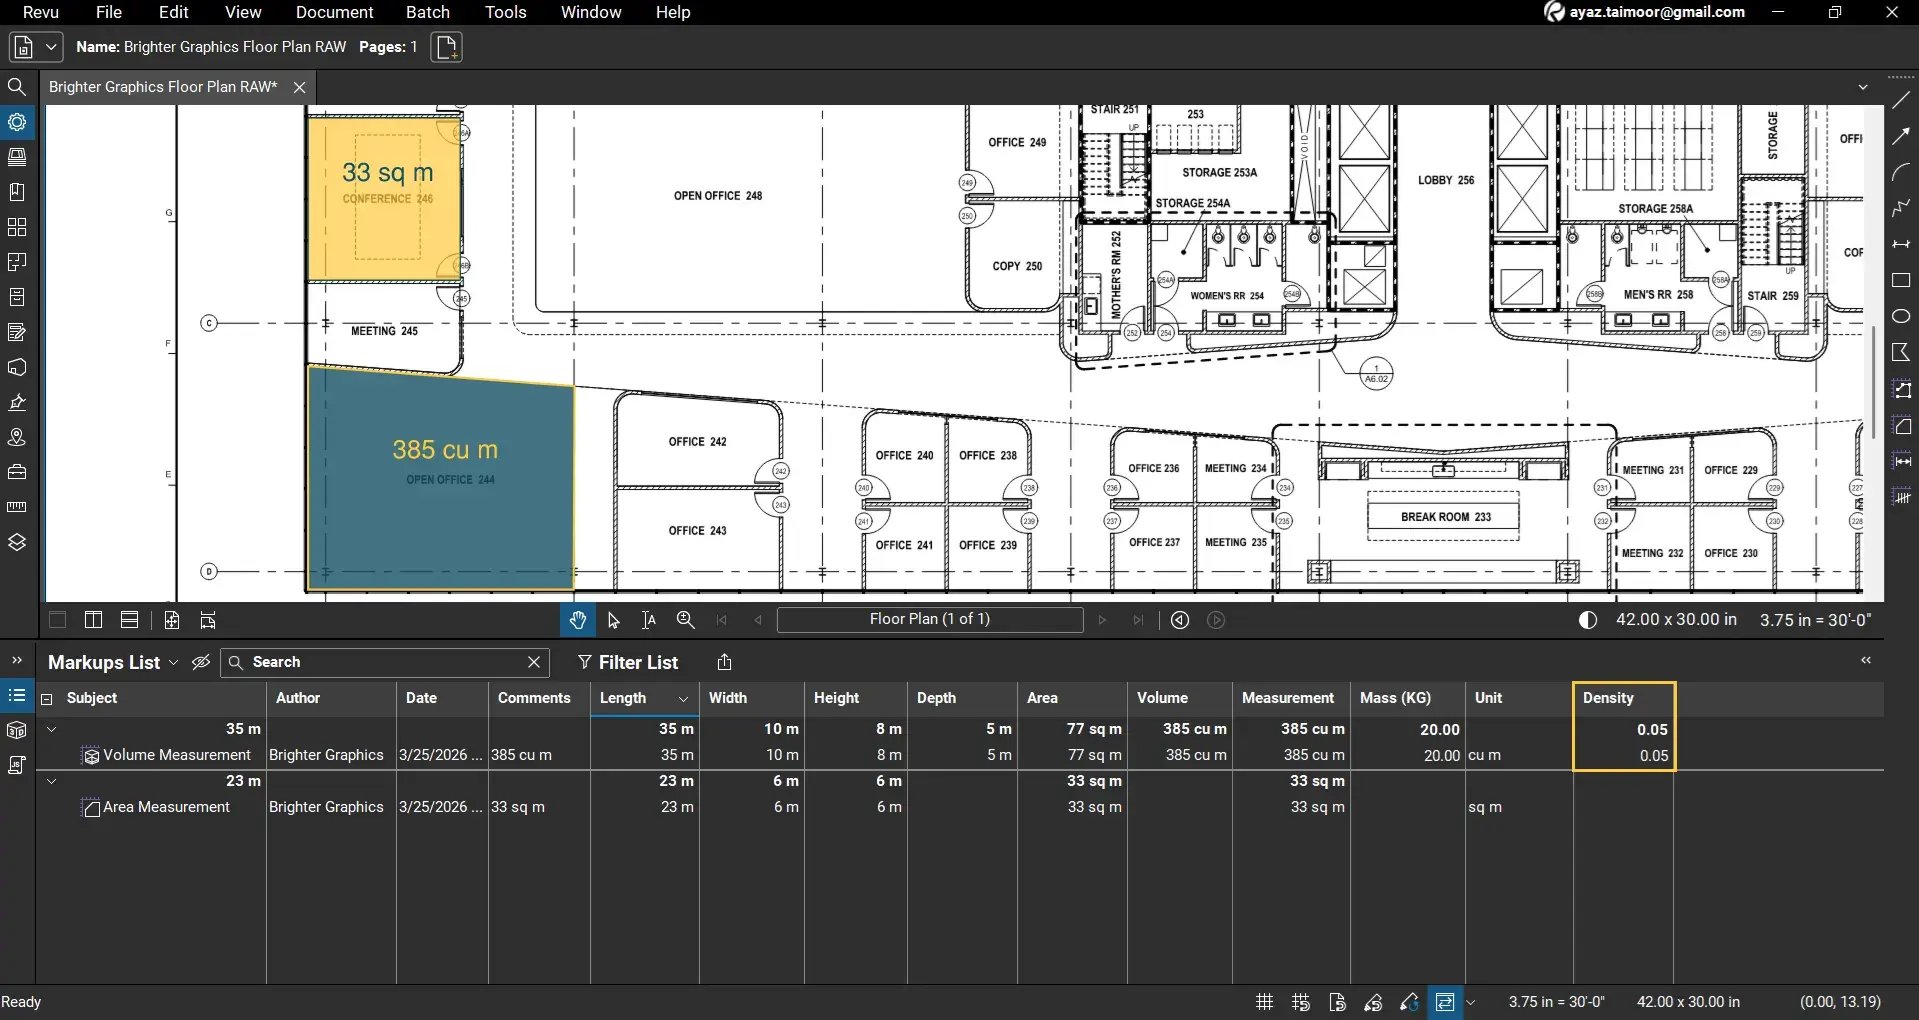
The new Density column will now appear in the Markups List and begin calculating density based on the provided values.
Review Calculated Results
Once the formula is applied, Bluebeam will automatically calculate density for each markup where relevant values exist.
You can now see:
- Mass (kg)
- Volume
- Density
The Density column dynamically updates whenever the Mass or Volume values change, or when you add a new volume measurement and manually assign or update the Mass value in the Markups List.
Optimise the Markups List for Estimation Workflows
To improve readability and data organisation within the Markups List, you can:
- Resize columns to fit your screen.
- Turn the unwanted columns off, and keep only relevant fields (columns) visible, such as:
- Subject
- Volume
- Mass (kg)
- Density
For example:
This creates a clean and focused dataset for estimation tasks.
When to Use Custom Columns in Bluebeam Revu
Custom columns are widely used in construction and estimation workflows. The common applications include:
- Material quantity calculations (mass, density, weight)
- Cost estimation (cost per unit × quantity)
- Conversion calculations (e.g., diameter to radius, density to weight)
- Reporting and exporting structured data
By combining measurement tools with custom columns, you can turn your PDF into a structured data source for estimation construction workflows, without any need for 3rd-party tools or manual calculations. To everything directly on your PDFs.
Tips for Using Custom Columns in Bluebeam Revu
For clear, understandable, and efficient workflows, below are some useful tips that you must remember while creating custom columns in Bluebeam Revu:
- Always Calibrate your drawings in Revu before using measurements for precise calculations
- Use Number type columns for measurable values to ensure accurate calculations.
- Always include units in column names to avoid confusion.
- Use Formula columns to automate repetitive calculations.
- Ensure column names used in formulas are case sensitive.
To avoid miscalculations and garbage data, remember to avoid:
- Incorrect data type by always setting numeric fields as Number, not Text.
- Missing units. Always add units to column names for clarity.
- Formula errors. Ensure column names match exactly when used in expressions. To ensure this, select from the suggestions instead of manually typing the column name as syntax.
- Empty values. Density or other formulas will not calculate if required fields are missing. Make sure you enter these values manually where required, such as mass and depth.
Level Up Your Bluebeam Experience
This is how you can create and use custom columns in the Bluebeam Revu Markups List to perform calculations directly on your PDFs. By combining measurement data with formula-based columns, you can build efficient workflows for quantity takeoffs and construction estimation. Bluebeam is just a tool with many ways to do the same thing; it's now up to you to deploy it well and efficiently for faster, smoother calculations and annotation workflows.
To further improve your Bluebeam workflows, explore our other Bluebeam guides on different measurement and markup tools.
Stay connected with Brighter Graphics, your go-to Bluebeam partner in the UK, Europe, and the Middle East.


