If you are working with Claude in Bluebeam Max, you would frequently ask the AI to modify one markup at a time. While this works well for individual tasks, it quickly becomes repetitive when your drawing contains 100s of measurements, each requiring different instructions.
Instead of sending separate prompts for every markup, you can embed individual instructions directly inside your PDF by using a text-based Custom Column in the Markups List. Each markup receives its own dedicated instruction set, allowing Claude to read each instruction and execute them all in a single operation for that markup.
Think of it as your own batch-processing feature with Claude. Every markup has its own workflow, making the process faster, easier to audit, and far more scalable for changes across multiple markups or measurements.
This workflow requires a Bluebeam Max subscription, your Revu upgraded to 21.9 or later, and the Claude Desktop app. If you are not on a Bluebeam Max subscription, you can try it free for 14 days.
Read this guide to learn how to create a prompt column, assign instructions to individual markups, execute them with Claude, and build reusable AI-driven workflows inside Revu.
Step-by-Step Guide to Batch Prompting with Claude
Before getting started, ensure you have connected Bluebeam Revu with your Claude desktop app via MCP. Learn how.
Once you are done, follow the steps below (prompt template added at the end of this guide):
Step 01: Open Your PDF Drawing
01 A: Open Bluebeam Revu on your desktop.
01 B: Open a PDF containing the markups or measurements you want Claude to process.
For this example, our drawing already contains three Area measurements labelled:
- Area Measurement 1
- Area Measurement 2
- Area Measurement 3
Open the Markups List to view these measurements and the enabled columns.
Step 02: Create a Custom Column for Claude Prompts
Rather than writing prompts directly in Claude, we will create a dedicated Custom Column to store AI instructions for each markup.
To create a new column in your Markups List:
- Go to the Manage Columns option
- Click the Custom Columns tab
- Click the Add button
- Select a Text type custom column
- Name it Claude Prompt (or whatever sounds more meaningful for you).
Each row in this column will hold the instruction Claude should execute for that specific markup.
If you have not created Custom Columns before, read our separate guide on creating Custom Columns in Bluebeam Revu.
Step 03: Add Prompt Instructions for Each Markup
Now populate the Claude Prompt column with the required instructions.
Every markup can contain a completely different prompt depending on the workflow you want Claude to perform.
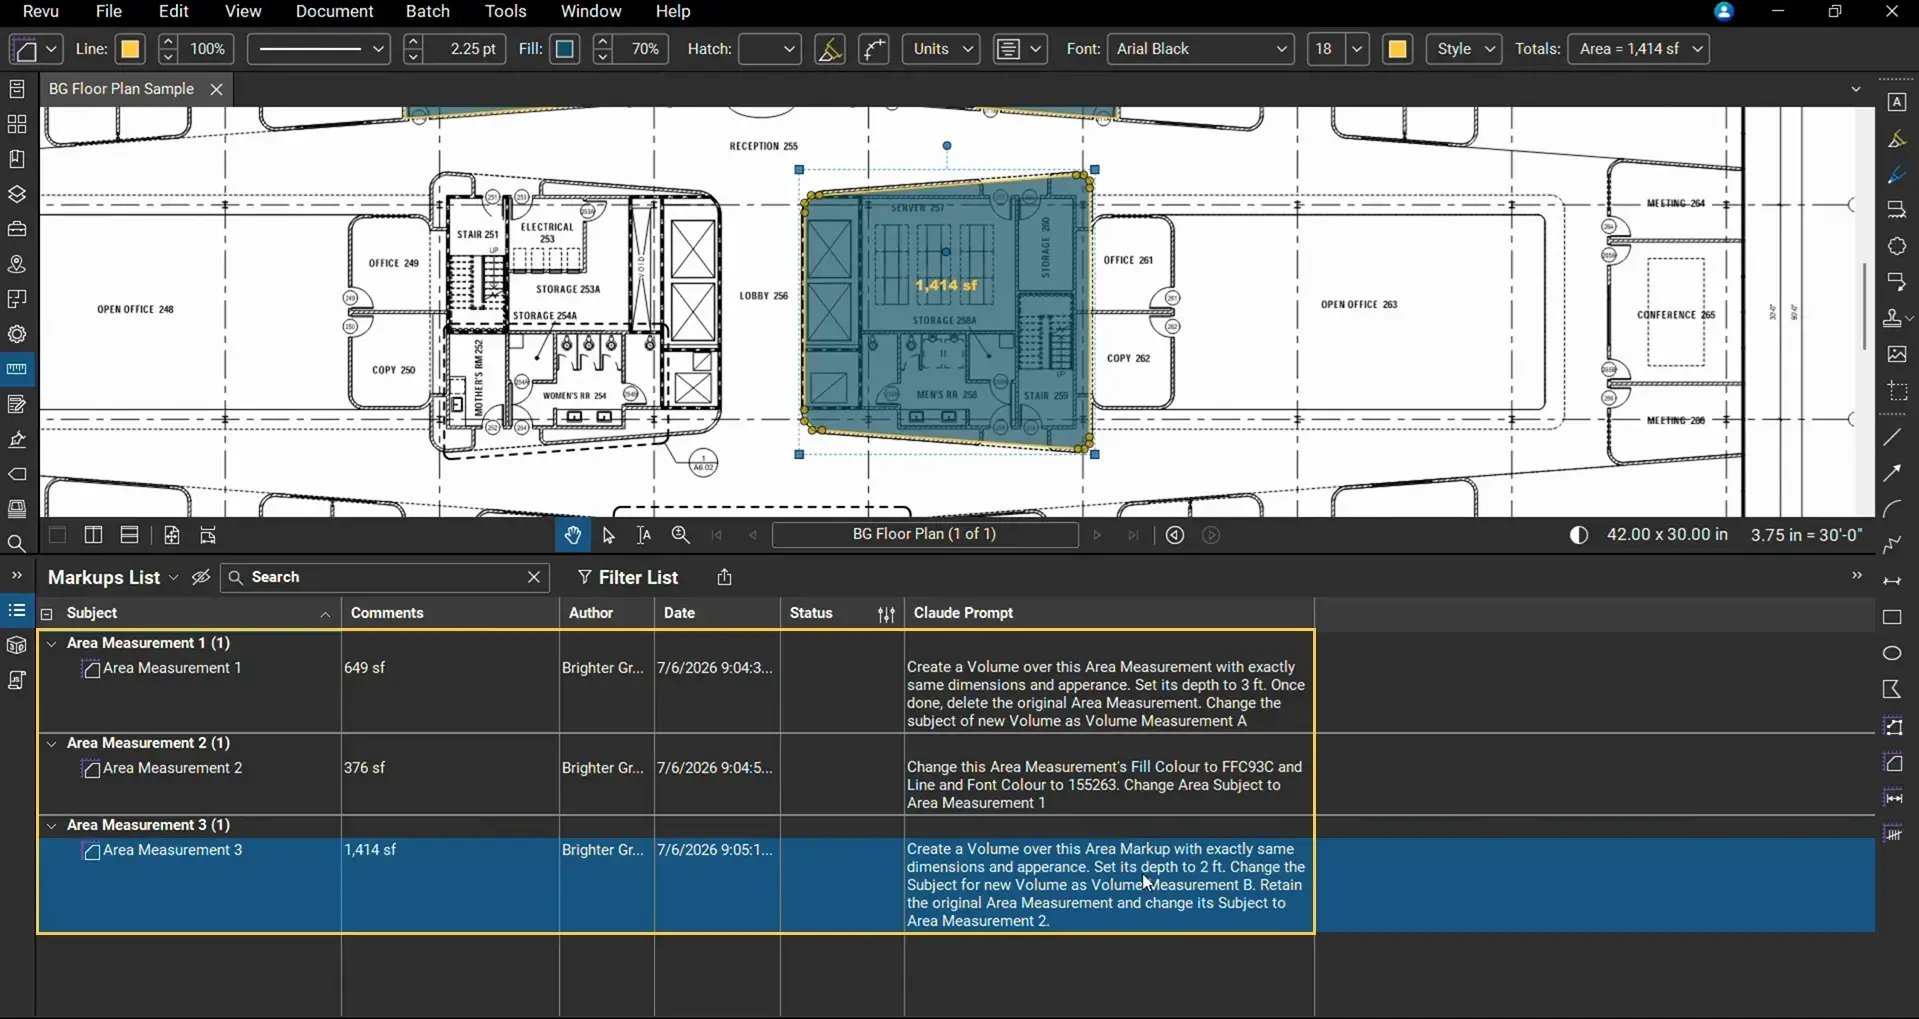
Prompt Example 1: Replace an Area with a Volume
For Area Measurement 1, our prompt instructs Claude to:
- Duplicate the Area as a Volume measurement.
- Apply a depth of 3 feet.
- Delete the original Area measurement.
- Rename the new markup as Volume Measurement A.
Because Claude cannot directly convert an Area to a Volume, the workflow first duplicates the Area and then removes the original markup.
Embedding the depth within the prompt means the Volume is fully calculated automatically without any manual adjustments afterwards.
Prompt Example 2: Update Appearance and Rename a Markup
For Area Measurement 2, we are not creating a new measurement.
Instead, the prompt instructs Claude to:
- Change the font colour.
- Change the line colour.
- Change the fill colour.
- Rename the subject to Area Measurement 1.
Since the original Area Measurement 1 will be deleted during the previous task, we are renaming this markup to maintain sequential numbering.
Prompt Example 3: Duplicate an Area While Keeping the Original
For Area Measurement 3, the prompt tells Claude to:
- Duplicate the Area as a Volume.
- Apply a depth of 2 feet.
- Keep the original Area measurement.
- Name the new markup Volume Measurement B.
- Rename the existing Area measurement to Area Measurement 2.
Unlike the first example, the parent measurement remains on the drawing while the new Volume is added alongside it. Also, we are updating the parent markup subject to Area Measurement 2 for sequential numbering.
Step 04: Ask Claude to Process the Entire Prompt Column
After every markup has its own instruction, open the Claude Desktop application.
Instead of copying each prompt individually, simply ask Claude to:
“Read the Custom Column named Claude Prompt and carry out the instructions for each markup or measurement.”
Claude reads every prompt stored in the PDF and executes each task sequentially.
Note: Depending on the number of markups, processing may take several minutes.
Step 05: Review the Results
In this example that we followed for this workflow, once Claude completes the workflow, review the drawing and the Markups List, and you will find:
- Area Measurement 1 replaced with Volume Measurement A.
- Area Measurement 2 updated with its new appearance and renamed as Area Measurement 1.
- Area Measurement 3 retained and renamed as Area Measurement 2.
- Volume Measurement B created from Area Measurement 3.
- Updated subjects throughout the Markups List.
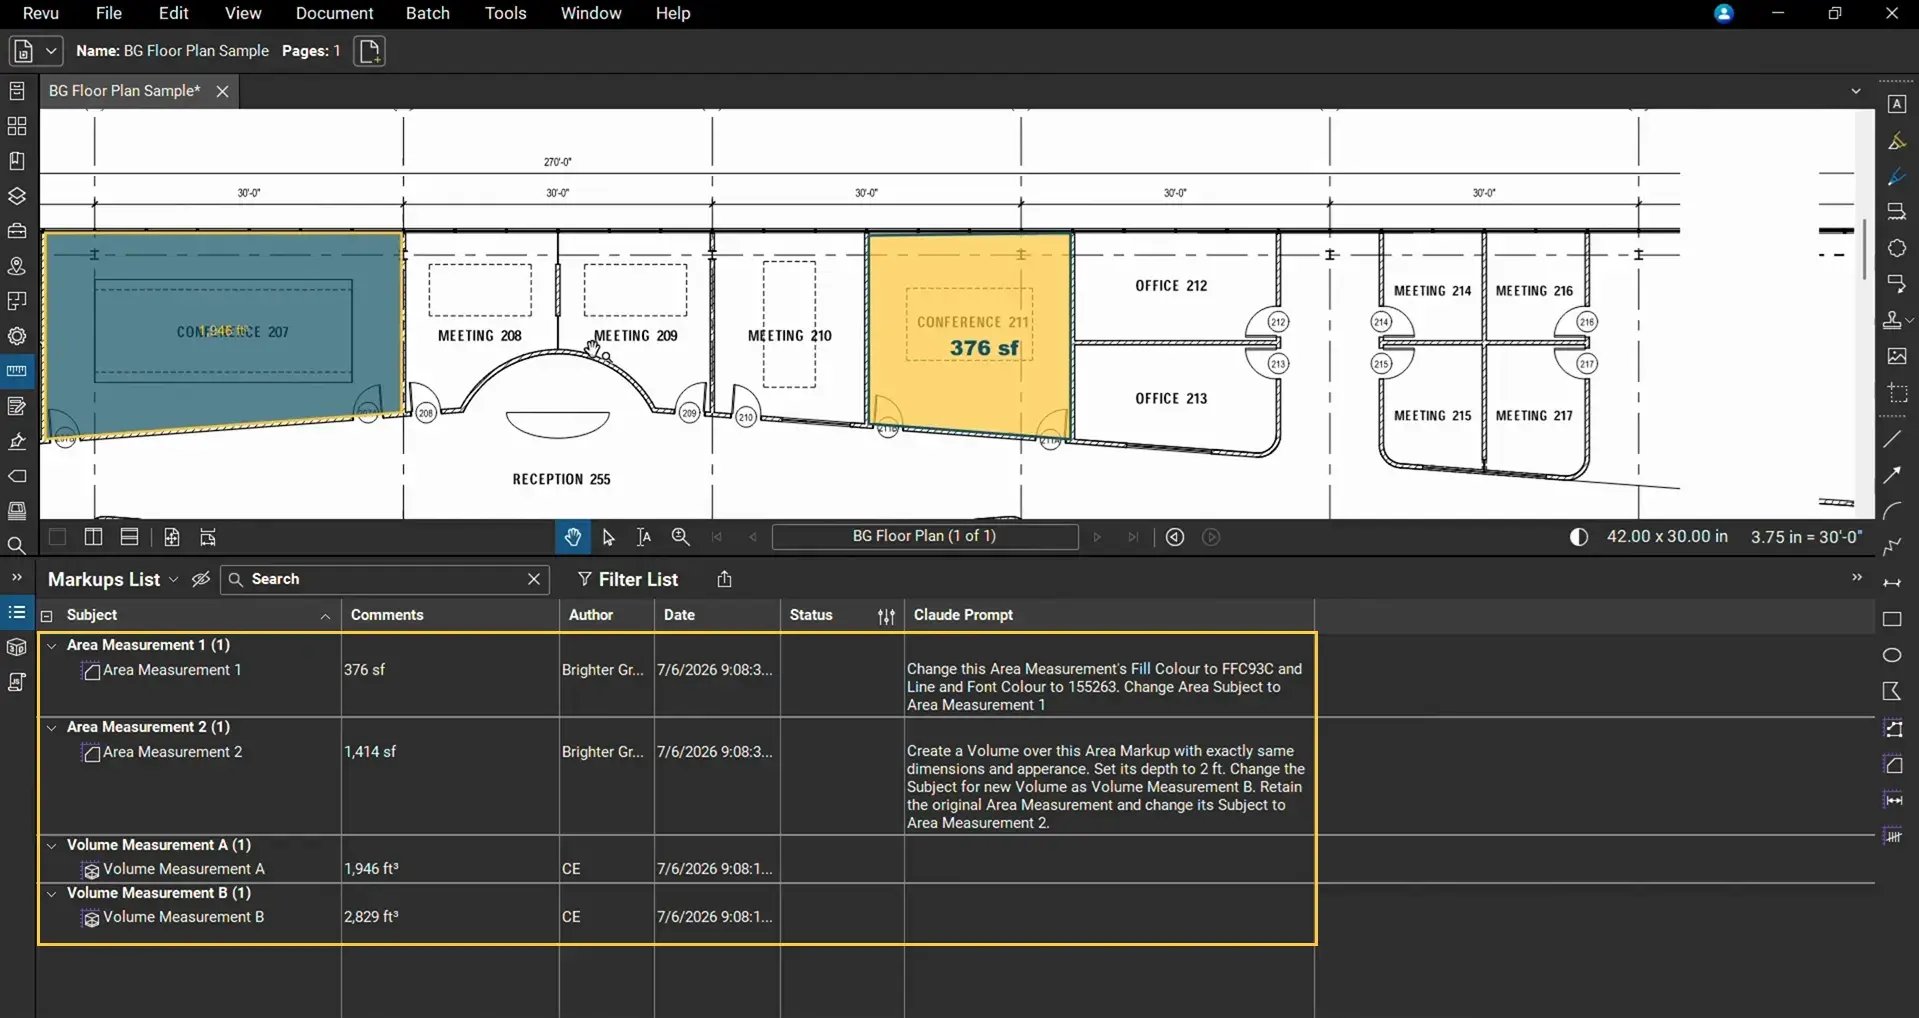
Each instruction is executed independently in response to its corresponding prompt.
Step 06: Verify Measurement Properties
Whenever Claude creates Volume measurements, verify the generated values.
Select each Volume markup and open the Measurements panel.
For this example:
- Volume Measurement A contains a depth of 3 feet.
- Volume Measurement B contains a depth of 2 feet.
Both values were assigned automatically from the prompts stored in the Custom Column.
You can also specify your preferred measurement units directly in each prompt so that Claude generates measurements in those units without requiring manual conversion afterwards.
Workflow and Templates for Batch Prompting with Custom Columns
Below are the prompt templates you can modify and use in a similar workflow for testing.
Claude Prompt Column Template
Create a Text Custom Column named:
Claude Prompt
Example values for each markup:
Area Measurement 1
Duplicate this Area measurement as a Volume measurement. Set the depth to 3 feet. Name the new markup "Volume Measurement A". Delete the original Area measurement after creating the Volume. Keep all other appearance properties the same.
Area Measurement 2
Change the font colour, line colour, and fill colour of this Area measurement. Rename the subject to "Area Measurement 1". Keep all other properties unchanged.
Area Measurement 3
Duplicate this Area measurement as a Volume measurement. Set the depth to 2 feet. Name the new markup "Volume Measurement B". Keep the original Area measurement. Rename the original Area measurement to "Area Measurement 2". Match the appearance of the parent markup.
Note: Update the prompts, markup/measurement subjects, quantities, units, and instructions to use them in your workflow for each markup in its respective column cell.
Claude Prompt
Once the column has been populated, send Claude a single prompt:
“Access the active PDF currently open in Bluebeam Revu. Locate the Custom Column named "Claude Prompt" in the Markups List. For every markup, read the instruction contained in its Claude Prompt field and execute only the instruction associated with that markup.
Carry out each task independently. Preserve all markup properties unless the instruction specifically tells you to change them.
After completing all instructions, provide a summary of every action you performed.”
Using Prompt Templates in Custom Columns
One of the biggest advantages of this workflow with Bluebeam Max is that prompts become reusable and can be processed in a batch.
A typical prompt can include instructions such as:
- Duplicate or replace a markup.
- Create a different measurement type.
- Set depth values.
- Specify measurement units.
- Rename subjects.
- Update colours and appearance.
- Delete existing markups.
- Retain original measurements.
- Copy comments.
- Append outcome notes.
Instead of writing instructions repeatedly and individually for each markup, create a prompt template by merging multiple above actions into your custom column whenever similar tasks are required.
Doing so, you can streamline repetitive workflows consistently across hundreds of markups with minimal manual effort.
Why Use Batch Prompting?
Rather than treating Claude as a simple chatbot, this approach turns your drawing into a structured AI instruction set, with each markup carrying its own instruction. It means:
- Instructions live in the file, not the chat. No more scrolling back through a conversation to remember what you asked for.
- Every markup gets its own instruction. No compromises from batching similar markups together.
- It's auditable by design. Ask Claude to copy the original comment across and append an outcome note whenever it replaces or deletes a markup, so the prompt history stays with the new one.
- It scales. Twenty markups, twenty instructions, still just one message to Claude.
- You can control scope too. Add a second column and flag any markup you want Claude to skip; everything else gets picked up automatically.
Try Bluebeam Max Free for 14 Days
The Claude AI integration is available exclusively in Bluebeam Max. Request a 14-day free Bluebeam Max trial to explore Magic Markups, Smart Review, Smart Overlay, and other AI-powered capabilities designed to speed up your work in Bluebeam Revu.
Level Up Your Bluebeam Experience
Using Custom Columns as a batch-prompting system is a secret new way to work with Claude in Bluebeam Max. Instead of manually guiding AI through one markup at a time, you can embed instructions directly into your drawings and let Claude process every markup automatically.
Explore more Bluebeam guides to learn about everything Bluebeam and get more from your Revu subscription. For more Bluebeam tips and tricks, stay connected with Brighter Graphics.