This guide provides a detailed prompting reference for using Claude via the Model Context Protocol (MCP) to perform quantity takeoffs and cost estimates directly from marked-up PDF drawings open in Bluebeam Revu Max.
The prompt is intended to eliminate the need to buildFull Prompt Template manual formula columns in Revu's Markups List or to export data to Excel before analysis. But note that AI can make mistakes, so always cross-check the results unless you are 100% sure.
The prompt we used will ask Claude to read the active markup data from your open Revu file, perform all unit conversions, apply our provided rates and wastage factors, and return a formatted cost schedule, along with a visual dashboard for better reporting.
A Must-Know Claude Prompt for Quantity and Cost Estimate in Bluebeam Max
Read this document till the end to discover the full prompt structure, an annotated parameter reference, material-specific prompt templates, output interpretation, and prompting best practices.
Disclaimer: AI can make mistakes. It isLabel each markup clearly in the Markups List before querying Claude (for example: Screed Area 01 highly recommended not to rely 100% on AI calculations and results. Always double-check and validate your results manually.
Prerequisites and System Requirements
Before using this workflow, ensure the following are in place.
Bluebeam Revu
- Revu version 21.9 or later is required
- An active Bluebeam Max subscription is required (MCP is a Max-tier feature)
- The Revu file containing your marked-up drawings must be open at the time Claude is queried
Claude Desktop
- Claude Desktop must be installed and running on the same machine as Revu
- The Bluebeam MCP server must be connected and authorised within Claude Desktop
MCP Connection
- The Bluebeam Max MCP integration must be configured before use
Read our separate guide on how to connect Claude to Bluebeam Max for a full walkthrough of the setup process
Markups
- Area, length, volume, or perimeter measurements must be applied to the PDF using Revu's built-in measurement tools
- Each markup must be labelled clearly in the Markups List (for example: Flooring Area 01, Flooring Area 02, etc.)
- Labels are case-sensitive when referenced in the prompt
Workflow Architecture
The workflow below illustrates how data flows between Bluebeam Revu, the MCP server, and Claude during an estimation session.
- You will apply and label measurements in Revu using standard measurement tools.
- Claude Desktop is opened alongside Revu.
- Submit a structured prompt specifying which markups to read and what material and pricing parameters to apply.
- Via MCP, Claude queries the active Revu file and reads the relevant markup data directly from the Markups List.
- Claude processes the data, performs calculations, and returns a formatted estimation table.
- The last line of the prompt (included in the template) requests a visual dashboard for better reporting.
Setting Up Measurements in Bluebeam Revu
For the example covered in this guide, we are using Area Measurements for tile quantity and cost estimate. For other materials, you might need length or volume measurements (sample templates provided in the later sections of the guide). So tailor your workflow per your requirements.
Applying Area Measurements
Use the Area Measurement tool in Revu to mark up the regions you wish to estimate. Ensure your drawing scale is calibrated before applying measurements.
Steps:
- Open the PDF drawing in Revu.
- Go to the Measurements Panel > Select Area Measurement
- Trace the boundary of each region.
- Once applied, the measurement appears in the Markups List with its calculated area.
Read our separate guide on using Area Measurement in Bluebeam Revu.
Labelling Markups
Clear, consistent labelling is critical. Claude references markup labels exactly as they appear in the Markups List. Use a naming convention that is unambiguous and descriptive.
Recommended convention:
[Material/Zone Type] [Number]
Examples:
- Flooring Area 01
- Flooring Area 02
- Flooring Area 03
- Concrete Slab 01
- Wall Render North
- Pipe Run A
Avoid generic labels such as "Area 1" or "Markup 3", as you and your team members will find it difficult to distinguish or comprehend across disciplines or drawing sets.
Markups List: Columns and Markups View
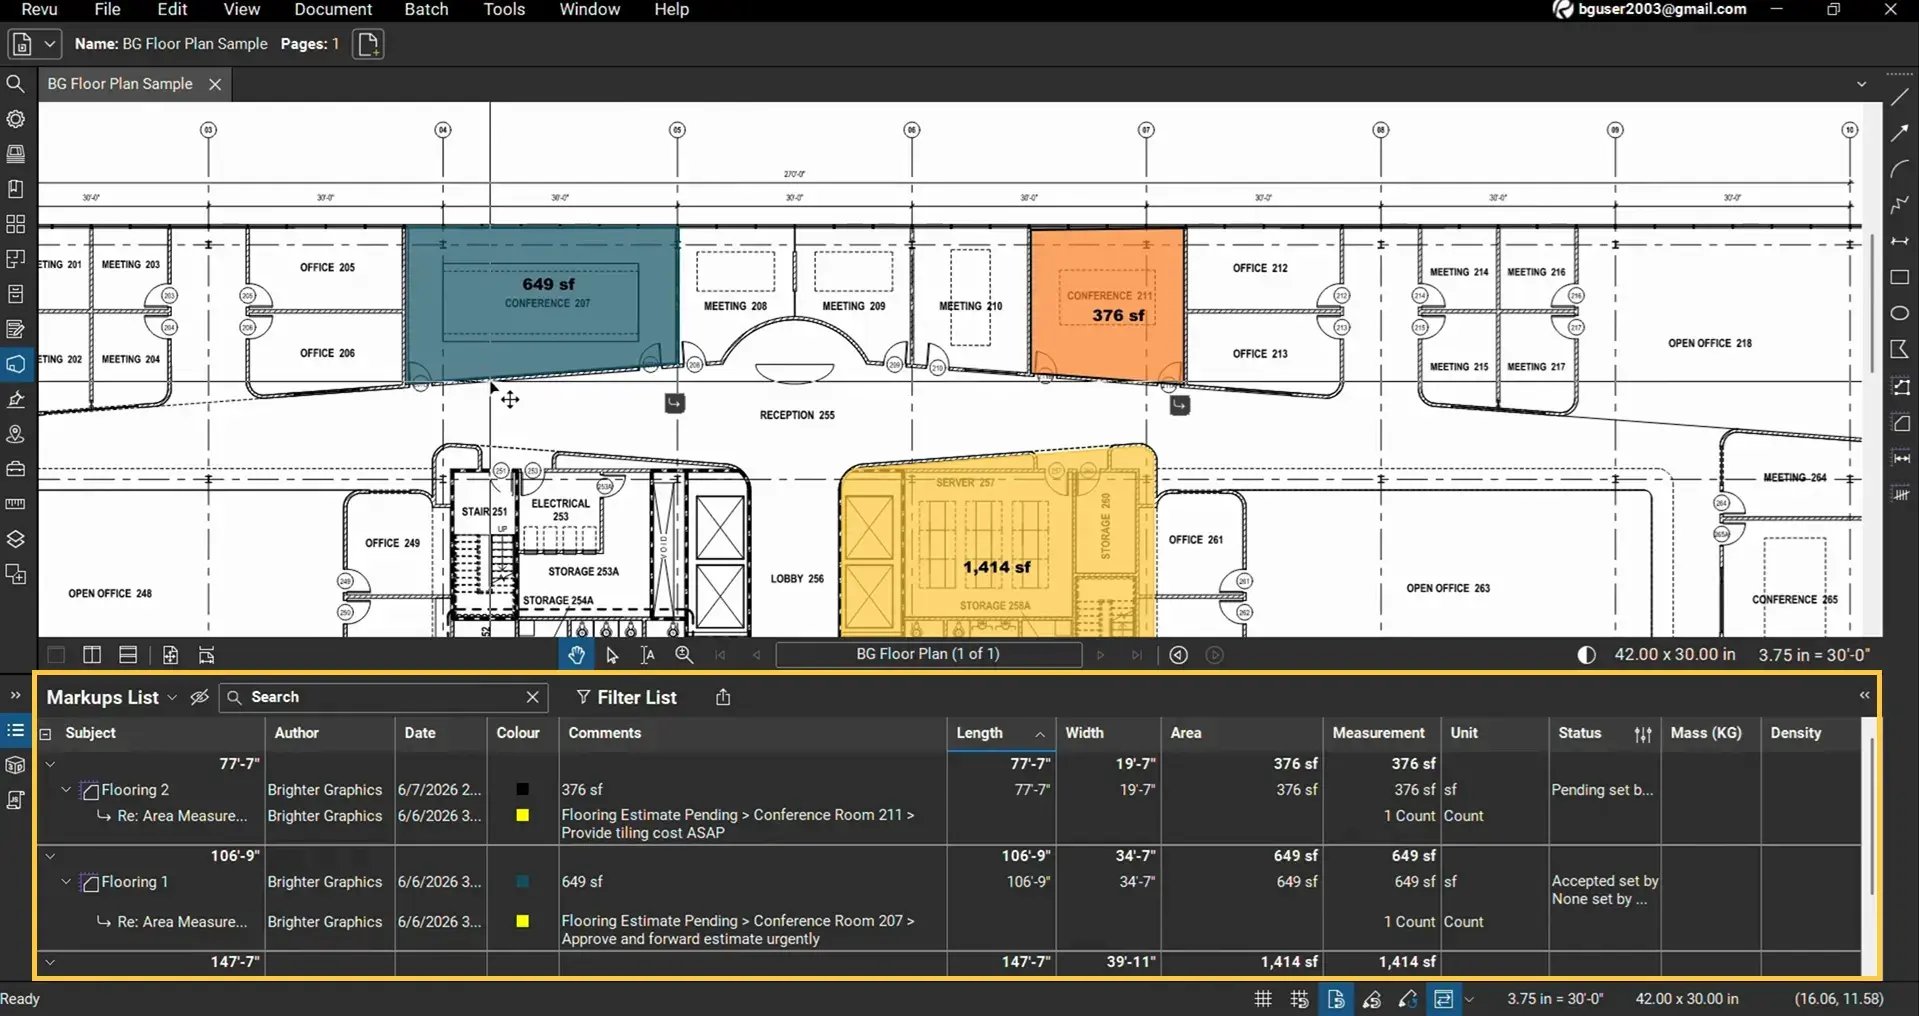
The Markups List in Revu will display your measurements in a tabular format. The columns relevant to this workflow are:
|
Column |
Description |
|
Subject |
The markup/measurement label you have assigned |
|
Measurement |
The calculated area, length, or volume |
|
Unit |
The unit of measurement set in Revu |
|
Comments |
Optional notes field, replies, and measurement values |
Supported Measurement Types
This workflow supports any of Revu's built-in measurement types. The prompt template must be adjusted to match the measurement type in use.
|
Measurement Type |
Typical Use Case |
|
Area |
Flooring, tiling, paint |
|
Volume |
Screed, Slabs, Concrete pours, fill material, earthworks |
|
Length/Polylength/Perimeter |
Piping, ducting, cabling, skirting, kerbs |
|
Count |
Fixings, bolts, outlets, fittings |
The Flooring Estimation Prompt Example
The following is the master prompt we are using in this Bluebeam + Claude estimation workflow for the flooring cost and quantity estimate (each section explained). Remove the annotation text and change the values inside square brackets before sending the prompt to Claude.
Full Prompt Template (Annotated)
You are a quantity surveyor assistant working with Bluebeam Revu.

Using the area measurements from the following marked-up regions currently open in my Revu file:

Areas: [Flooring Area 01, Flooring Area 03]
Perform a detailed flooring quantity and cost estimation using the material details below.

MATERIAL DETAILS:


Tile Size: [500] x [500] mm

Tile Shape: [Square/Rectangle/Hexagonal/Other]

Laying Pattern: [Straight/Diagonal 45/Herringbone/Brick Offset/Other]

Grout Joint Width: [3] mm

Tile Price: [£40] per sq m

Labour Cost: [£20] per sq m

Wastage Factor: [10]%

Tiles per Pack: [Optional, e.g. 4 tiles]

MEASUREMENT SETTINGS:


Revu Markup/Measurement: [Area Measurement]

Measurement Unit in Revu: [mm/cm/m/ft/in]

Output Area Unit: [sq m/sq ft/sq cm]

OUTPUT REQUIREMENTS:


Create a detailed table with the following columns:

 - Area Name/ID

 - Measured Area (sq unit)

 - Converted (Central) Unit (sq m)

 - Net Tiles Required

 - Wastage Factor (10%)

 - Total Tiles Required (incl. wastage)

 - Cost of Tiles excl. labour

 - Labour Cost

 - Total Cost incl. labour


Additional requirements:

 - Show all unit conversions side by side in separate columns

 - Include a separate row/column for wastage tiles and wastage cost

 - Provide individual costing and quantity for each area

 - Provide a total row summarising all areas combined

 - Calculate the number of tile boxes/packs required (if pack size is provided)

 - Estimate the grout quantity required based on the joint width

 - Show all calculations transparently

 - Include a notes/assumptions section at the bottom
2nd Prompt (Following the 1st One)
Also, provide me with a GUI-based dashboard to view detailed information on materials, markups, costing, measurements, and other data points.
Section-by-Section Explanation
Below is the breakdown to help you understand what each section and command of our prompt is intended to do.
Role Assignment
You are a quantity surveyor assistant working with Bluebeam Revu Max.
This line sets Claude's operational context. Assigning a domain-specific role at the start of a prompt improves the relevance and format of responses. Claude will apply QS conventions (wastage, unit rates, cost schedules) rather than generic calculation logic.
Markup Reference
Areas: [Flooring Area 01, Flooring Area 03]
This tells Claude exactly which labelled markups to retrieve from the active Revu file via MCP. Labels must match the Markups List exactly, including capitalisation and spacing. You can reference as many markups as needed, separated by commas.
Material Details Block
This block defines all material-specific parameters. Every parameter maps directly to a column or row in the output table.
*Leaving a parameter blank or marking it as "Optional" instructs Claude to omit that calculation.
Measurement Settings Block
This block resolves the unit context. Revu measurements and the material details you provide may potentially mismatch. They may be recorded in feet, metres, or millimetres, depending on the drawing origin and calibration. The Output Area Unit field specifies the central unit for all conversions in the output table.
Output Requirements Block
This block drives the structure of Claude's response. The column list is explicit and ordered. Additional requirements below the column list extend the output with supplementary calculations (grout quantity, pack counts) and transparency requirements (show all calculations, notes section, etc.).
Dashboard Request
“Now, give me a GUI-based dashboard...”
This 2nd prompt will be added as a follow-up prompt to trigger Claude to generate a GUI-based dashboard once the estimation process completes. Claude will use the same data from the estimation and showcase it in a better visual format with graphs and sections.
Behaviour Aspects of a Prompt
The following aspects are intended to improve our workflow and avoid anomalies by clearly defining the prompt behaviour that will eventually lead Claude to do the job right.
Wastage Factor Application
Our prompt applies a 10% wastage factor. This is added to the net tile count to give the total tiles required, including wastage. The wastage will be shown in a separate column, so the net and gross figures are both visible. You can change the wastage factor to match your specific requirements.
Automatic Unit Conversion
Claude converts all Revu markup measurements to the specified central unit (sq m by default) before calculating costs. No manual conversion is required from the user. All intermediate conversions are shown side by side in the output table.
Transparency Requirement
The phrase "Show all calculations transparently" instructs Claude to include intermediate steps, conversion factors, and formula logic in the output. This is important for audit and verification purposes on complex, detailed projects.
More Claude Prompt Templates for Bluebeam Max Estimation Job (By Material Type)
The following templates are ready-to-use adaptations of the master prompt for common construction materials. Replace all values in square brackets with your project-specific data.
Tiling and Flooring
<The Template Used in the Example Above>
Cement Screed and Sand/Cement Bed
Use this template for cement screed, floor levelling compound, or sand/cement bedding beneath tiles or stone.
Important: Use Revu's Volume Measurement tool for this takeoff, not the Area Measurement tool. The Volume Measurement markup captures the plan area and the screed depth together, and Revu computes the resulting volume internally (Volume = Plan Area x Depth). Claude reads this volume directly from the Markups List via MCP. You do not enter the screed thickness separately in the prompt, as it is already embedded in the Revu markup.
To apply a Volume Measurement in Revu:
- Go to Measurements Panel > Select the Volume Measurement.
- Trace the screed area boundary.
- Once done, set the Depth field in Volume measurement to your screed thickness (for example, 75 mm).
- Revu will calculate and store both the volume and area for the selected region.
Label each markup clearly in the Markups List before querying Claude (for example: Screed Area 01, Screed Area 02).
Prompt Template:
You are a quantity surveyor assistant working with Bluebeam Revu.

Using the volume measurements from the following marked-up regions currently open in my Revu file:

Volumes: [Screed Area 01, Screed Area 02]

The volume for each markup has been recorded using Revu's Volume Measurement tool.

Each markup stores the plan area and screed depth, and Revu has calculated the resulting volume. Read the volume, plan area, and depth directly from each markup.

Do not recalculate volume from external dimensions.

Perform a detailed cement screed quantity and cost estimate using the material details below.

MATERIAL DETAILS:

Screed Type: [Sand and Cement/Liquid Screed/Self-Levelling Compound]

Mix Ratio: [1:3 (cement:sand)/Pre-mixed (specify product)]

Cement Bag Size: [25] kg

Cement Yield: [approx. 0.013 cubic metres per 25 kg bag at 1:3 mix]

Sand Bulk Density: [1,600 kg per cubic metre]

Cement Price: [£6.50] per 25 kg bag

Sand Price: [£45] per tonne

Labour Cost: [£18] per sq m

Wastage Factor: [10]%

MEASUREMENT SETTINGS:

Revu Markup/Measurement: Volume Measurement

Volume Unit in Revu: [cubic feet/cubic metres]

Area Unit in Revu: [sq ft/sq m]

Depth Unit in Revu: [mm/m/ft]

Output Volume Unit: cubic metres

Output Area Unit: sq m

OUTPUT REQUIREMENTS:

Create a detailed table with the following columns:

  - Area Name/ID

  - Plan Area from Revu (original unit)

  - Converted Plan Area (sq m)

  - Screed Depth from Revu (converted to metres)

  - Net Screed Volume from Revu (cubic metres)

  - Wastage Volume ([10]%)

  - Total Screed Volume incl. wastage (cubic metres)

  - Cement Required (bags)

  - Sand Required (tonnes)

  - Material Cost

  - Labour Cost (based on plan area)

  - Total Cost incl. labour

Additional requirements:

  - Confirm that volume is read from Revu and state the raw value retrieved for each markup

  - Show any unit conversions applied to volume, area, or depth

  - Show the cement and sand quantity derivation from the total volume

  - Provide individual quantities per area and a combined total row

  - Show all calculations transparently

  - Include a notes and assumptions section covering mix ratios, yield assumptions, confirmation that depth was set in Revu (not assumed), and any rounding applied
2nd Prompt:
Also, provide me with a GUI-based dashboard to view detailed information on materials, markups, costing, measurements, and other data points.
Structural Concrete (Volume-Based)
Use this template for in-site concrete elements such as slabs, foundations, columns, beams, or walls.
Important: Use Revu's Volume Measurement tool for this takeoff. For the same reason as screed estimation, the Volume Measurement records the plan area and the element depth together, and Revu computes the volume internally. Claude reads the volume directly from the Markups List via MCP. You do not enter element thickness or depth in the prompt, as that data is already captured in the Revu markup.
For slabs, strip foundations, and wall panels with a constant depth, set the Depth field in Revu's Volume Measurement to the element thickness. For columns and piers, set the plan area to the cross-section and the depth to the element height.
Prompt Template:
You are a quantity surveyor assistant working with Bluebeam Revu.

Using the volume measurements from the following marked-up regions currently open in my Revu file:

Elements: [Slab 01, Slab 02, Foundation Strip A]

The volume for each markup has been recorded using Revu's Volume Measurement tool.

Each markup stores the plan area and element depth, and Revu has calculated the resulting volume. Read the volume, plan area, and depth directly from each markup.

Do not recalculate volume from external dimensions.

Perform a detailed concrete quantity and cost estimation using the details below.

MATERIAL DETAILS:

Concrete Grade: [C25/30/C30/37/RC30/specify]

Element Type: [Ground Slab/Suspended Slab/Strip Foundation/Column/Wall]

Concrete Price: [£115] per cubic metre (ready-mix, supplied and poured)

Labour/Pour Cost: [£35] per cubic metre

Wastage Factor: [5]% (reduce for regular pours; increase for complex formwork)

Pump Surcharge: [£250] per pour (enter 0 if not needed)

MEASUREMENT SETTINGS:

Revu Markup/Measurement: Volume Measurement

Volume Unit in Revu: [cubic feet/cubic metres]

Area Unit in Revu: [sq ft/sq m]

Depth Unit in Revu: [mm/m/ft]

Output Volume Unit: cubic metres

Output Area Unit: sq m

OUTPUT REQUIREMENTS:

Create a detailed table with the following columns:

 - Element Name/ID

 - Plan Area from Revu (sq m)

 - Element Depth from Revu (m)

 - Net Volume from Revu (cubic metres)

 - Wastage Volume ([5]%)

 - Total Volume incl. wastage (cubic metres)

 - Concrete Cost (excl. labour)

 - Labour/Pour Cost

 - Pump Surcharge (if included)

 - Total Cost incl. all items

Additional requirements:

 - Confirm that volume is read from Revu and state the raw value retrieved for each markup

 - Show any unit conversions applied to volume, area, or depth

 - Provide individual element quantities and a combined total row

 - Show all calculations transparently

 - Include a notes section covering concrete grade, exclusions (rebar, formwork,

 curing, testing), confirmation that depth was set in Revu (not assumed), and rounding
2nd Prompt:
Also, provide me with a GUI-based dashboard to view detailed information on materials, markups, costing, measurements, and other data points.
Piping and Ducting (Length-Based)
Use this template where Revu length or perimeter measurements have been applied to pipe runs, duct routes, drainage lines, or conduit.
Prompt Template:
You are a quantity surveyor assistant working with Bluebeam Revu.

Using the length measurements from the following marked-up regions currently open in my Revu file:

Pipe Runs/Routes: [Pipe Run A, Pipe Run B, Duct Route 01]

Perform a detailed piping/ducting quantity and cost estimation using the details below.

MATERIAL DETAILS:

Service Type: [HVAC Ducting/Foul Drainage/Cold Water/Gas/Conduit/Other]

Pipe/Duct Size: [110] mm diameter (or [250 x 150] mm for rectangular duct)

Material: [uPVC/Copper/Steel/GRP/Galvanised Steel/Other]

Pipe/Duct Unit: sold per [1 metre/3 metre/6 metre] length

Unit Price: [£22] per linear metre (supply only)

Fittings Allowance: [15]% of pipe cost (to cover bends, couplers, reducers)

Labour Cost: [£18] per linear metre

Wastage/Cutting: [10]%

Insulation: [Yes/No] (if yes, specify type and cost per linear metre)

MEASUREMENT SETTINGS:

Revu Markup/Measurement: Length Measurement

Measurement Unit in Revu: [ft/m]

Output Length Unit: linear metres

OUTPUT REQUIREMENTS:

Create a detailed table with the following columns:

 - Run/Route Name

 - Measured Length (original unit)

 - Converted Length (linear metres)

 - Net Pipe/Duct Length

 - Wastage/Cutting Allowance ([10]%)

 - Total Length Required (incl. wastage)

 - Number of Pipe Lengths Required (based on standard length)

 - Material Cost (excl. fittings)

 - Fittings Allowance Cost ([15]%)

 - Labour Cost

 - Total Cost

Additional requirements:

 - Show unit conversions from Revu unit to linear metres

 - Provide individual costs per run and a combined total row

 - Include a notes section covering fittings assumptions, exclusions (brackets, supports, testing), and rounding
2nd Prompt:
Also, provide me with a GUI-based dashboard to view detailed information on materials, markups, costing, measurements, and other data points.
Wiring and Cabling (Length-Based)
Use this template for electrical cable runs, data cabling, or containment (trunking, conduit). This template uses Revu length measurements.
Prompt Template:
You are a quantity surveyor assistant working with Bluebeam Revu.

Using the length measurements from the following marked-up regions currently open in my Revu file:

Cable Routes: [Cable Route 01, Cable Route 02, Data Run A]

Perform a detailed wiring and cabling quantity and cost estimation using the details below.

MATERIAL DETAILS:

Cable Type: [2.5mm Twin and Earth/4mm SWA/CAT6 UTP/Multicore/specify]

Number of Cores: [2/3/4/other]


Cable Rating: [specify, e.g. 6242Y, 6491X]

Containment Type: [Surface Trunking/Conduit/Cable Tray/Buried/None]

Cable Price: [£1.85] per linear metre (supply only)

Containment Price: [£4.20] per linear metre (if applicable)

Termination Cost: [£12] per termination (both ends = 2 per run)

Labour Rate: [£15] per linear metre

Wastage/Looping: [15]% (includes loops at boards, junction boxes, and sockets)

MEASUREMENT SETTINGS:

Revu Markup/Measurement: Length Measurement

Measurement Unit in Revu: [ft/m]

Output Length Unit: linear metres

OUTPUT REQUIREMENTS:

Create a detailed table with the following columns:

 - Route Name

 - Measured Length (original unit)

 - Converted Length (linear metres)

 - Net Cable Length

 - Wastage/Looping ([15]%)

 - Total Cable Length (incl. wastage)

 - Cable Cost

 - Containment Cost (if applicable)

 - Termination Cost

 - Labour Cost

 - Total Cost per Route

Additional requirements:

 - Show unit conversions explicitly

 - Provide individual costs per route and a combined total row

 - Include a notes section covering exclusions (consumer units, accessories, testing,

 certification), rounding, and looping assumptions
2nd Prompt:
Also, provide me with a GUI-based dashboard to view detailed information on materials, markups, costing, measurements, and other data points.
Render and Paint (Area-Based)
Use this template for external or internal render, masonry paint, or specialist coatings applied to wall areas measured in Revu.
Just like flooring, we will use area measurement for render or paint job estimate.
Prompt Template:
You are a quantity surveyor assistant working with Bluebeam Revu.

Using the area measurements from the following marked-up regions currently open in my Revu file: Wall/Surface Areas: [Wall North, Wall South, Soffit Area 01]

Perform a detailed render and coating quantity and cost estimation using the details below.

MATERIAL DETAILS:

Finish Type: [Sand and Cement Render/Monocouche/Tyrolean/Masonry Paint / Internal Plaster/Dry Lining/Other]

Number of Coats: [2]

Coverage Rate: [specify kg per sq m per coat, or use manufacturer's standard]

Product Pack Size: [25 kg bag/10 litre tub/specify]

Material Price: [£ 8.50] per sq m (or [£12] per 25 kg bag, whichever applies)

Labour Cost: [£14] per sq m

Wastage Factor: [10]%

Primer Required: [Yes/No] (if yes, specify coverage and price)

Deductions: [Yes/No] (if yes, specify door/window openings to deduct)

DEDUCTION AREAS (if applicable):

 - Door 01: [2.0 x 2.1] m

 - Window 01: [1.2 x 1.0] m

 (Add further openings as needed)

MEASUREMENT SETTINGS:

Revu Markup/Measurement: Area Measurement

Measurement Unit in Revu: [sq ft/sq m]

Output Area Unit: sq m

OUTPUT REQUIREMENTS:

Create a detailed table with the following columns:

 - Surface Name

 - Gross Measured Area (sq m)

 - Deductions (sq m) [if applicable]

 - Net Area (sq m)

 - Material Required (bags or litres, per coat)

 - Wastage Allowance ([10]%)

 - Total Material Required (incl. wastage)

 - Material Cost

 - Labour Cost

 - Total Cost

Additional requirements:

 - Show deduction calculations explicitly

 - Show coverage rate formula: Net Area/Coverage Rate = Quantity Required

 - Provide individual costs per surface and a combined total row

 - Include a notes section covering the number of coats applied, deduction policy,

 and any substrate preparation excluded from this estimate
2nd Prompt:
Also, provide me with a GUI-based dashboard to view detailed information on materials, markups, costing, measurements, and other data points.
Output Table for Flooring Estimate: Column-by-Column Reference
After you provide your prompt to Claude, wait for it to process data from your markups and measurements. Once done, it will provide a detailed estimate of quantity and cost.
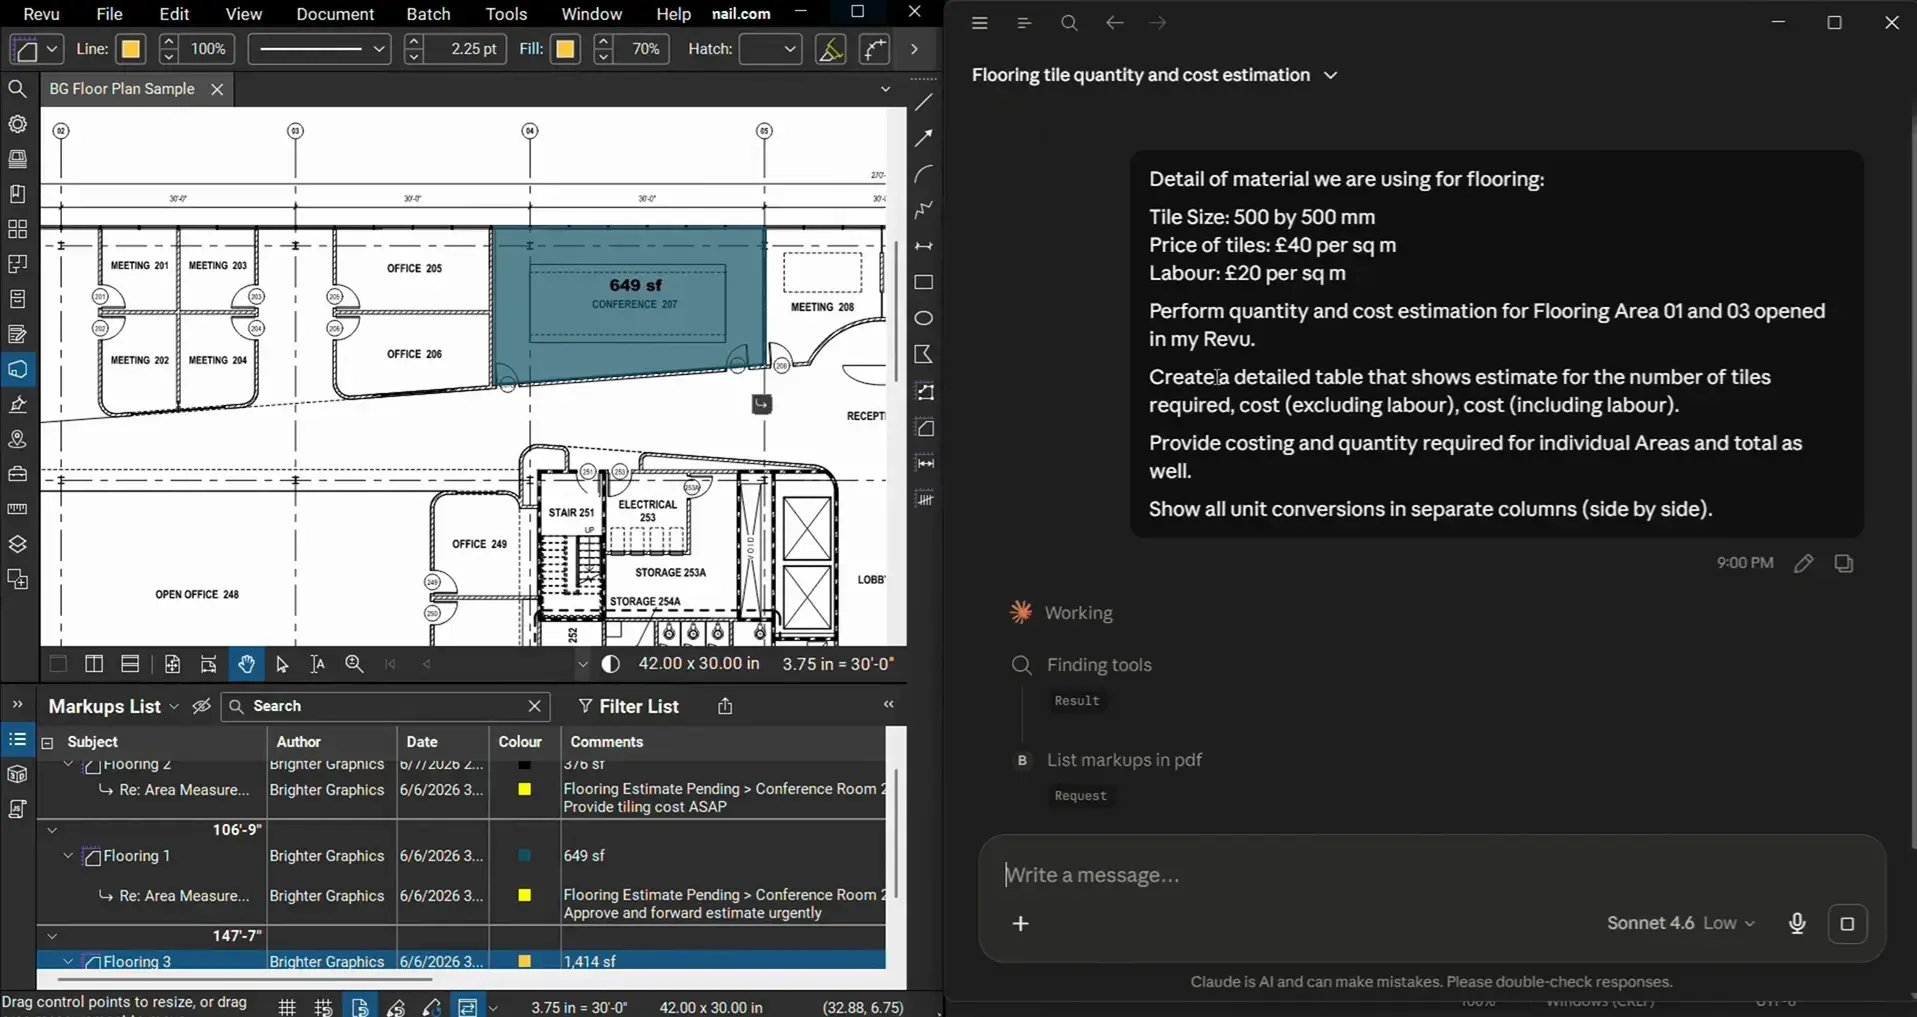
Remember our first example prompt in this guide for the flooring estimate?
The following Claude output describes what each column in Claude's output table represents and how it is calculated. This is useful for verification and for explaining the schedule to project teams.
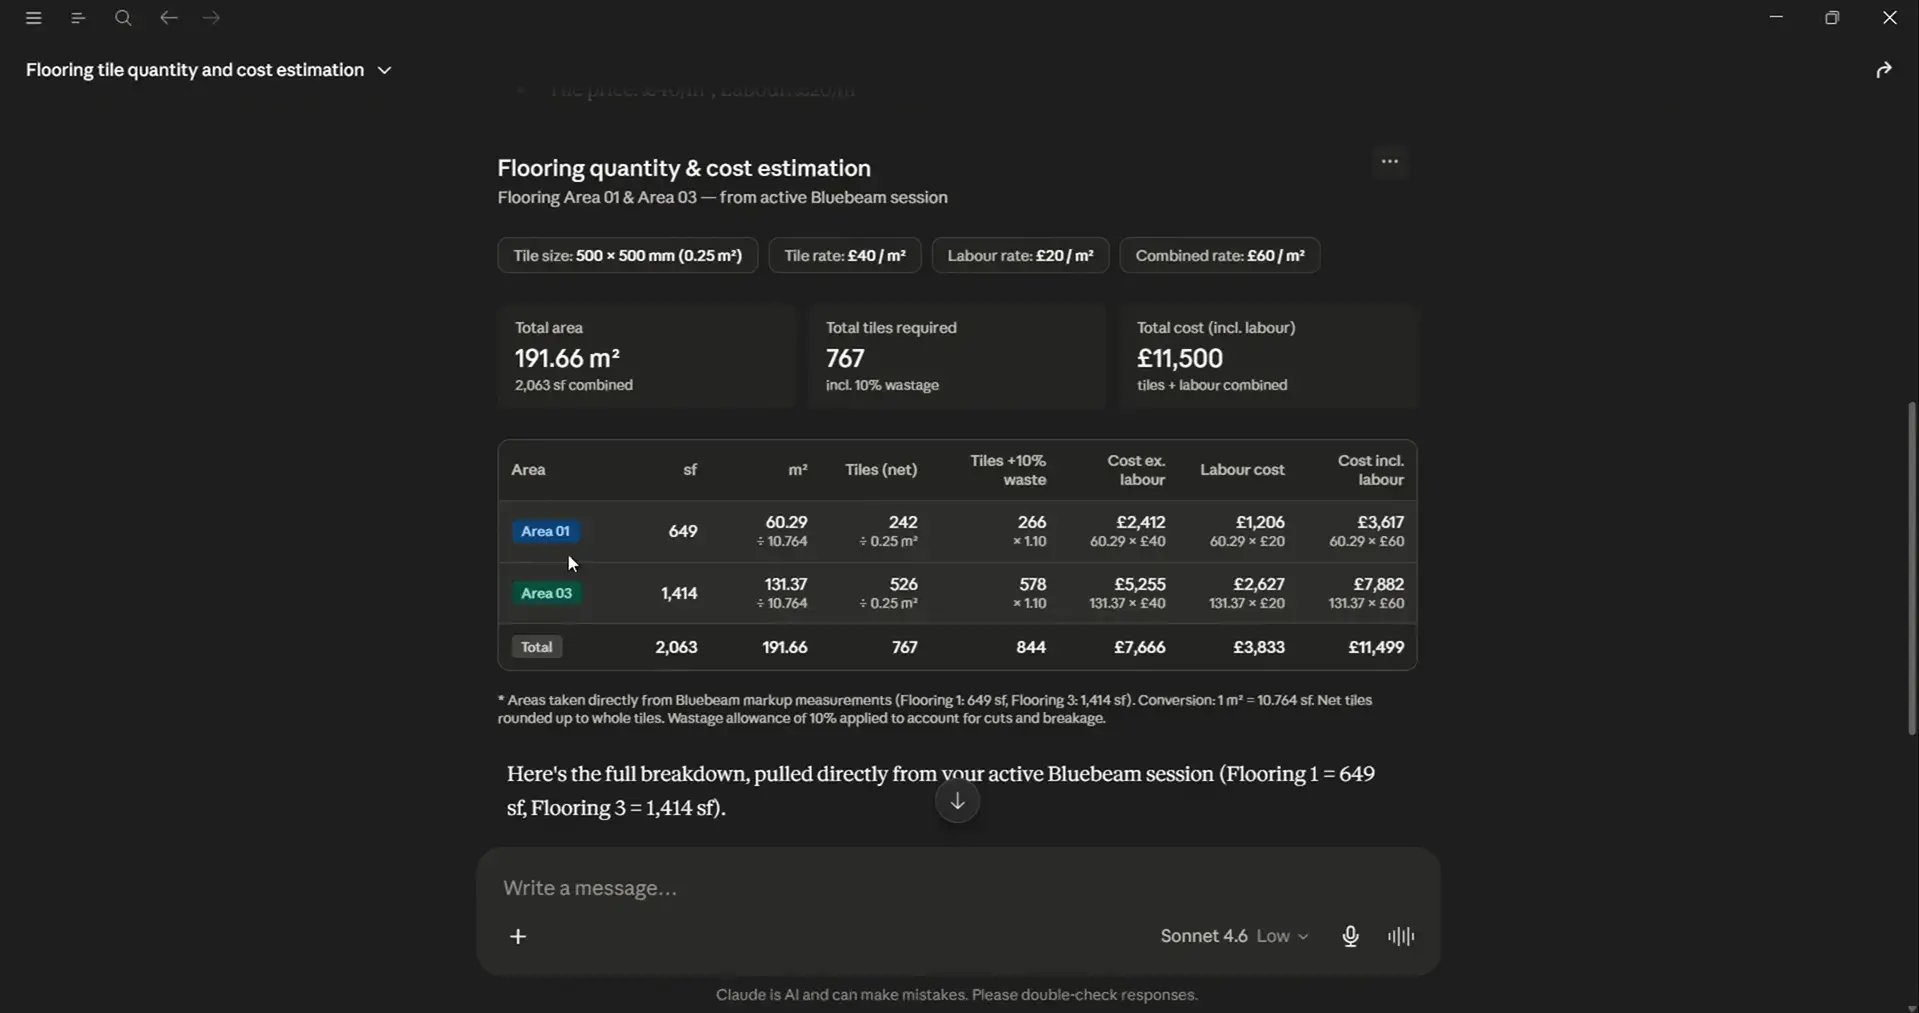
*For a simple workflow, we didn't include grout quantity in our example
|
Column |
Description |
How It Is Calculated |
|
Area Name/ID |
The markup label as retrieved from the Revu Markups List |
Pulled directly from the MCP data |
|
Measured Area (original unit) |
The raw figure from Revu in its recorded unit |
Pulled directly from the MCP data |
|
Converted Area (sq m) |
The area in the central output unit |
Multiplied by the appropriate conversion factor (e.g., 1 sq ft = 0.0929 sq m) |
|
Net Tiles Required |
The number of whole tiles to cover the net area |
Tile area = (Tile Width x Tile Height)/1,000,000 |
|
Wastage Tiles |
Additional tiles to account for cutting and breakage |
Net Tiles x (Wastage Factor/100) |
|
Total Tiles Required |
Gross tile count, including wastage |
Net Tiles + Wastage Tiles |
|
Tile Packs Required (Optional) |
Number of packs or boxes to order |
Total Tiles/Tiles per Pack, rounded up to the next whole number |
|
Material Cost (excl. labour) |
Cost of tiles or material only |
Converted Area x Material Price per sq m (includes wastage factor applied to area) |
|
Labour Cost |
Cost of installation |
Converted Area x Labour Rate per sq m |
|
Total Cost (incl. labour) |
Combined material and labour cost |
Material Cost + Labour Cost |
|
Total Row (Last Row) |
Sum of all individual quantities |
Sum of each column across all rows |
Notes and Assumptions Section
At the bottom of every output, Claude includes a notes section that records:
- The wastage percentage applied and its basis
- Unit conversion factors used
- Any parameters that were omitted or defaulted
- Rounding conventions applied (typically rounded up to whole tiles or whole bags)
- Items specifically excluded from the estimate
Dashboard Generation
The final line of the estimation prompt requests a GUI-based dashboard:
For this estimation job, provide me with a GUI-based dashboard to view detailed information on materials, markups, costing, measurements, and other data points.
Claude generates a visual dashboard in response to this request. The dashboard is rendered within Claude's interface and displays the estimation data in a structured, visual format.
Dashboard Components
The dashboard generated by Claude in our Flooring estimate example includes the following components.
KPI Summary Tiles (Top Row)
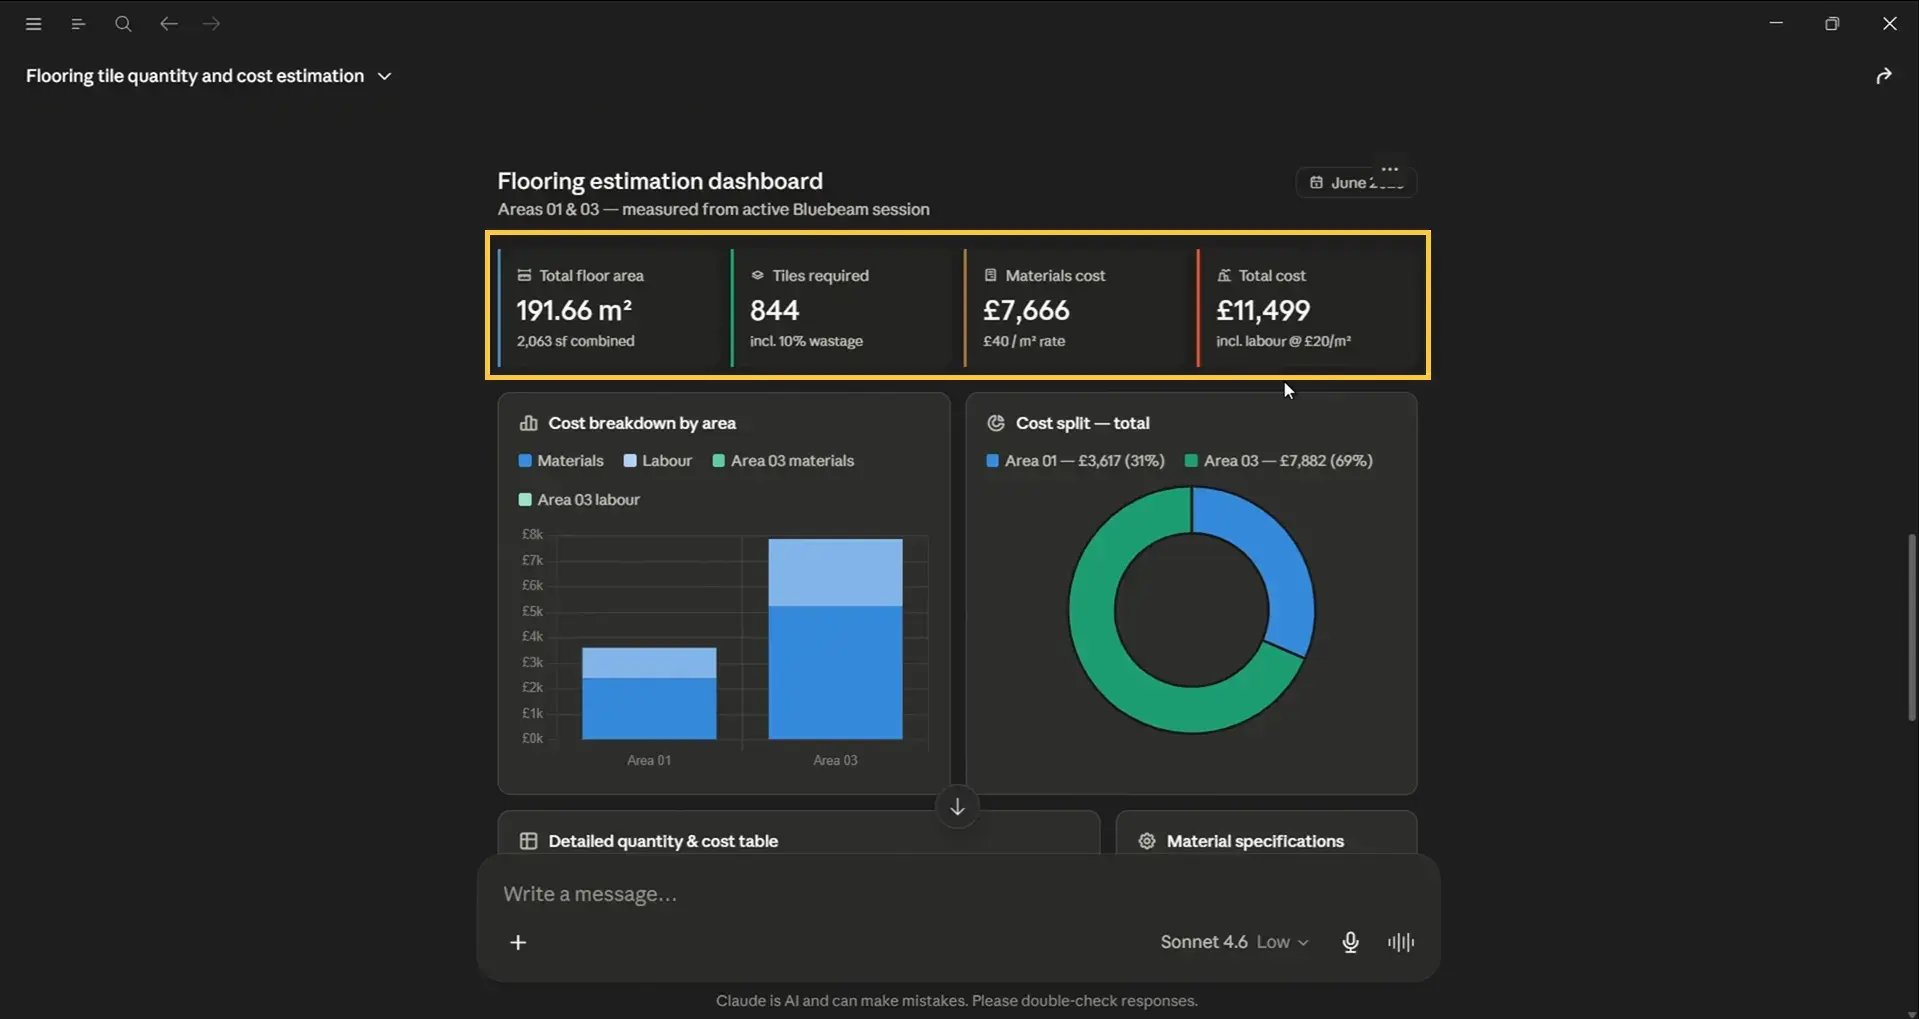
Four summary tiles are displayed at the top of the dashboard:
|
Tile |
Content |
|
Total Floor Area |
Combined converted area across all measured regions (sq m) |
|
Total Tiles Required |
Total tile count, including wastage |
|
Total Material Cost |
Cost of materials only, excluding labour |
|
Total Project Cost |
Combined material and labour cost |
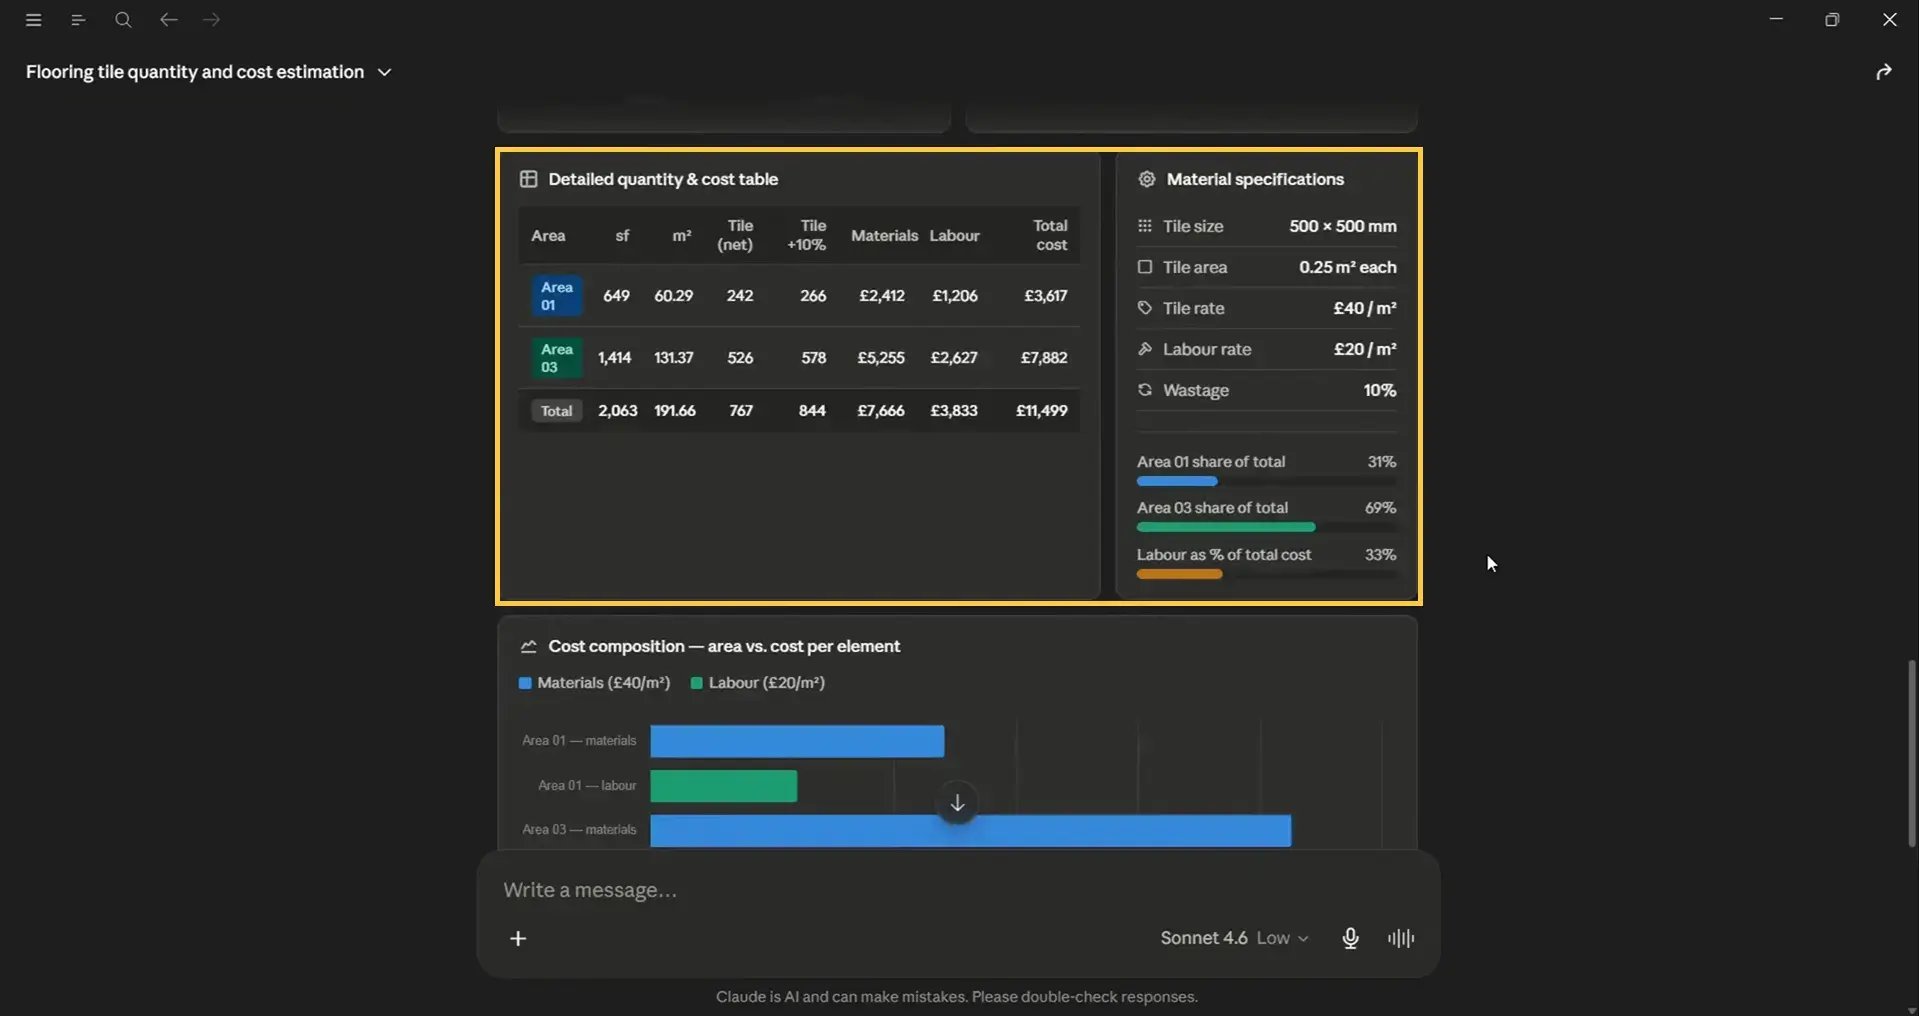
Cost Breakdown Table
The same structured table from the estimation output is reproduced within the dashboard in a cleaner, formatted layout, with material specifications displayed alongside the cost schedule.
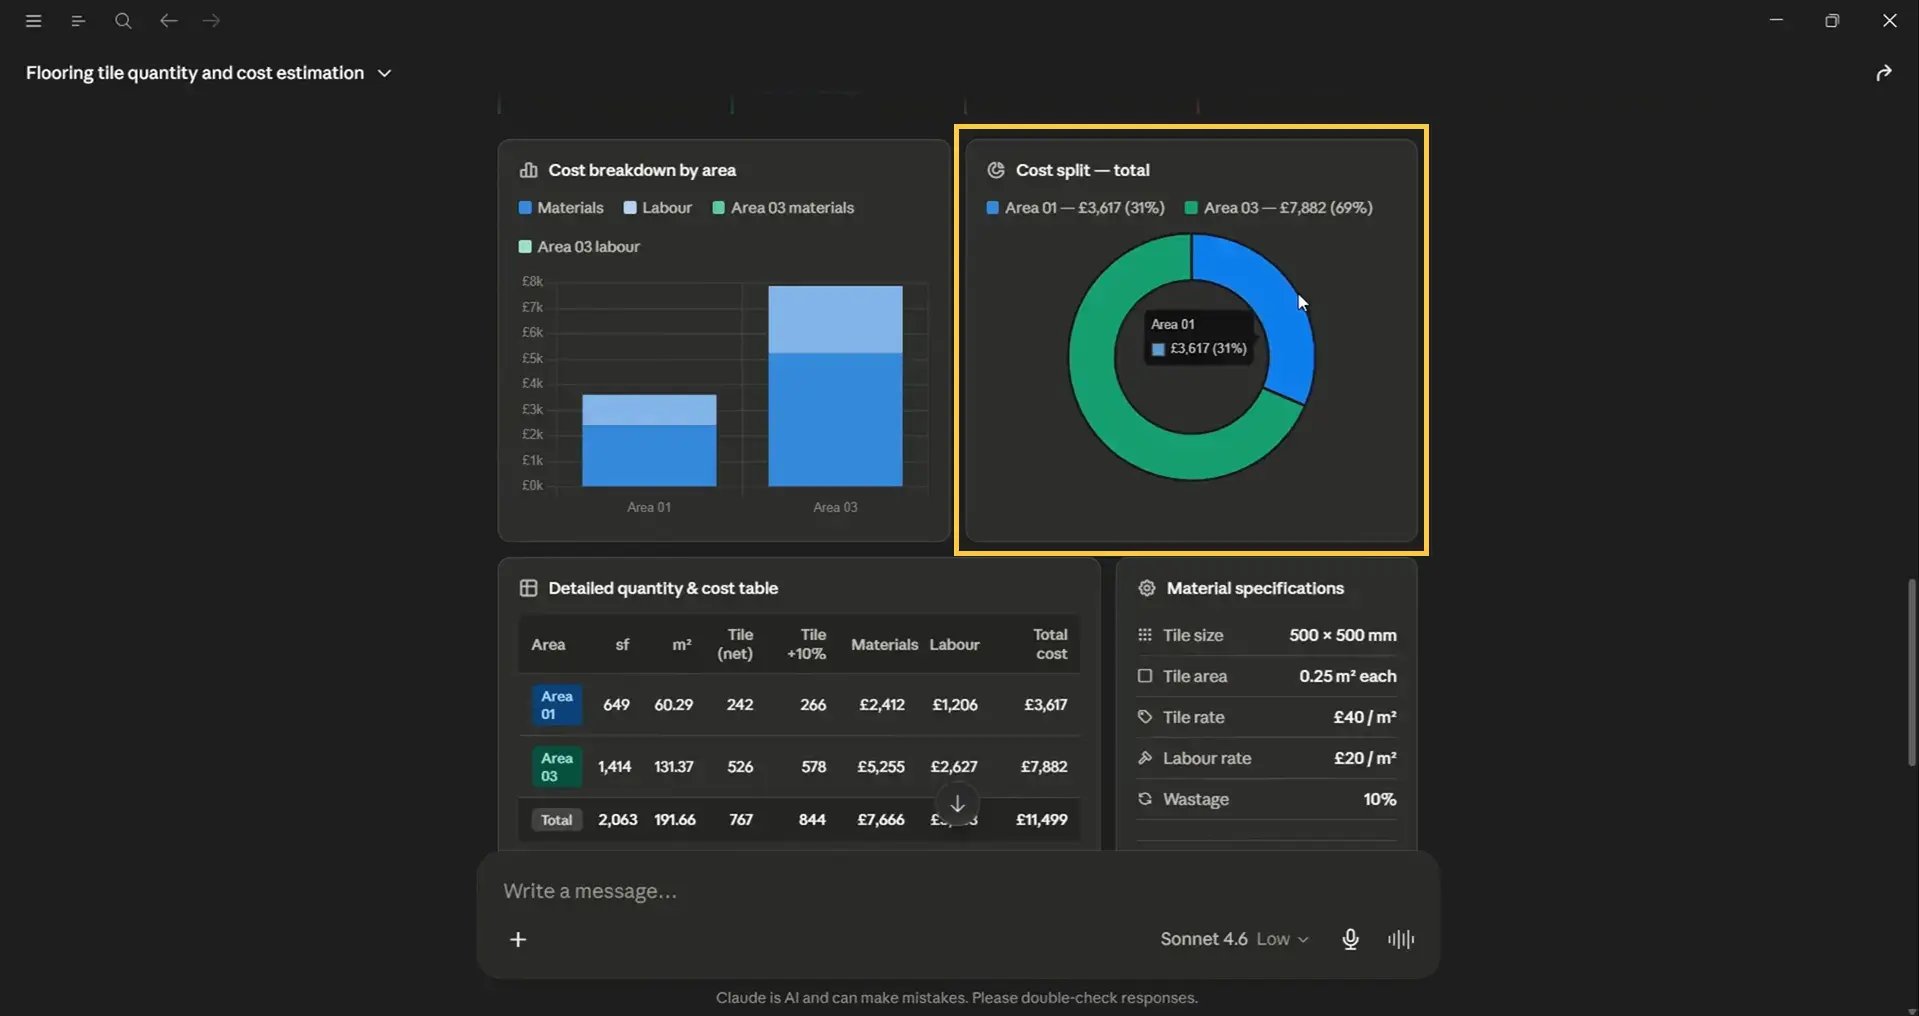
Donut Chart: Cost Split by Area
A donut chart illustrating the proportional cost contribution of each measured region. In the flooring example, our Flooring Area 01 accounts for approximately 30% of the total cost, and Flooring Area 03 accounts for approximately 70%.
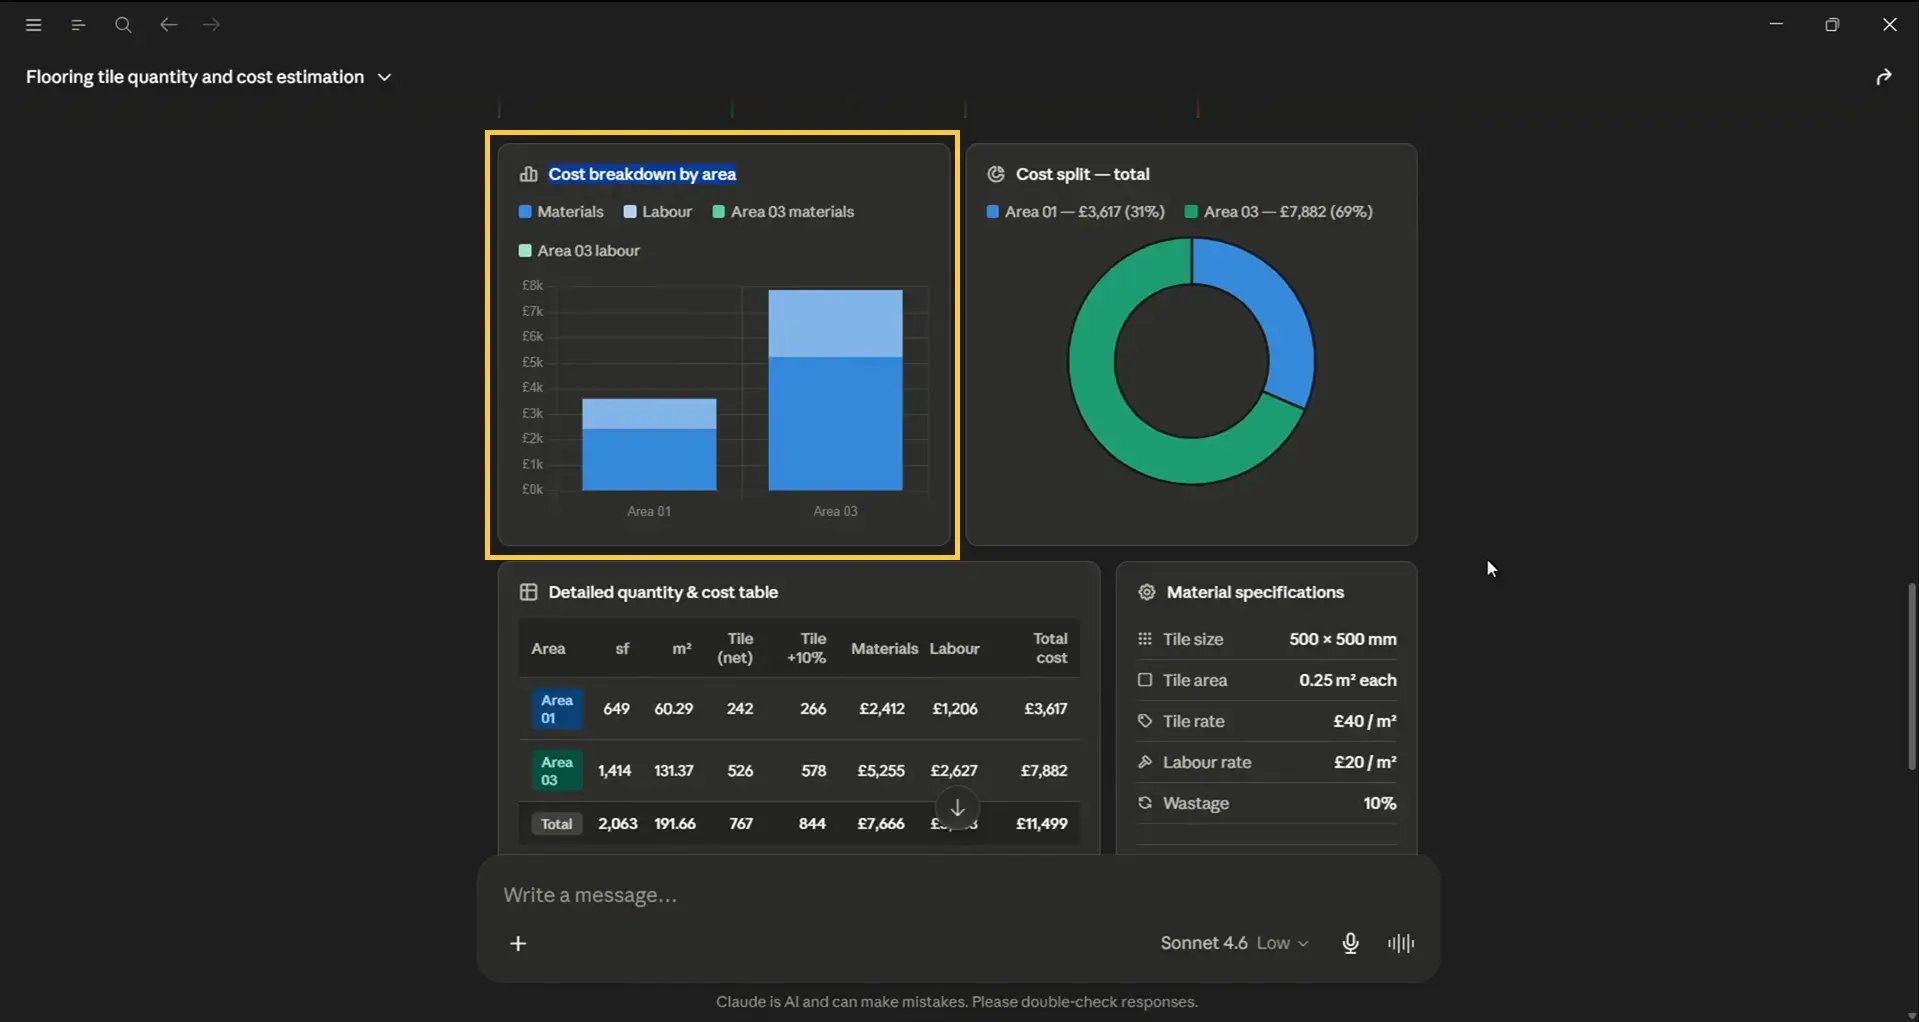
Bar Chart: Material and Labour Cost (Cost Breakdown) by Area
A grouped bar chart showing material cost and labour cost side by side for each area, allowing quick visual comparison across regions.
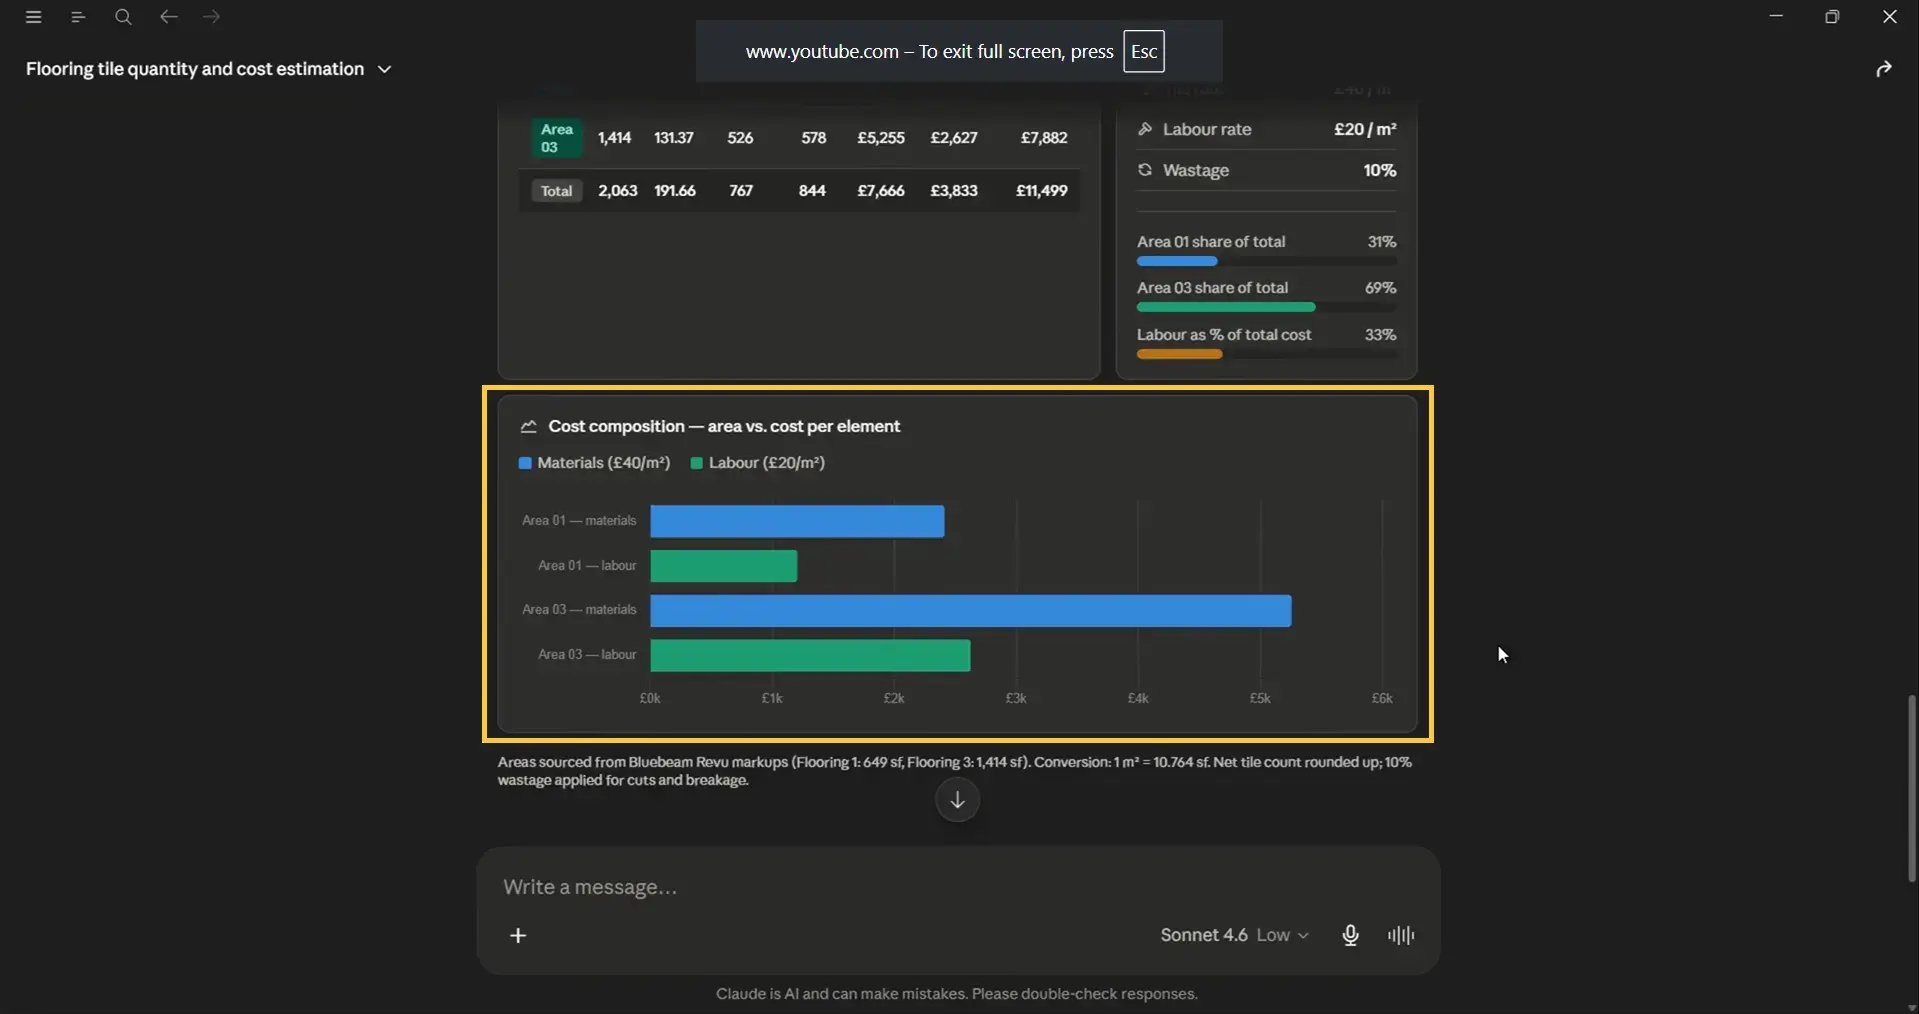
Cost Composition Chart
We also got a cost composition breakdown showing cost per element (for material and labour) for each area division.
Prompting Best Practices to Avoid Miscalculations or Wrong Interpretations
Remember, the reliability and accuracy of results depend on how well you explain your prompt to Claude. When you use the prompt templates provided in this guide, follow the following best practices to avoid miscalculations and limit the mistakes of AI.
AI tools are prone to errors and misjudgments. So cross-check all the results before making a final decision. Also, do not forget to tailor the provided prompts to match your specific requirements.
-
Be Explicit About Markup Labels
Claude reads markup labels via MCP exactly as they appear in the Revu Markups List. If a label contains a typo, extra space, or different capitalisation, Claude will be unable to locate the markup and will report an error or make an assumption. Always verify labels in the Markups List before submitting the prompt.
Correct:
Areas: [Flooring Area 01, Flooring Area 03]
Incorrect (typo in label):
Areas: [Flooring area 1, Flooring Area 3]
-
Specify the Measurement Unit in Revu
It is better to declare the unit in which Revu has recorded the measurements. If the Revu file was calibrated to imperial drawings, measurements will be in square feet. If calibrated to metric, they will be in square metres. Although Claude can judge it on its own, mismatching this parameter may result in incorrect conversions.
-
Adjust Wastage for Pattern and Shape Complexity
The default wastage factor of 10% is appropriate for straight-laid square or rectangular tiles in regular room shapes. Increase the wastage factor in other conditions or your specific workflow requirements.
-
Use the Optional Fields for More Accurate Outputs
Supplying the Tiles per Pack parameter enables Claude to calculate how many boxes or packs to order. Supplying the Grout Joint Width parameter enables Claude to estimate grout quantities. Both of these fields eliminate the need for additional manual calculation after the estimate is generated.
-
Reference Only the Markups You Need
You do not need to reference every markup in the Revu file. Specify only the labels relevant to the current estimation. This reduces processing time and keeps the output focused. In the tutorial example, Flooring Area 02 was deliberately excluded because it was not part of our scope. It will also save your Claude tokens with each prompt.
-
Iterate and Refine
Claude supports follow-up prompts within the same conversation. After the initial estimate is returned, you can send follow-up instructions such as:
- Recalculate using a wastage factor of 15%.
- Add Flooring Area 02 to the estimate and update all totals.
- Change the tile price to 45 per sq m and show the revised total.
Each follow-up is processed in context, so you do not need to resubmit the full prompt.
-
Request Transparency for Audit Purposes
Always include " Show all calculations transparently" in the OUTPUT REQUIREMENTS block of your prompt. This ensures that every intermediate step is visible, which is important when the output will be reviewed by you, your team member, project manager, or auditor.
Disclaimer: AI can make mistakes. It is highly recommended not to rely 100% on AI calculations and results. Always double-check and validate your results manually.
Troubleshooting and Common Issues
If you face any issues or errors in Claude or the results are showing wrong calculations, ensure and fix the following:
|
Issue |
Likely Cause |
Resolution |
|
Claude cannot find the markup |
The label in the prompt does not match the Markups List exactly |
Check capitalisation, spacing, and numbering in the Markups List and update the prompt accordingly |
|
Unit conversion appears incorrect |
Wrong value in the "Measurement Unit in Revu" field |
Confirm the unit displayed in the Markups List and update the prompt |
|
Tile count seems too high or low |
Tile size entered in wrong units (e.g., metres instead of mm) |
Confirm that tile dimensions are entered in millimetres |
|
Pack count is not shown |
Tiles per Pack was left blank or marked as Optional |
Enter a numeric value for Tiles per Pack |
|
Dashboard not generated |
The dashboard request line was omitted from the prompt |
Add the final line of the template requesting the GUI dashboard as a follow-up prompt |
|
Revu does not refresh during analysis |
MCP connection has dropped or timed out |
Restart Claude Desktop, confirm the Bluebeam MCP server is active, and reopen the Revu file |
|
Output totals do not match the manual check |
Rounding applied at intermediate steps |
Request Claude to "show all intermediate values before rounding" to identify where rounding has been applied |
Unit Conversion Factors - For Quick Reference
For more accuracy and peace of mind (not necessary), you can delegate and remind Claude of the following unit conversions to avoid errors (especially if it's repeating any calculation mistakes).
|
From |
To |
Multiply By |
|
Square feet (sq ft) |
Square metres (sq m) |
0.0929 |
|
Square metres (sq m) |
Square feet (sq ft) |
10.764 |
|
Square inches |
Square centimetres |
6.452 |
|
Linear feet |
Linear metres |
0.3048 |
|
Linear metres |
Linear feet |
3.281 |
|
Cubic feet |
Cubic metres |
0.0283 |
|
Cubic metres |
Cubic feet |
35.315 |
|
Millimetres |
Metres |
0.001 |
|
Inches |
Millimetres |
25.4 |
Work Smarter and Faster with AI-Supercharged Bluebeam Max
This is how you can use Claude with Bluebeam Max to perform AI-assisted cost and quantity estimates with a full visual dashboard for reporting and analysis.
The Claude integration is available only to Bluebeam Max users. The new AI-supercharged Bluebeam MAX also comes with other AI features and capabilities, including Stitching, Magic Markups (Convert, Duplicate, and Offset), Smart Review, and Smart Overlay. You can also use Connection Studio sessions with Revit to bridge the gap between your 2D and 3D workspace.
Try Max free for 14 days. No credit card or reinstallation needed.
We will create more guides and tutorials to help you get up and running with the new product. You can explore our Bluebeam Knowledge Base for more Bluebeam guides. Stay connected withBrighter Graphics, your trusted Bluebeam partner in the UK, Europe, and the Middle East.