Custom Columns are among the most powerful and practical features in Bluebeam Revu for performing complex calculations, quantity takeoffs, and cost estimation. Traditionally, creating custom columns requires manually configuring text, numeric, choice, or formula columns through the Manage Columns section in Revu’s Markups List before you can begin using them.
With Bluebeam Max and Claude integration, you can notably speed up this process. Instead of manually building every custom column, you can simply describe your workflow in natural language prompts and let Claude create the required columns, configure formulas, and automatically prepare your Markups List for further calculations.
The best part is that the calculations themselves still happen inside Bluebeam Revu.
Most Bluebeamers hesitate to fully rely on AI for complex calculations and estimation jobs. So this is a middle ground for integrating Claude into your workflow without entirely relying on AI calculations, which are prone to errors.
Claude simply builds the workflow for you in your native Revu environment. Once the columns are created, Revu performs all calculations using its built-in formula engine, providing complete transparency and allowing you to verify every formula and calculation.
In this guide, you'll learn how to use Claude to create custom columns using Claude, populate calculation values, and verify with a simple visual example that every formula is working correctly inside Revu.
Step-by-Step Guide to Creating Custom Columns in Bluebeam Using Claude
Before getting started, remember that Claude integration requires a Bluebeam Max subscription and that your Revu is upgraded to version 21.9 or later. If you have not upgraded yet, request a 14-day free trial of Bluebeam Max.
Before getting started, make sure Claude is connected to Revu.
Once connected, Claude can create custom columns, update markups, populate values, and perform many other tasks directly within your Revu session.
Step 1: Open Your PDF Drawing
Begin by opening the PDF containing the measurements you want to analyse.
- Open Bluebeam Revu on your desktop.
- Go to File > Open.
- Open the PDF containing your Area measurements.
For this example, we are using a drawing that already contains three Area measurements.
Step 2: Ask Claude to Create Your Custom Columns
Instead of manually going to Manage Columns and configuring every column individually, ask Claude to create them for you.
For the workflow in this example, we need three custom columns:
- Tile Size (Text)
- Tile Area (Number)
- No. of Tiles (Formula)
We will use Claude to:
- Convert every Area measurement to square millimetres.
- Create the specified custom columns, explaining their types and scope.
- Configure the formula column (No. of Tiles) based on values from the Measurement and Tile Area columns.
- Set decimal place accuracy for the Formula column.
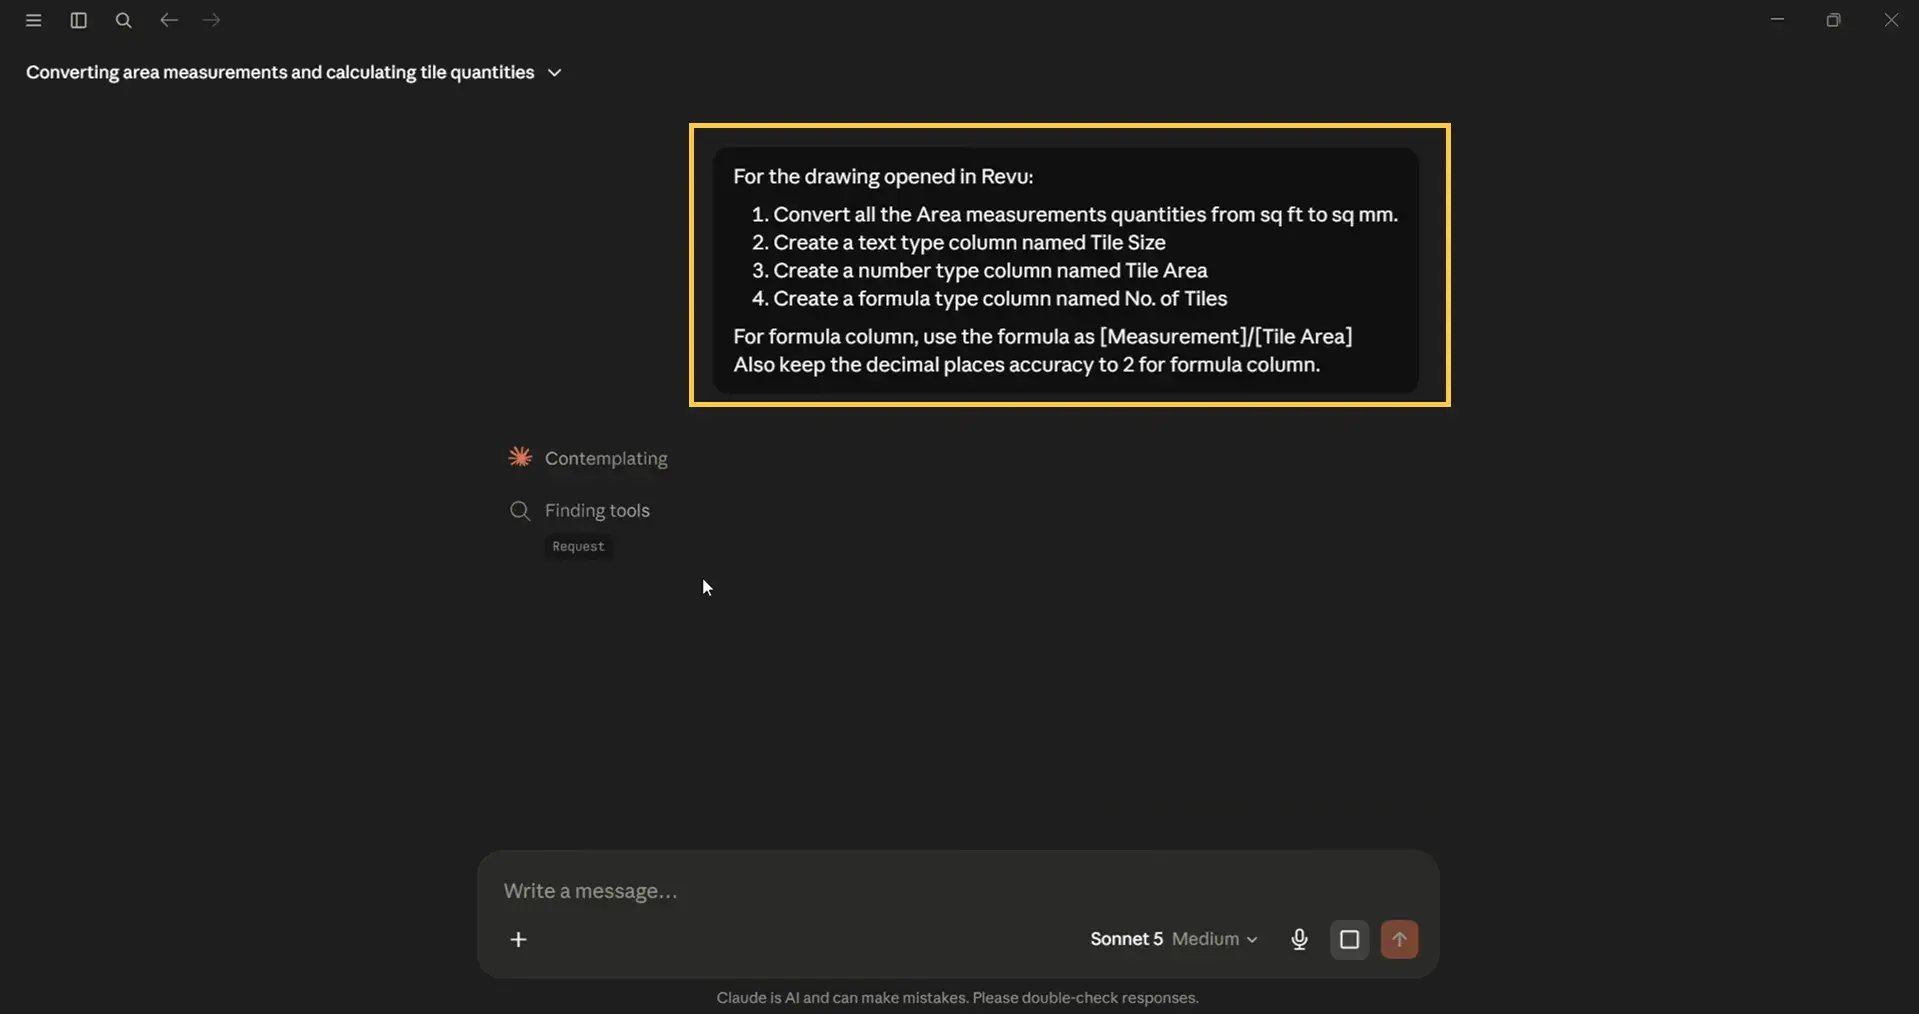
(Prompt template added at the end of this guide).
Once Claude completes the task, we will return to Revu.
We should now see:
- Area measurements converted to mm².
- Three new custom columns.
- The formula column ready to perform calculations.
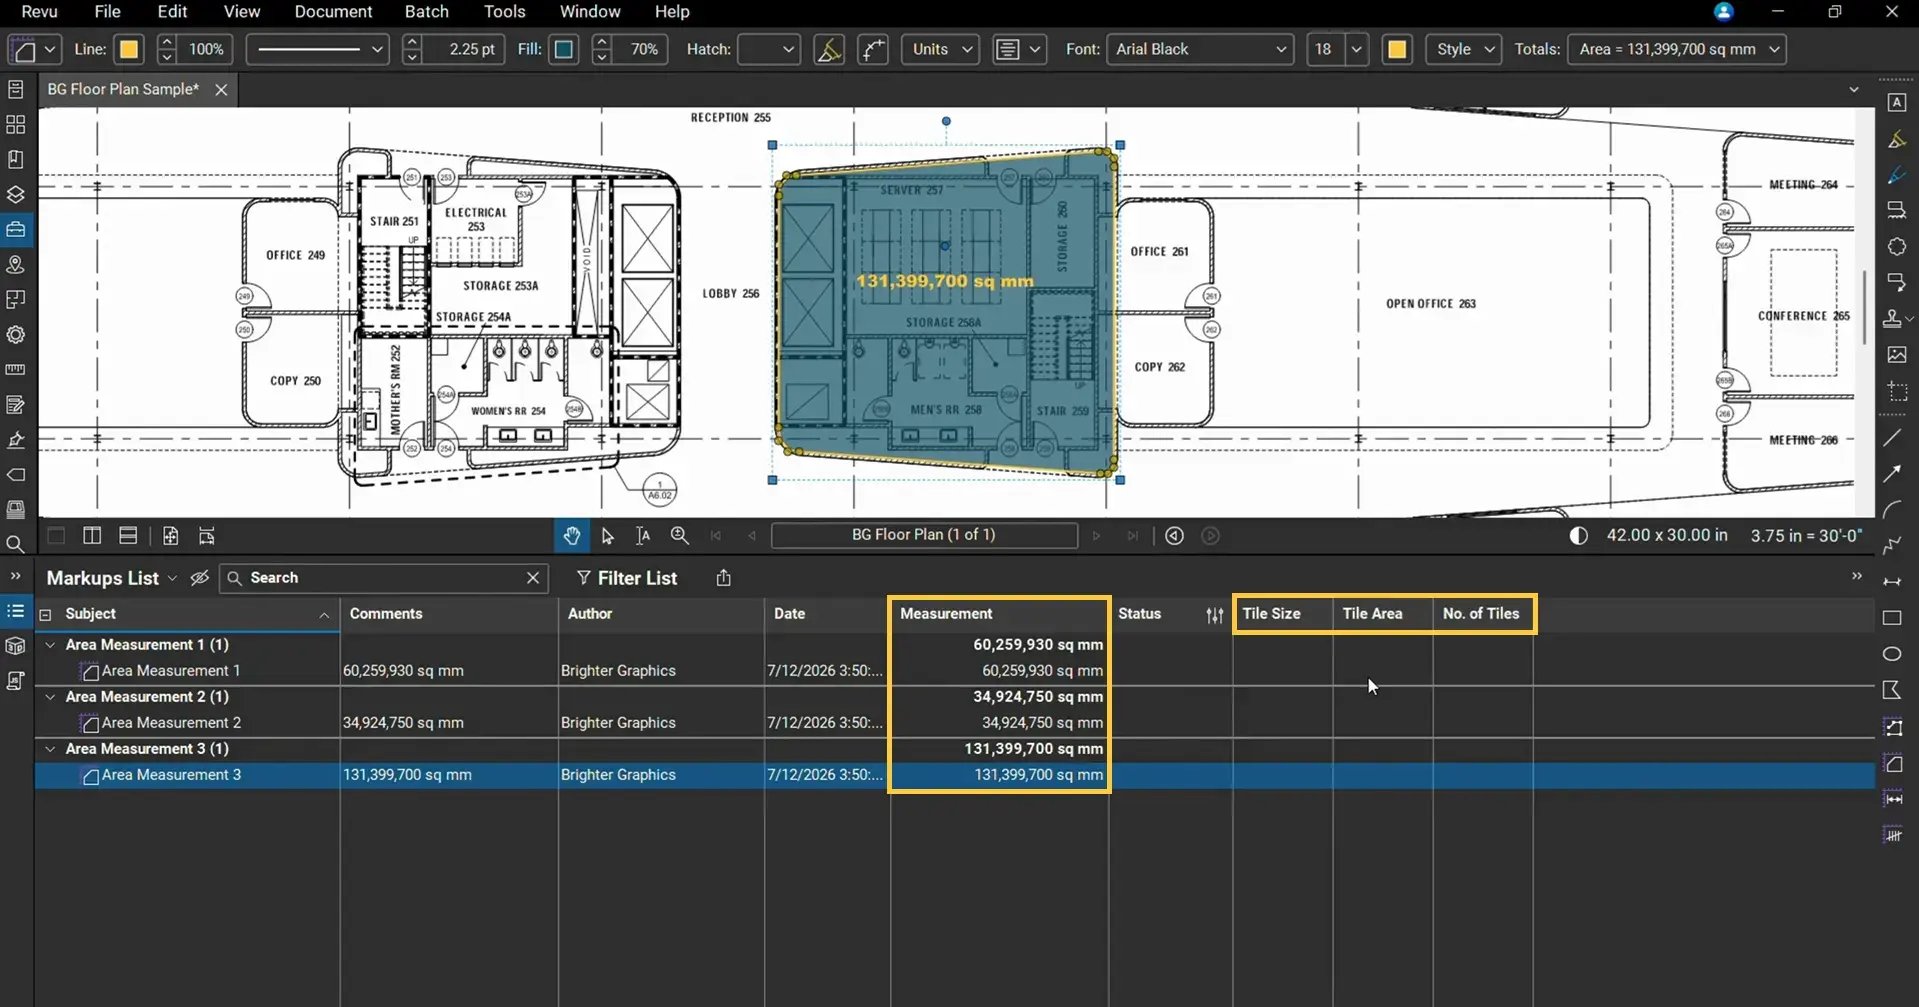
Next, we will enter the Tile Size input values to populate the Tile Area column, which will be used further by the No. of Tiles column with the Measurement column value to calculate the number of tiles.
Step 3: Enter the Required Input Values
Now, the Measurement value is our Revu input value calculated as Area Measurement, whereas the Tile Size column serves as user input and is mandatory for calculating the Tile Area required to find the number of tiles (Measurement/Tile Area).
Enter the tile dimensions for each Area measurement.
For example:
|
Area Measurement |
Tile Size |
|
Area 1 |
400 × 400 mm |
|
Area 2 |
600 × 600 mm |
|
Area 3 |
300 × 600 mm |
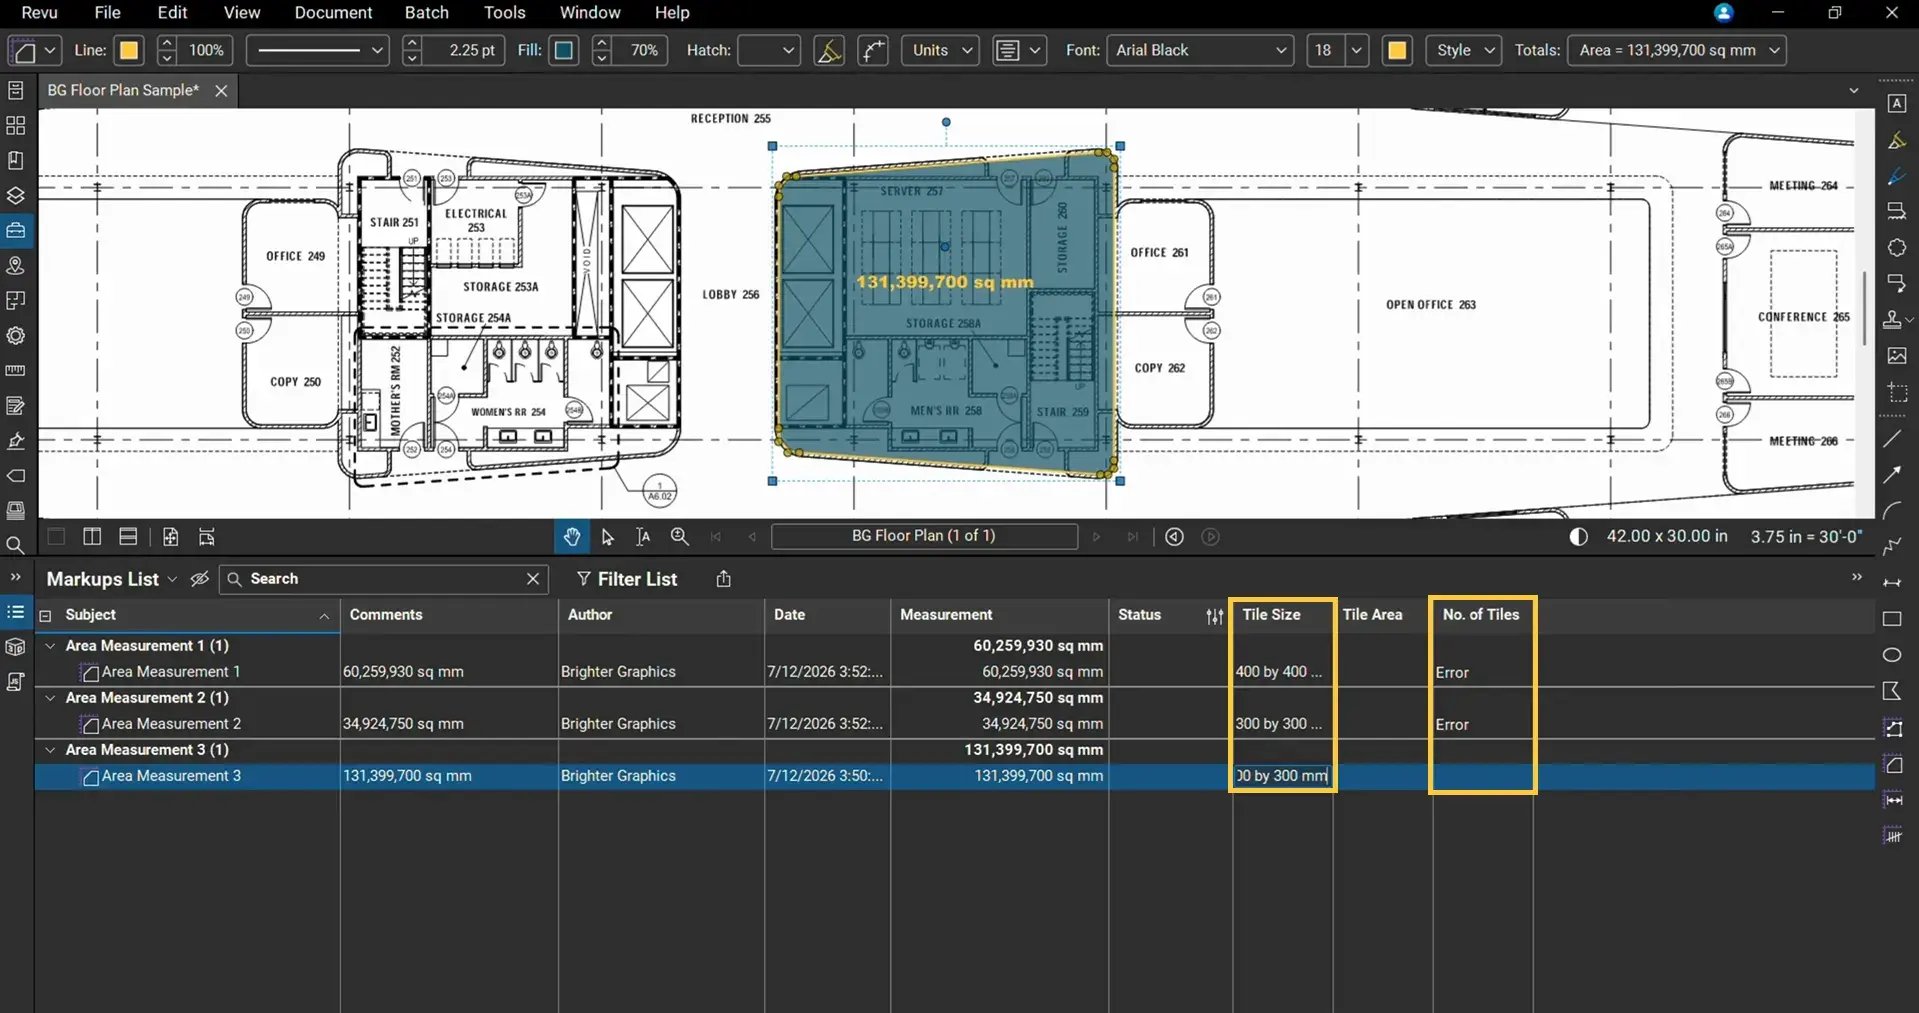
At this stage, the No. The Tiles column may display placeholder values or errors because the Tile Area column (the value we are using in our formula for the No. of Tiles column) has not yet been populated.
This is expected and obvious Revu behaviour.
Step 4: Ask Claude to Populate the Tile Area Column
Now ask Claude to read each Tile Size value, calculate its area, and populate the Tile Area column with the calculated area values.
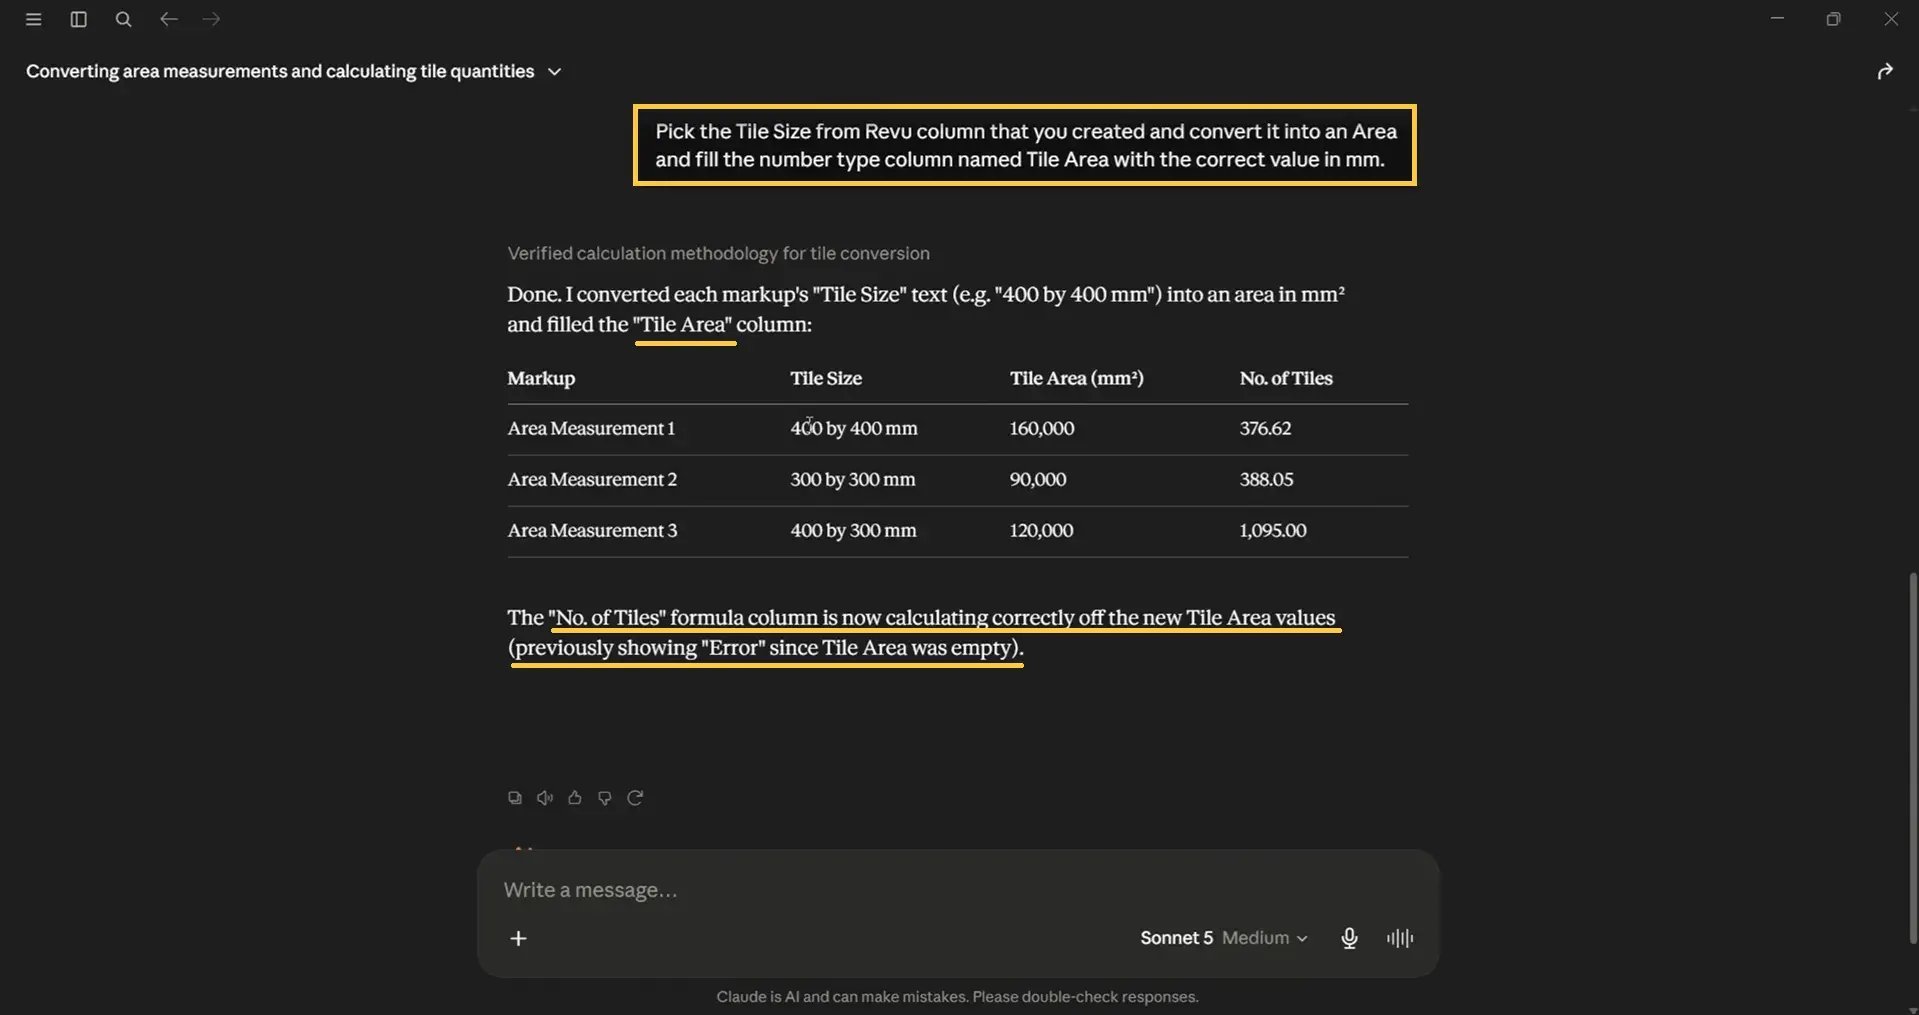
Claude reads every Tile Size entry, calculates the corresponding tile area, and writes the result into the Tile Area numeric column (it will also display the calculations in the Chat)
For example:
|
Tile Size |
Tile Area |
|
400 × 400 mm |
160,000 mm² |
|
600 × 600 mm |
360,000 mm² |
|
300 × 600 mm |
180,000 mm² |
(Prompt template added at the end of this guide).
Once these values appear in the Tile Area column, the No. of Tiles formula immediately updates.
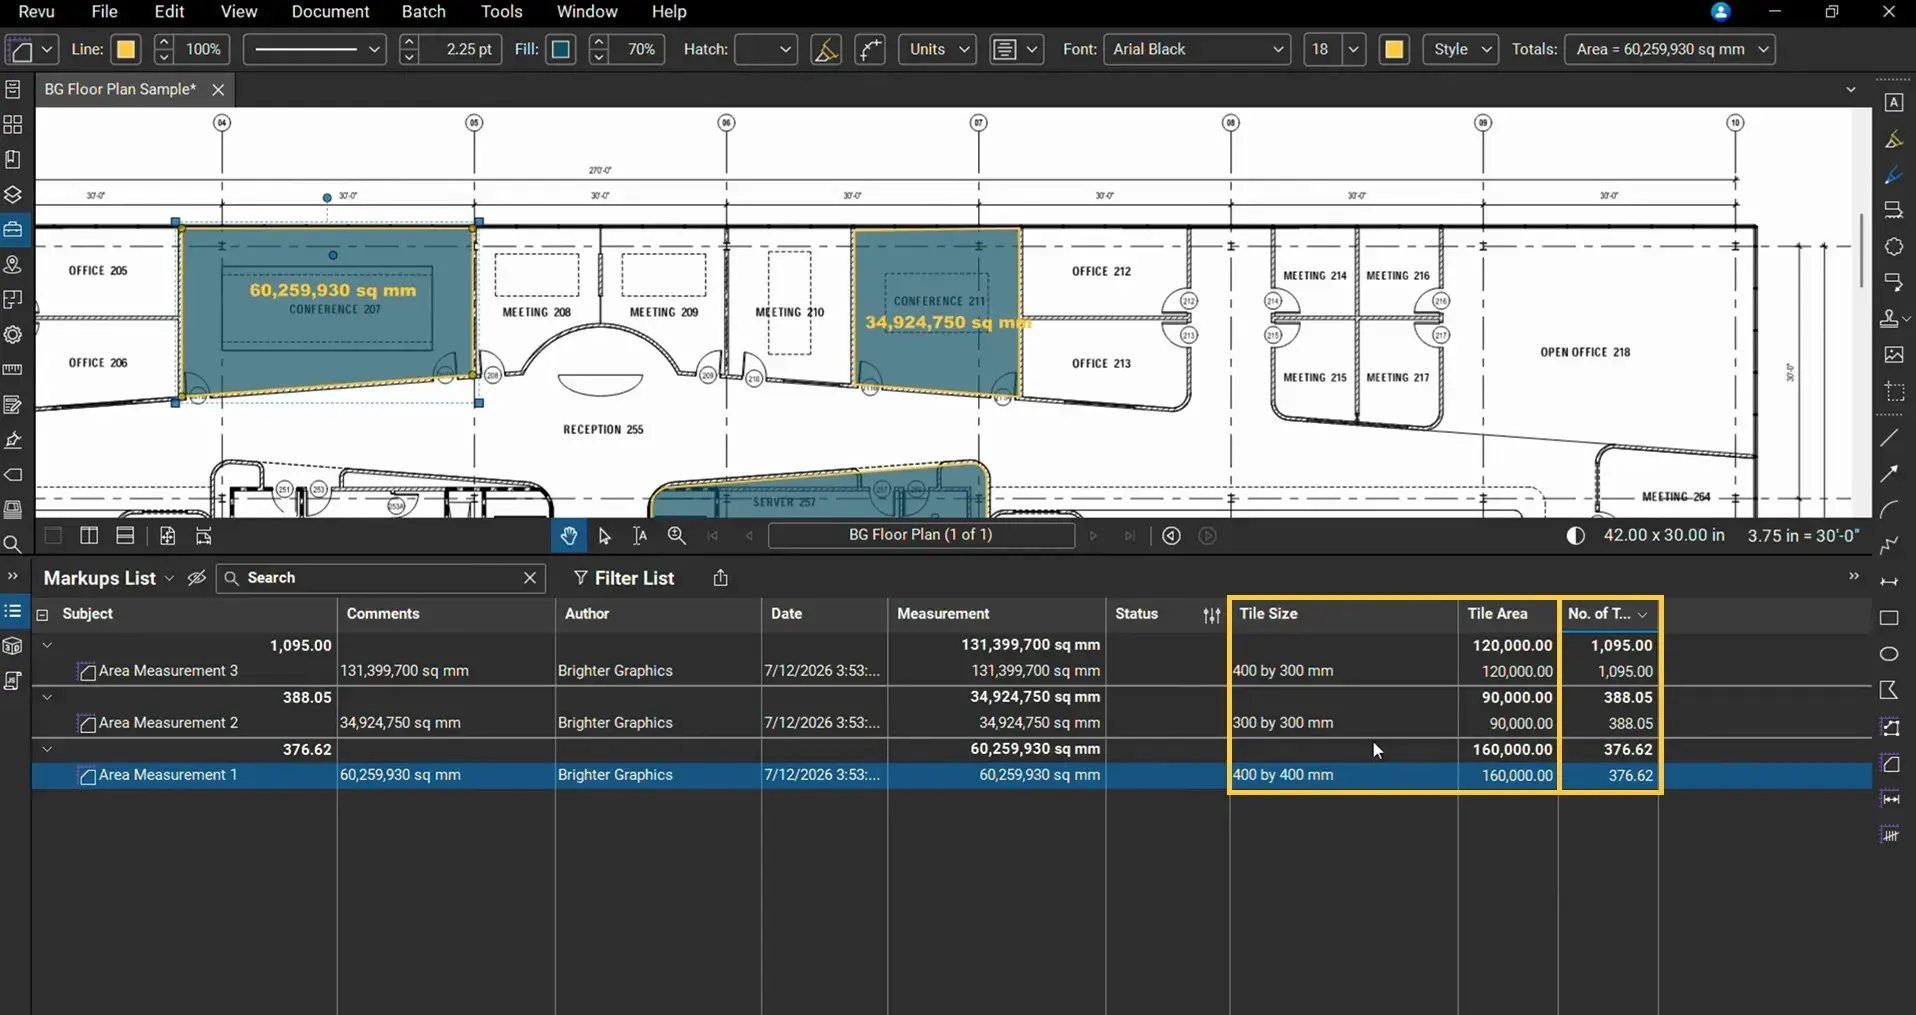
Notice that you are not entirely relying on Claude to perform the final quantity calculation.
Instead:
- Claude populated the Tile Area values using the Tile Size column.
- Revu performed the mathematical calculations automatically through its Formula column.
- The calculations appeared in the formula column No. of Tiles.
This keeps the workflow transparent and fully auditable within your native Revu environment. No need to rely fully on Claude.
Step 5: Review the Formula Inside Revu
Open the Markups List.
Click the Manage Columns option.
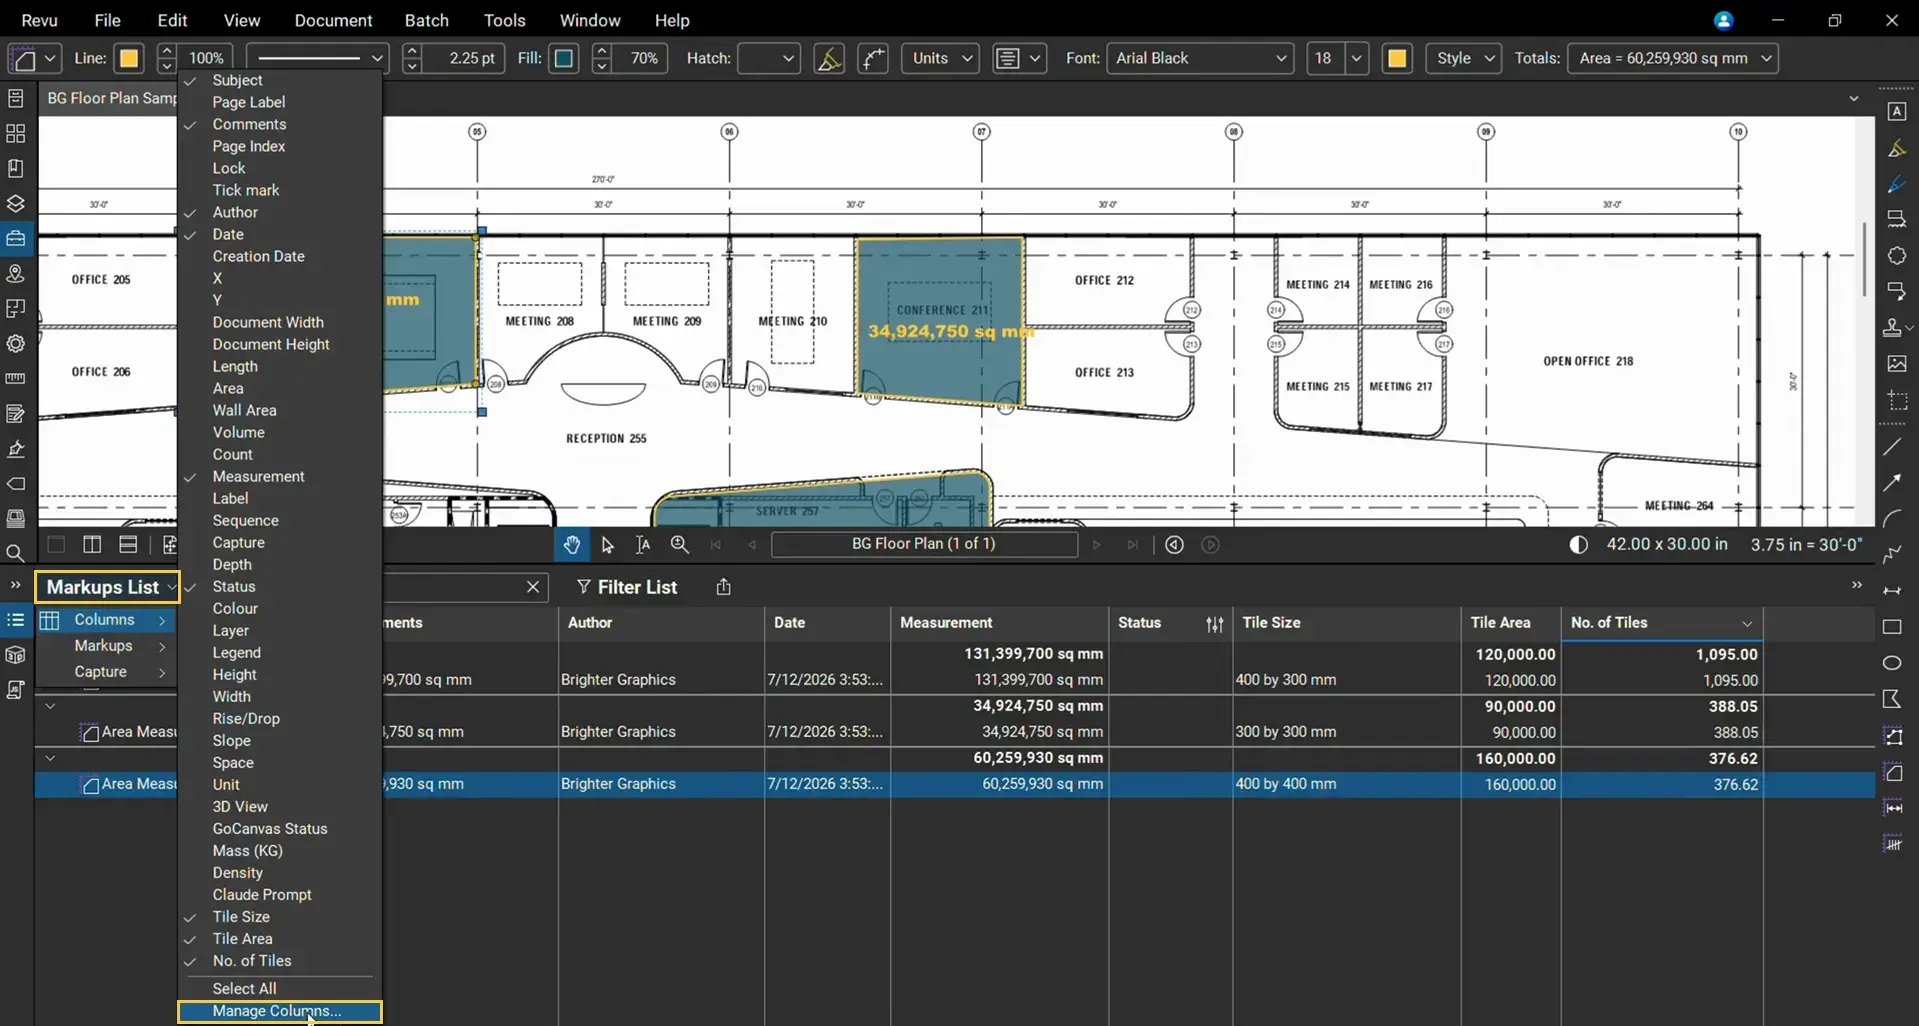
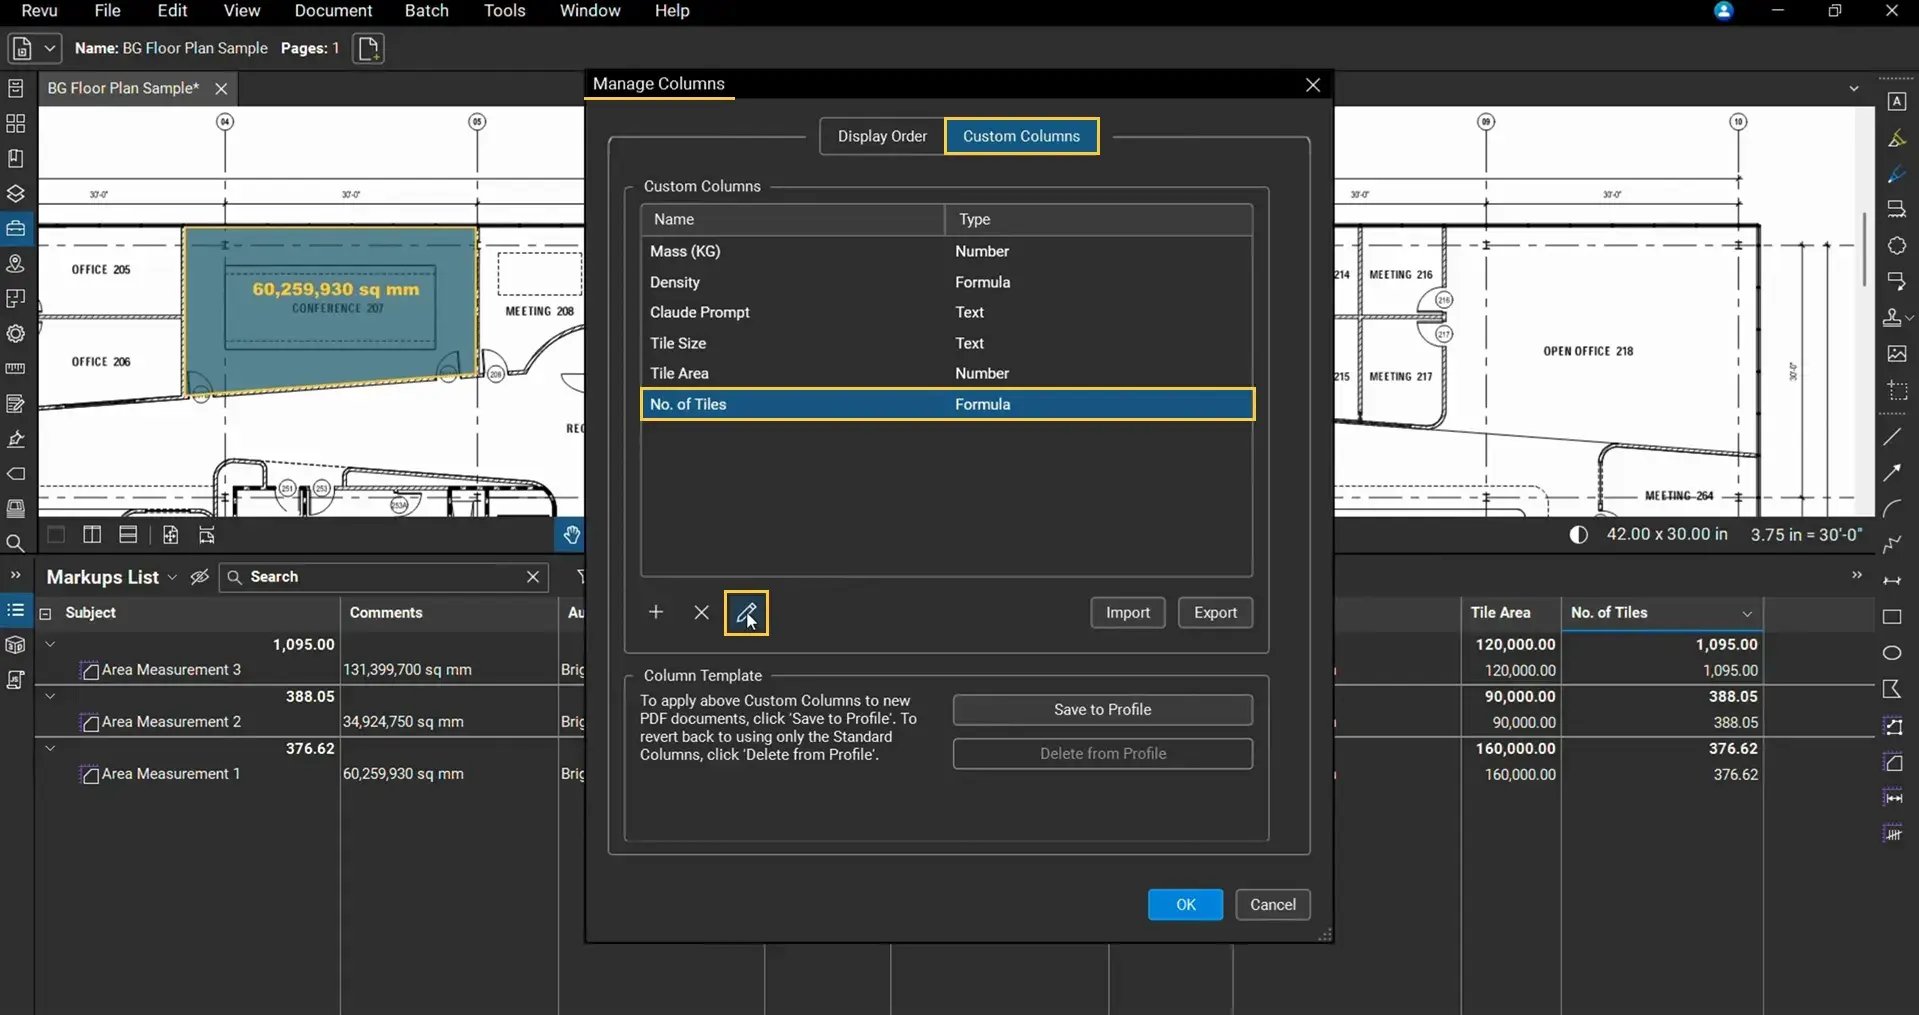
In the Manage Columns dialog box, go to the Custom Columns tab.
Locate the No. of Tiles column and select Edit.
You can now review the formula created by Claude.
In this example, the formula divides the Measurement column values by the Tile Area column values.
Measurement / Tile Area
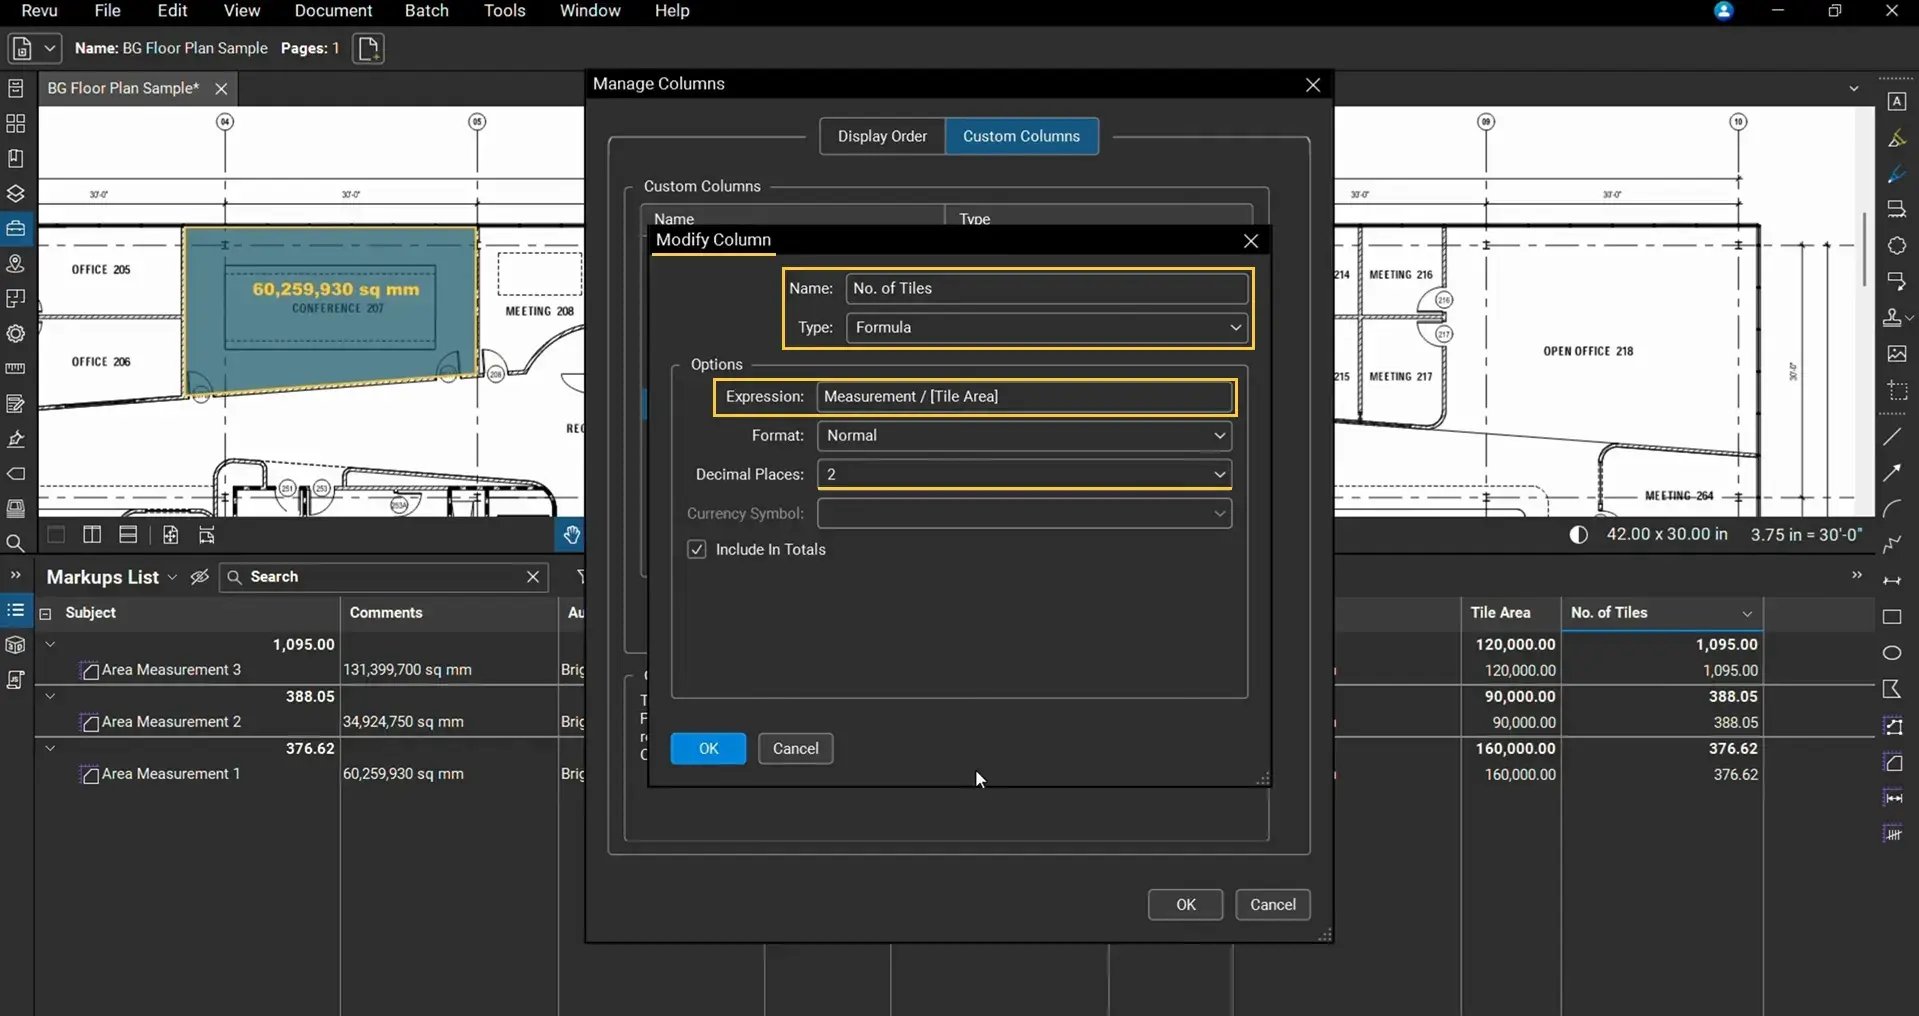
Because the calculation is performed by Revu itself, you can edit, customise, or reuse the formula at any time.
Similarly, you can verify the column types for other columns that you create using Claude.
Verify the Workflow Inside Revu
Although Claude creates the workflow, it is always good practice to verify the results independently.
One simple way to validate the calculation is by creating a known test case.
Create a Verification Area
Ask Claude to create two new Area measurements anywhere on your PDF with dimensions:
- 2,000 × 2,000 mm
- 400 × 400 mm
The larger area equals:
4,000,000 square mm
The smaller area represents a single tile:
160,000 square mm
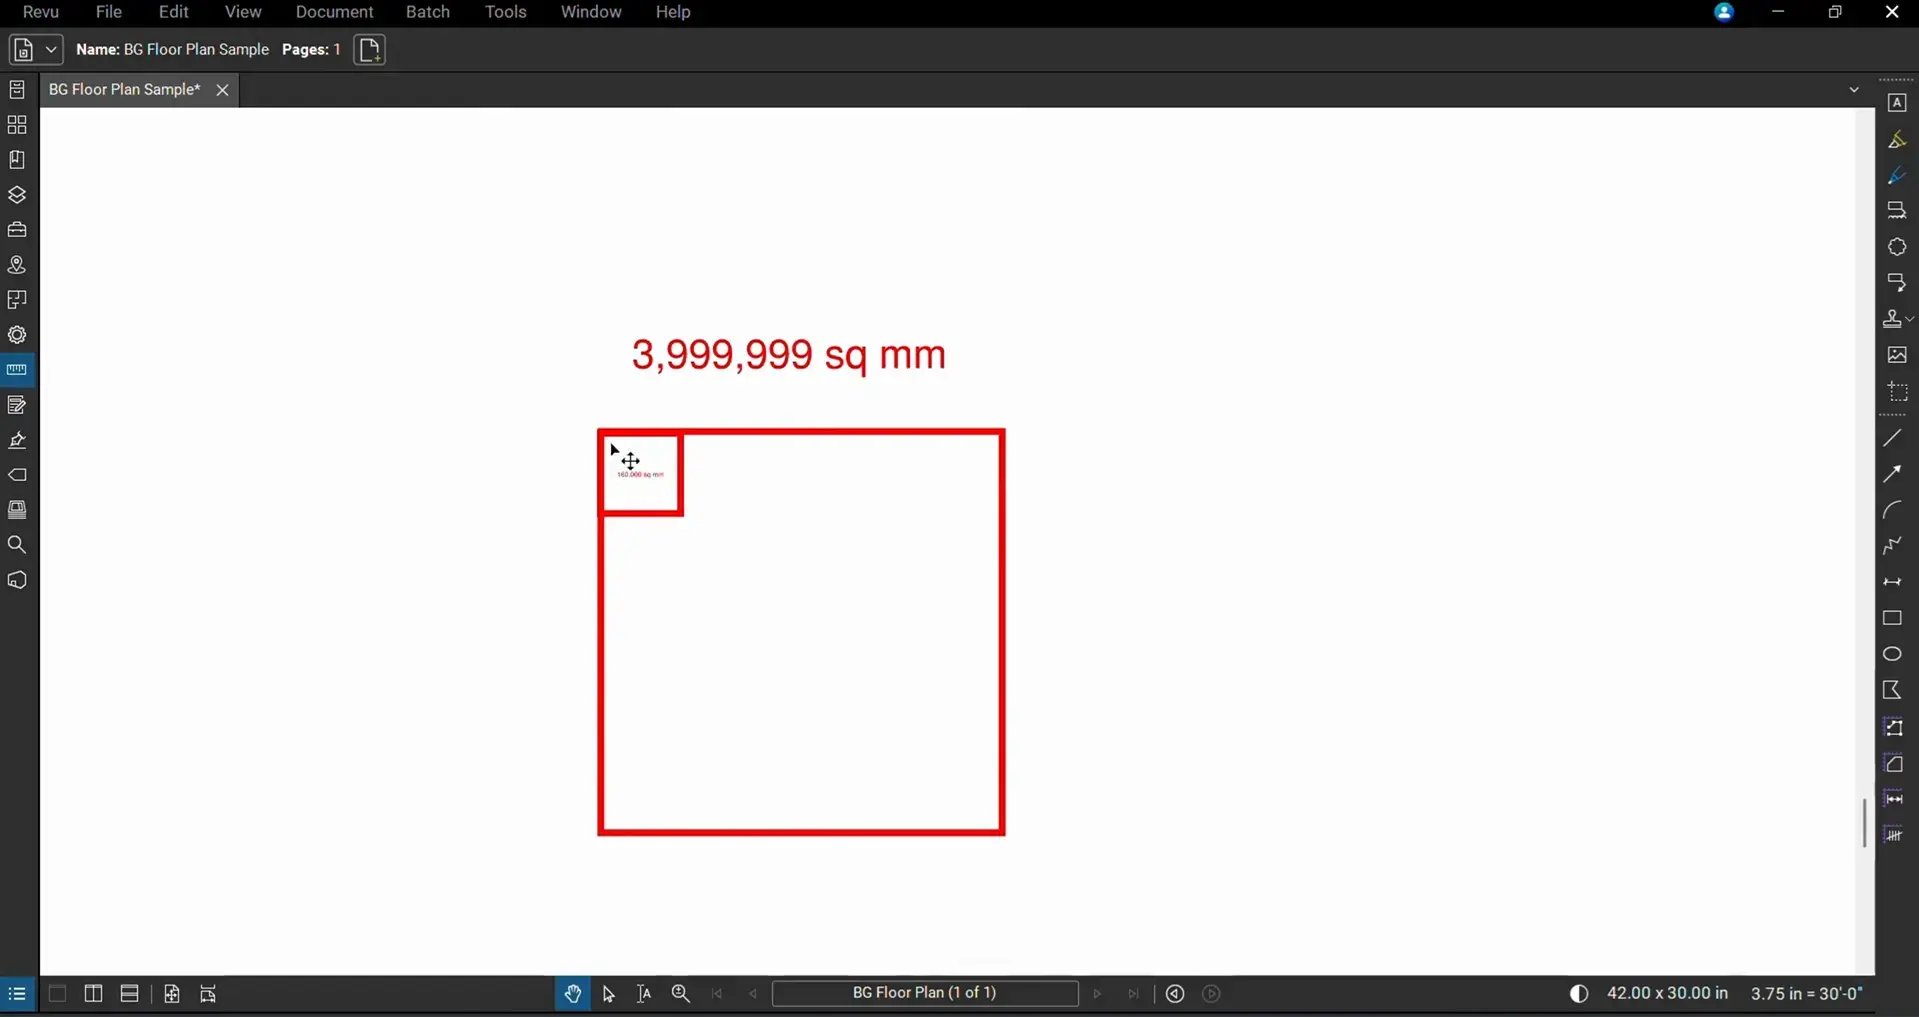
Multiply the Smaller Tiles
Adjust the smaller tile inside the larger one. Then, right-click the smaller tile and choose Multiply.
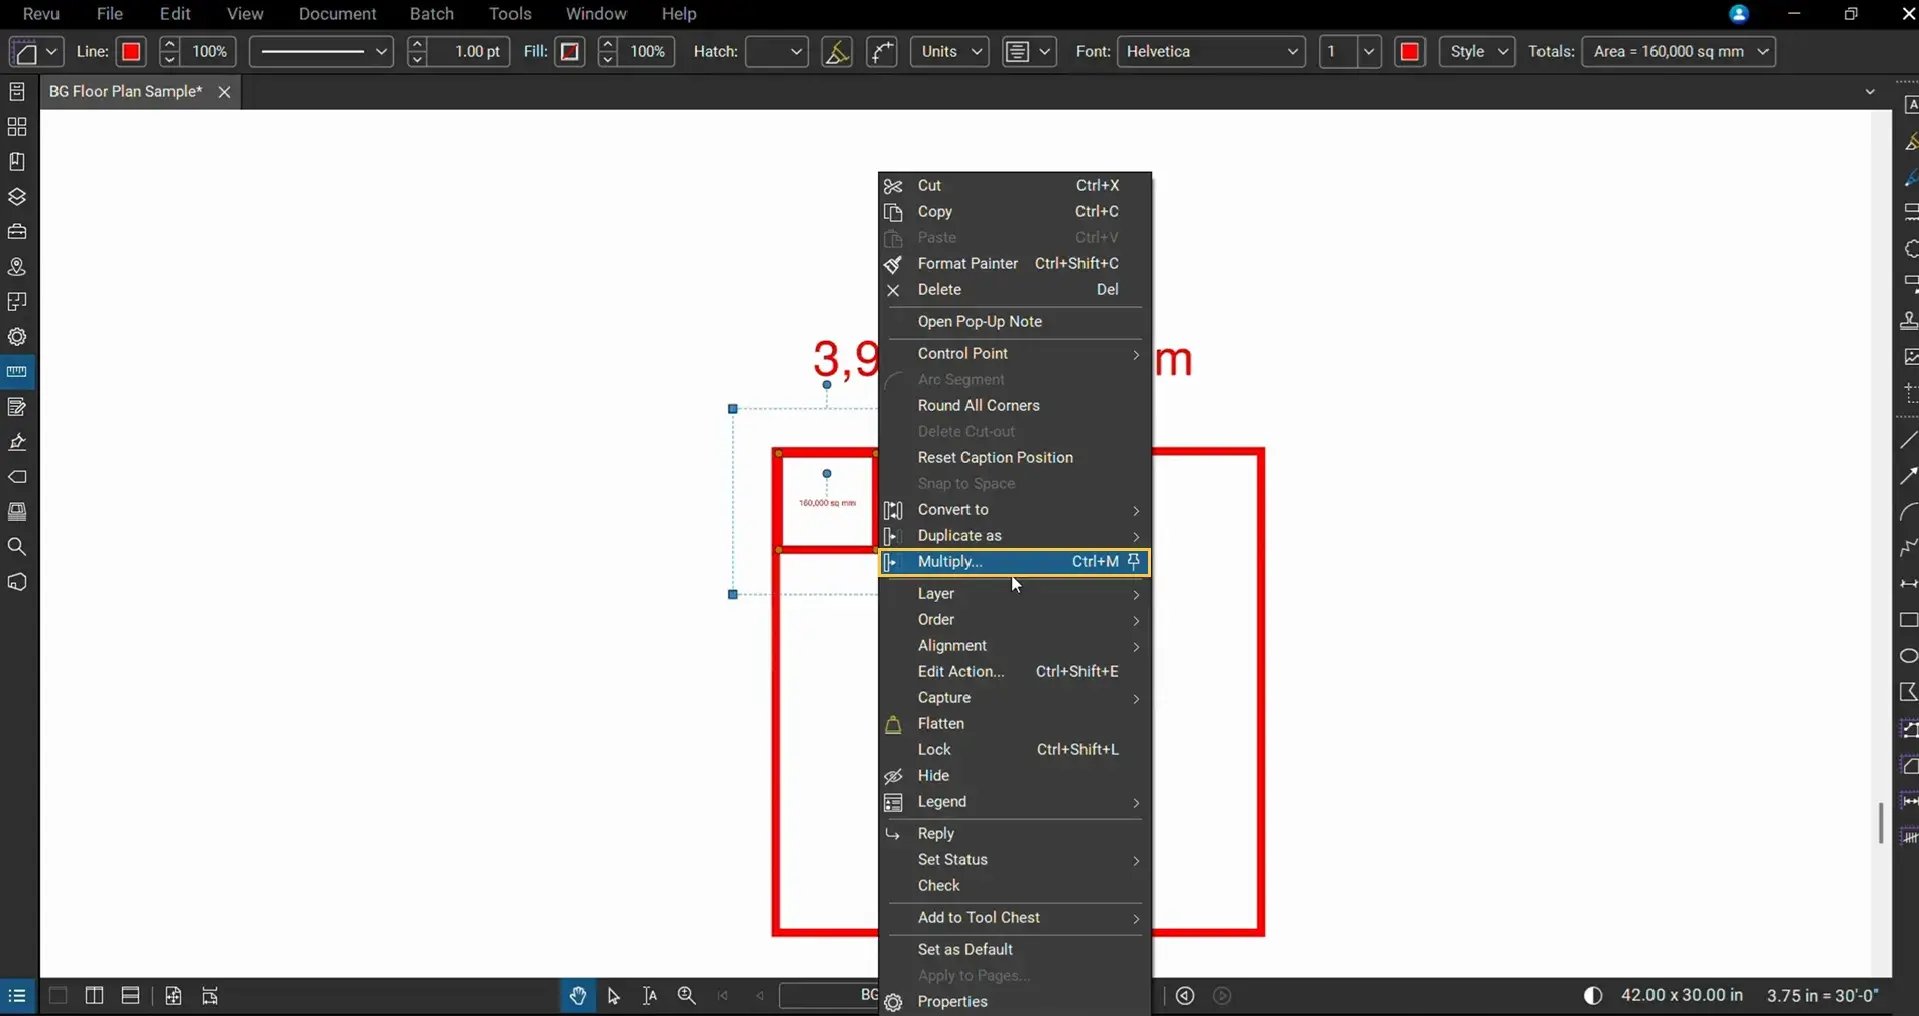
Configure the Multiply command so the spacing equals the tile width. Create 4 more copies, and set the direction to Right (Horizontal Expansion) or Left if your first tile is in the right corner of the larger tile. Once done, click OK.
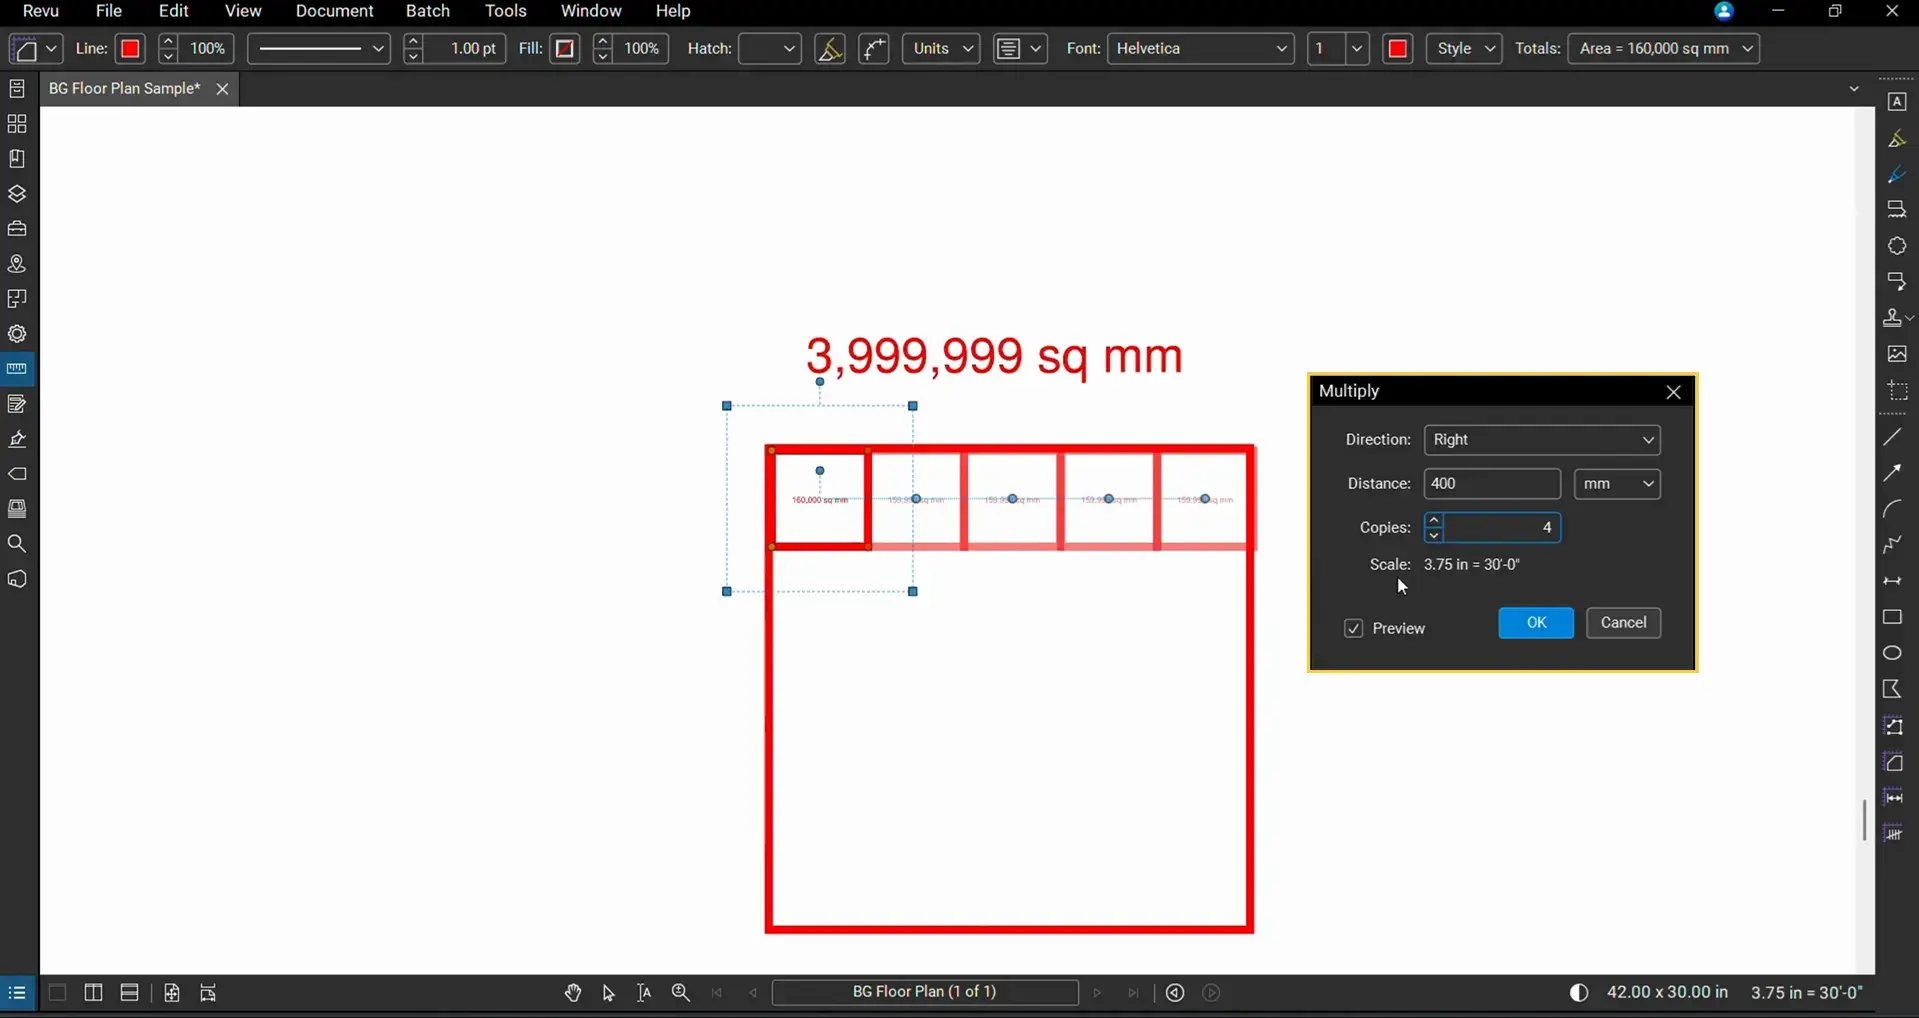
It will multiply your 1st smaller tile to create 4 more copies, each spaced 400 mm apart (smaller tile width), resulting in 5 tiles arranged horizontally inside the larger tile.
Repeat the operation to fill the large tile vertically. Select the entire horizontal set of smaller tiles, right-click, then Multiply.
Set the multiplying direction to Down (Vertical Expansion), 4 copies for each of the 5 tiles, click OK, and the entire larger area will be filled.
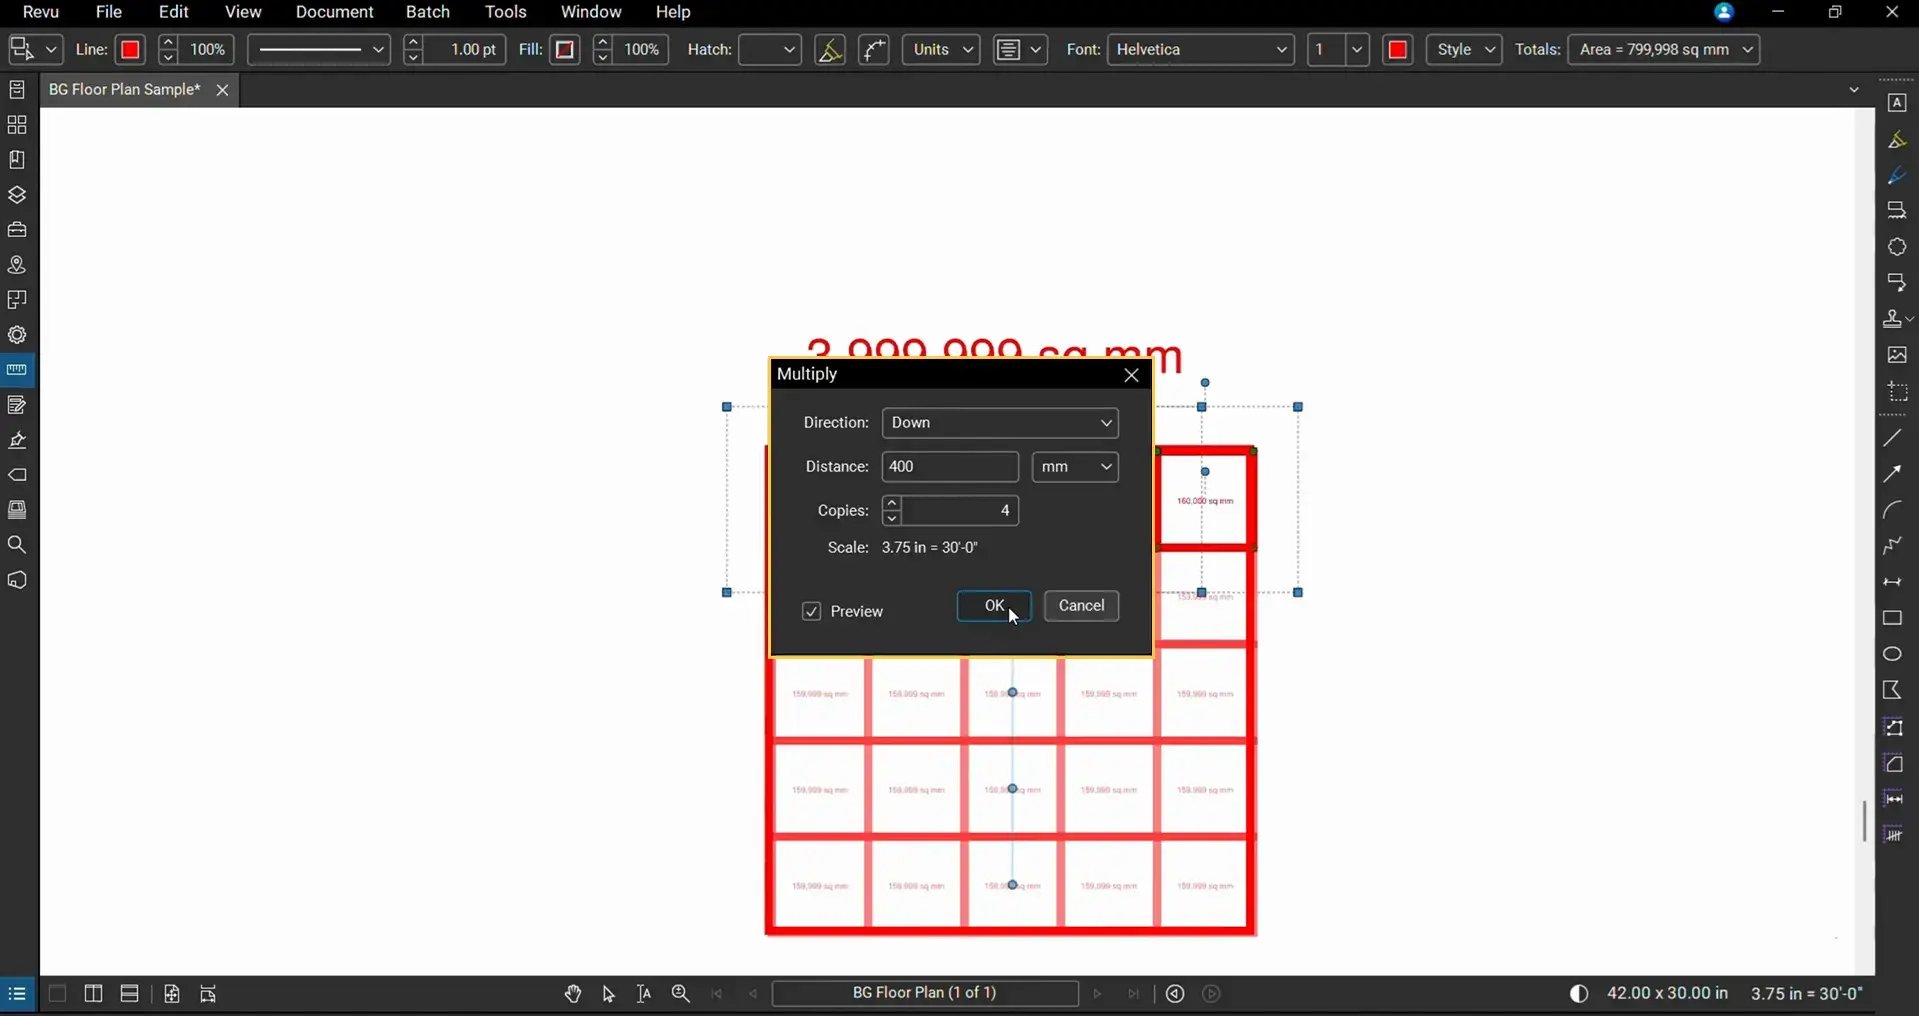
The resulting layout should contain exactly:
25 tiles
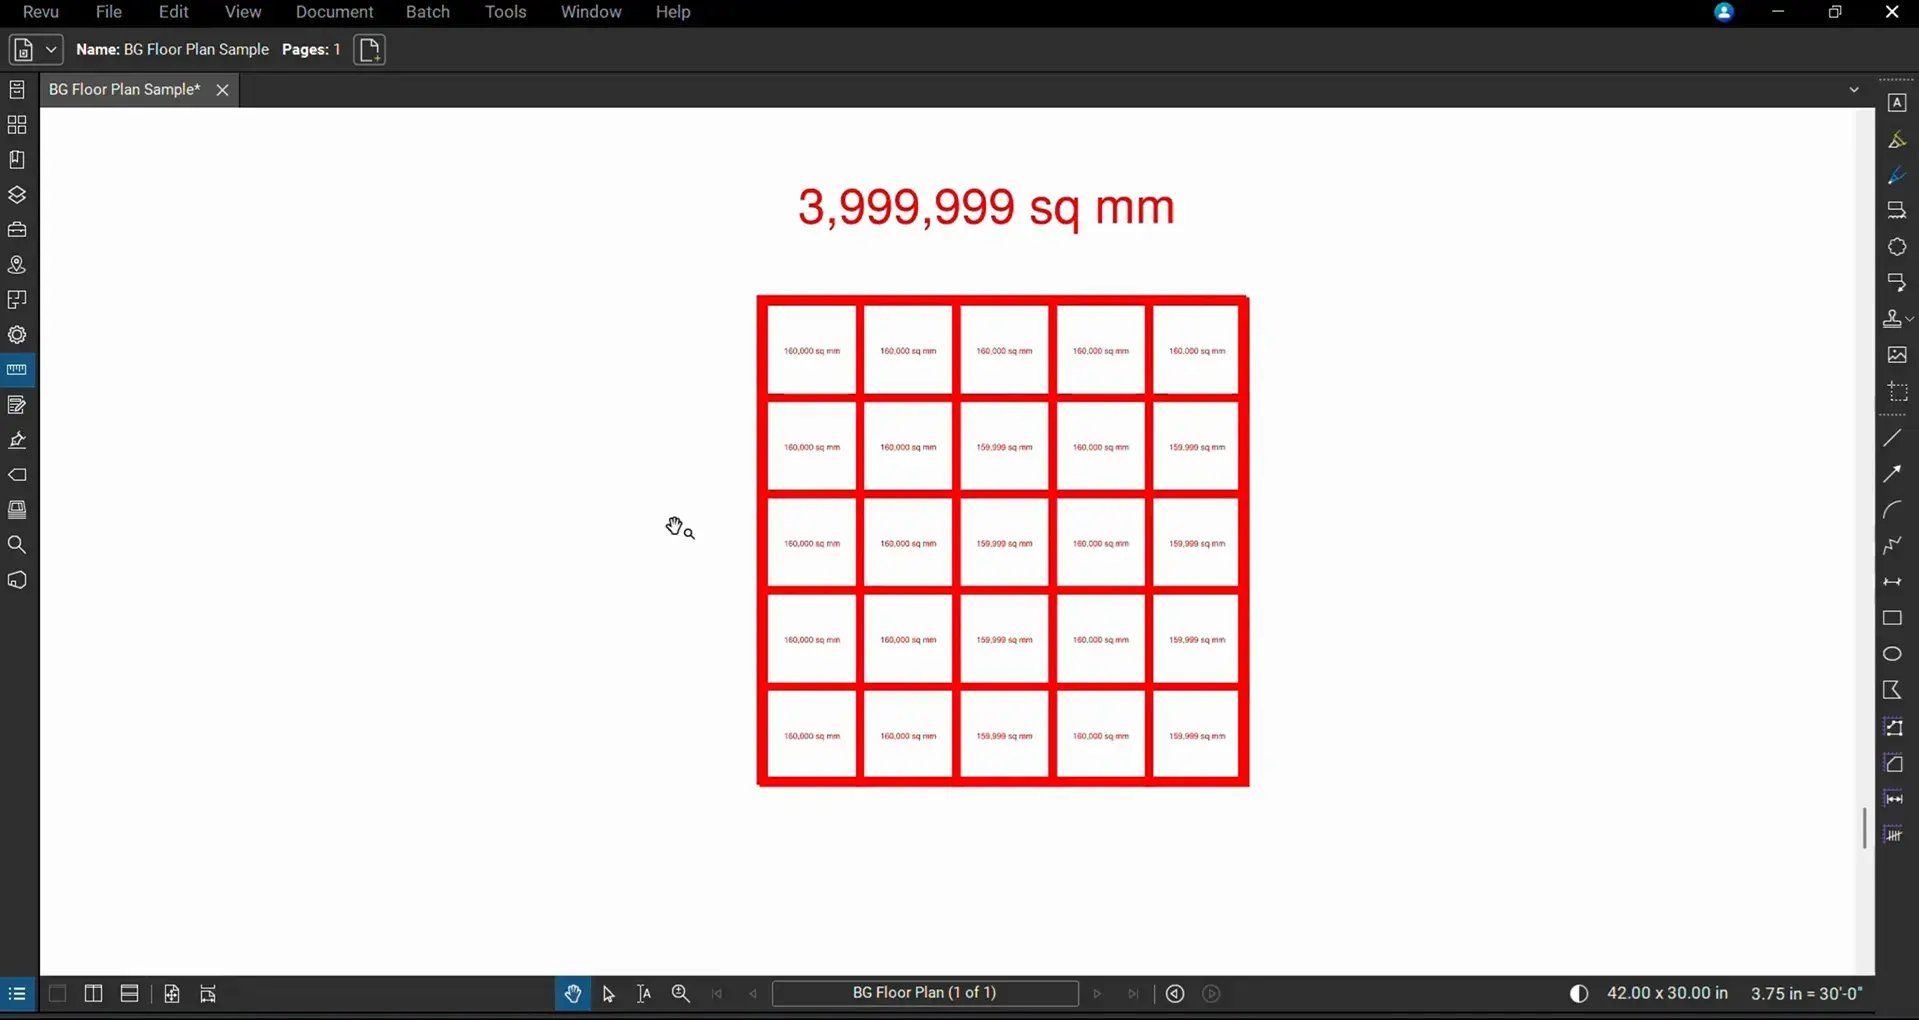
This provides a simple visual verification that the larger area of 4,000,000 square mm can exactly hold smaller tiles with an area of 160,000 square mm each.
Verify Using the Formula
Now return to the Markups List.
Enter the smaller tile size of 400 × 400 mm into the Tile Size column for the large Area measurement (Area Measurement 4).
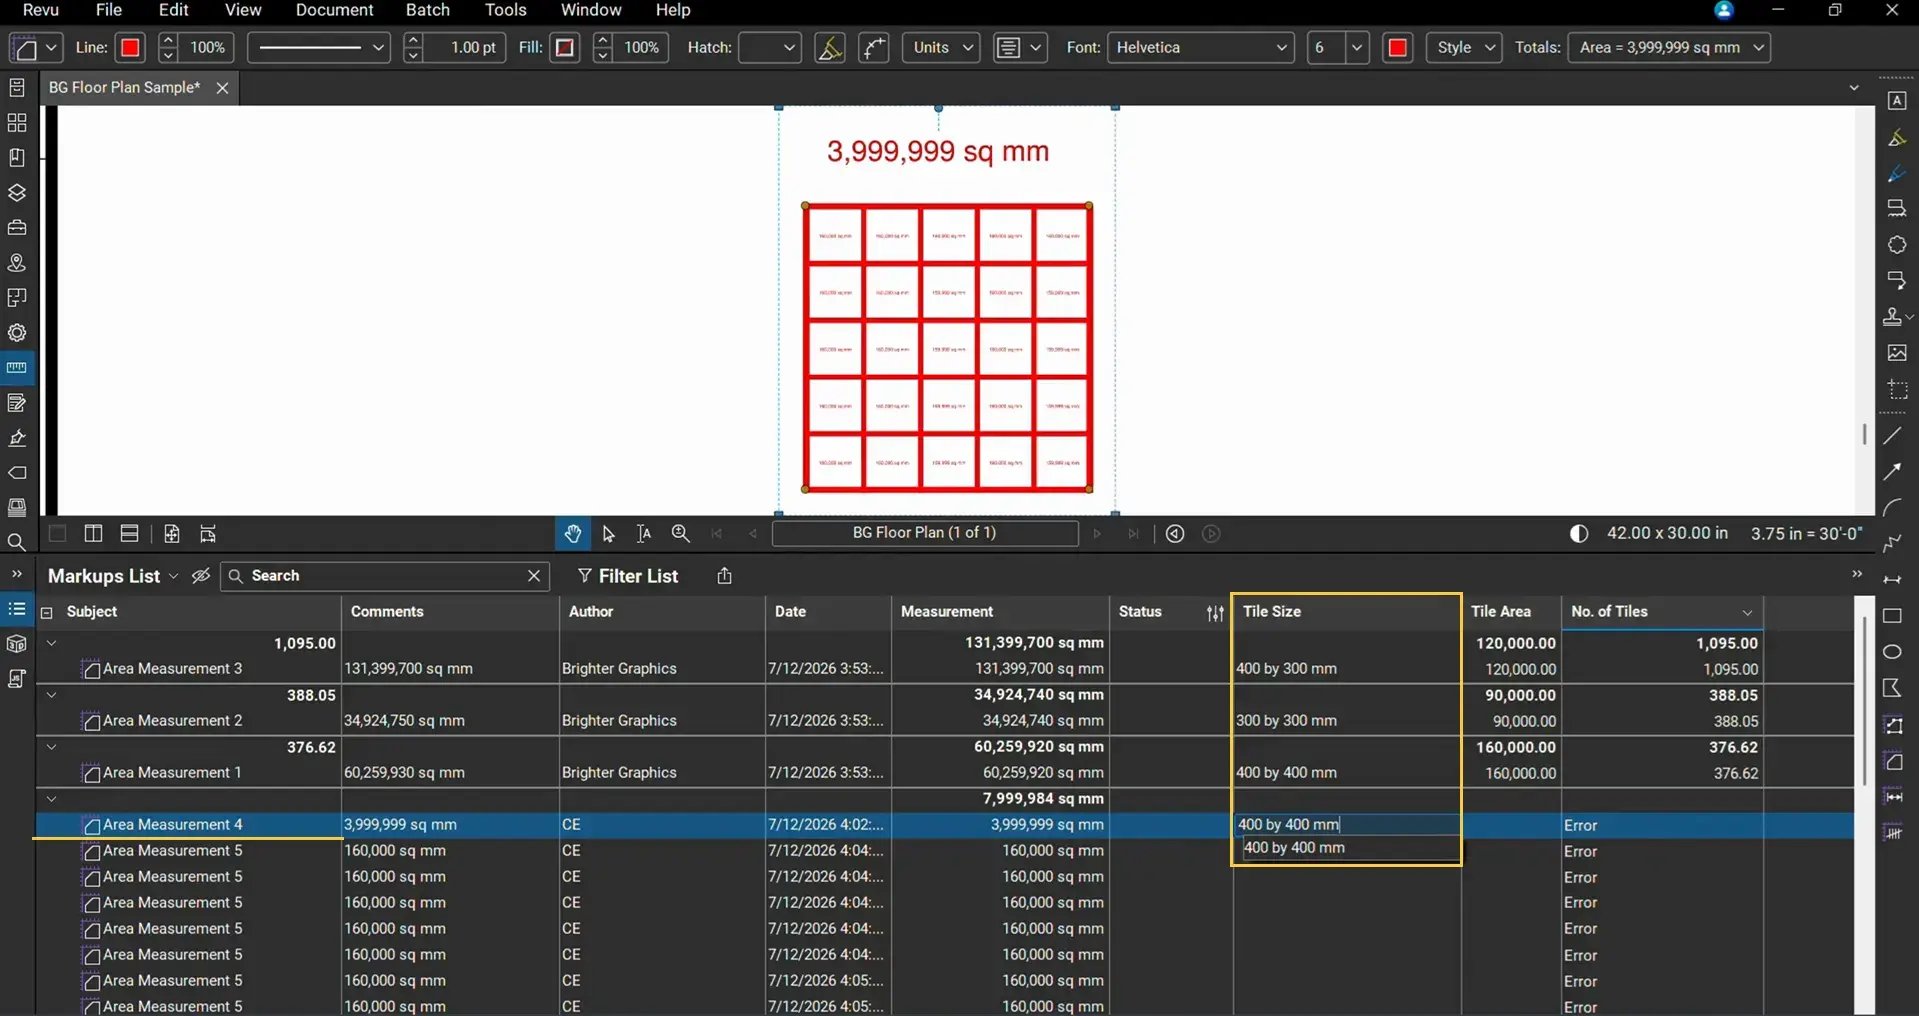
Ask Claude to populate the Tile Area value for Area Measurement 4 (the subject of the larger tile area).

The Tile Area becomes:
160,000 mm² (exactly the same as smaller tile area)
Revu immediately recalculates the Formula column (No. of Tiles) value and populates the result for Area Measurement 4.
The result should display:
25 tiles
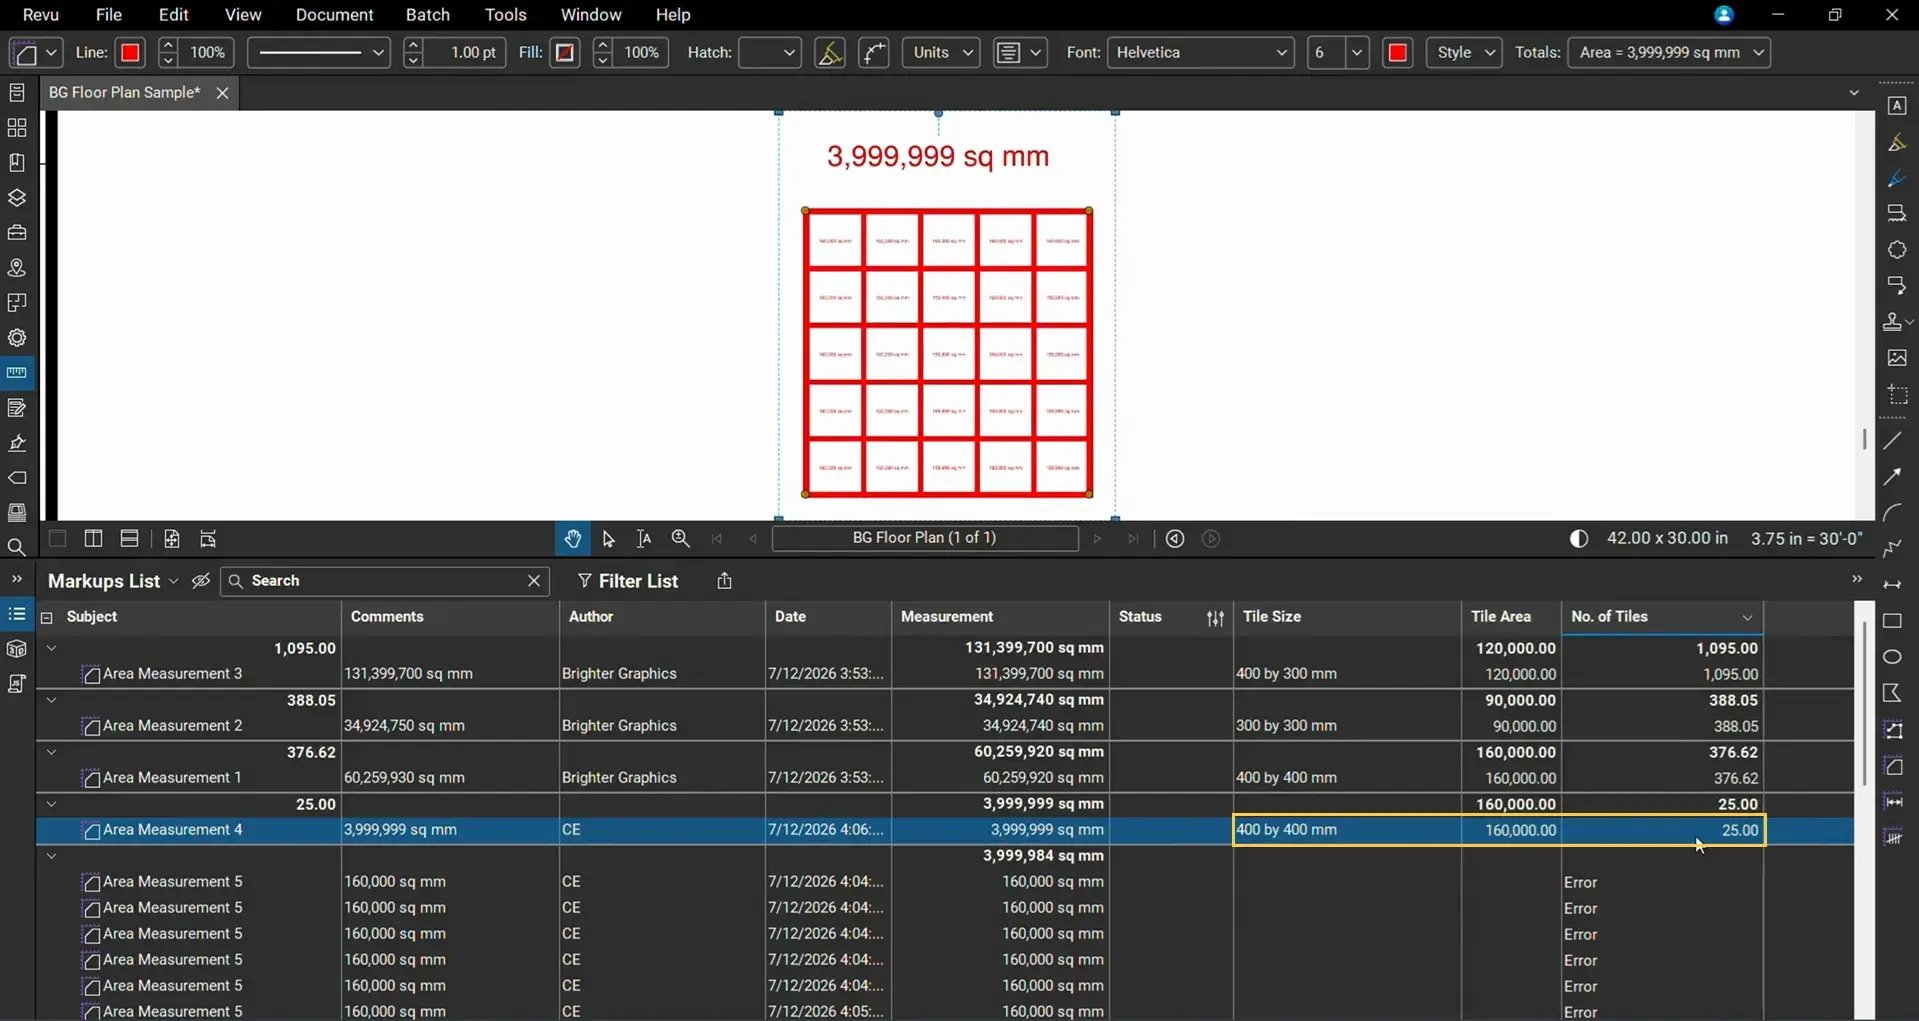
Both the visual layout and the Formula column now produce the same answer, confirming that the custom column workflow is working correctly.
Why Use Claude for Creating Custom Columns?
Using Claude significantly reduces the time required to build advanced calculation workflows. Instead of manually configuring multiple custom columns, formulas, and data types, you simply describe the workflow to Claude, and it will do it for you instantly.
Claude can automatically:
- Create Text, Number, Choice, Date, Formula, and other custom columns.
- Configure formulas.
- Convert measurement units.
- Populate numeric values.
- Rename columns.
- Update existing custom columns.
Once the workflow is created, Revu continues to perform all calculations using its own formula engine, allowing you to review, audit, and modify them as needed.
This gives you the convenience of AI-assisted setup without sacrificing the reliability and transparency of native Revu calculations. No need to rely fully on Claude for complex calculations and estimation jobs.
Prompt Template: Create the Custom Columns
Below is a prompt used in this tutorial (adjust it for your own workflow, column names, or other requirements):
Using the PDF currently open in Bluebeam Revu:

Convert (All or Specify their Subjects) Area Measurements to (mention square millimetres or any other desired unit).
Create the following custom columns in the Markups List:

1. Tile Size

Type: Text

2. Tile Area

Type: Number

3. No. of Tiles

Type: Formula

Formula:

Measurement ÷ Tile Area

Set the formula precision to two decimal places.

(Do not modify any existing measurements except to convert Area Measurement units).
Prompt Template: Populate the Tile Area Column
After entering values in your Tile Size column manually, use the following prompt:
Read the Tile Size custom column for every Area measurement.

Calculate the tile area for each row in (specify square millimetres or other desired units of area).

Populate the Tile Area numeric column with the calculated values.

Do not modify any other columns or measurements.
Level Up Your Bluebeam Experience
Now you see how creating custom columns with Claude can let you build advanced estimating and quantity takeoff workflows in minutes, rather than manually configuring each column yourself. More importantly, the completed workflow remains entirely inside Bluebeam Revu, where every formula can be reviewed, audited, and reused across future projects.
Whether you're calculating tile quantities, flooring estimates, paint coverage, material costs, or any other custom workflow, you can combine Claude with Revu's native Markups List and Custom Columns to get the best of both worlds: AI-assisted setup with reliable calculations performed directly within your PDF environment.
If you want to experience the new AI-supercharged Bluebeam Max without any commitments, request a 14-day free trial to see and test the new AI features in the most powerful Revu ever built.
Explore more Bluebeam guides to learn about everything Bluebeam and get more from your Revu subscription. For more Bluebeam tips and tricks, stay connected with