

How to Upgrade your Perpetual Licence to Revu 21 Subscription
Bluebeam Subscription Upgrade Tutorial
With the debut of Revu 21, Bluebeam has shifted to a subscription model and replaced previous versions. To continue with the Bluebeam updates and support with active maintenance, it is mandatory to upgrade to the Bluebeam Revu 21 subscription before Sep 30th, 2023.
You can convert your perpetual licences (with Active Maintenance) to a Bluebeam Complete subscription without paying for any subscription or licence cost.
*Perpetual Licence users without Active Maintenance must purchase a Revu 21 by paying a complete annual subscription for Bluebeam Basics, Core, or Complete.
This guide walks you through the step-by-step process of Bluebeam subscription upgrade by converting and upgrading your existing perpetual licences to the latest version of Bluebeam - Revu 21. Let’s discuss this in detail.
*The self-upgrade process is not for Bluebeam Open Licence (OL) users. If you use OL with an older version of Revu, connect with Brighter Graphics for the Bluebeam subscription upgrade.
Stage 1 – Create your BBID and Upgrade to Subscription from Bluebeam Webstore
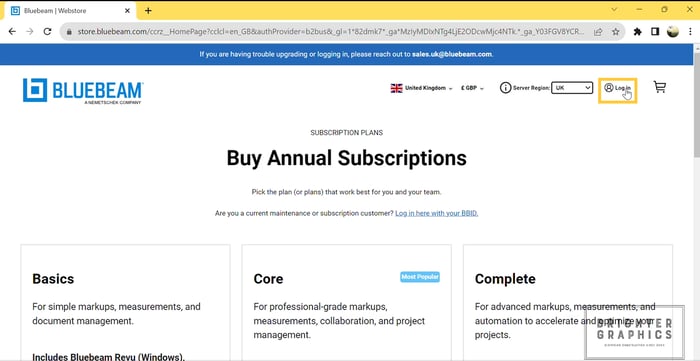
Step 1 - Access Bluebeam Website
Go to Bluebeam’s official website.
Step 2 – Go to Log-in Option
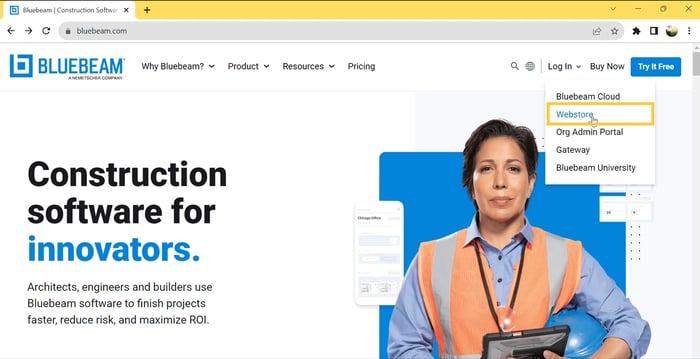
In the top-right corner, locate and click the "Log-in" button.

Step 3 - Access Webstore
From the drop-down menu that appears, select "Webstore."
Step 4 - Select Location and Currency
Wait for the Bluebeam Webstore to load. From the top, choose your location and preferred currency. For instance, if you're in the UK, select United Kingdom and GBP.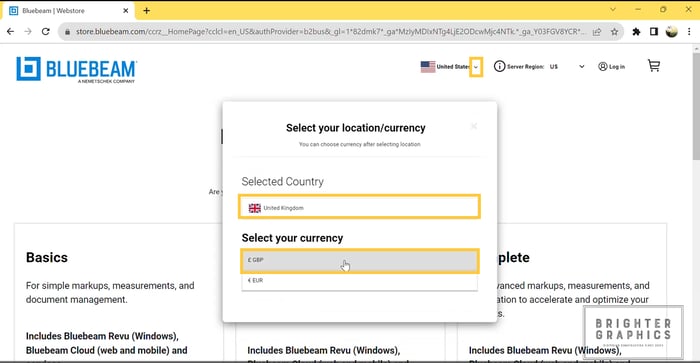
Step 5 - Choose Server Region and Log In
Proceed by selecting the server region that suits you best.
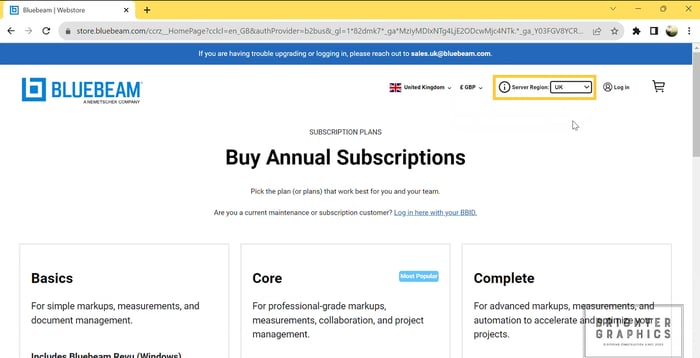
Then, click the log-in button.
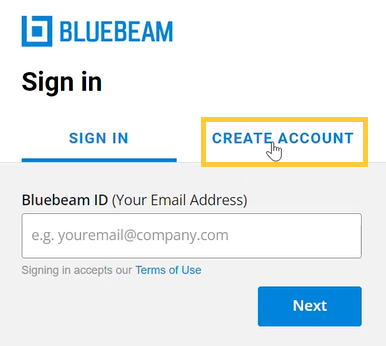
Step 6 - Create an Account (If you have not created it yet)
You will proceed to the log-in portal. If you don't have a Bluebeam account or BBID (Bluebeam ID), click on the "Create Account" tab. Fill in essential details such as name, email, and password. Remember, the email you enter will serve as your future BBID to access the complete suite of Bluebeam products including Bluebeam Cloud, Studio, and Revu 21.
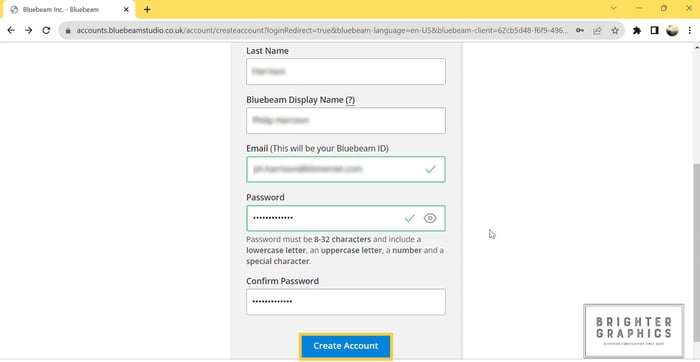
Step 7 - Account Creation
Once the necessary information is provided, click the "Create Account" button.
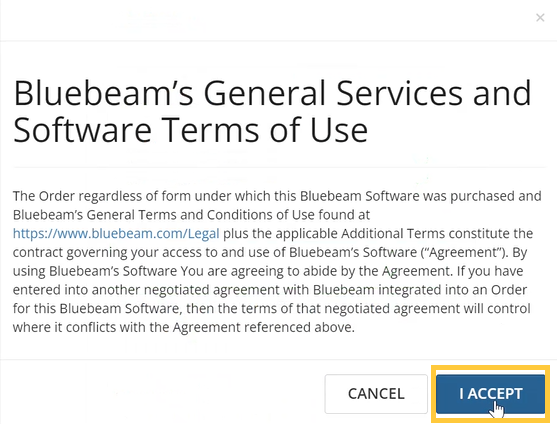
Step 8 - Agree to Terms and Conditions
A pop-up window will appear, displaying Bluebeam's Terms of Use. To proceed, read through and click "I Agree."
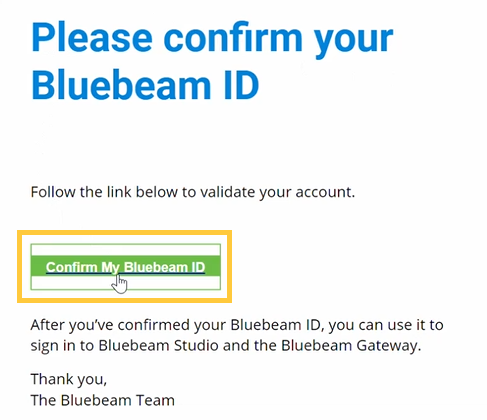
Step 9 - Email Confirmation
In the subsequent step, you'll need to confirm your email. Locate the Bluebeam Confirmation Email in your inbox and click the "Confirm My Bluebeam ID" button within.
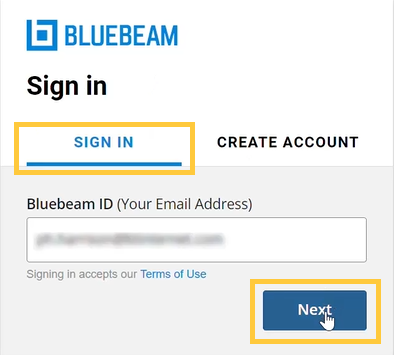
Step 10 - Return to Bluebeam Store
Once your BBID is confirmed, return to the Bluebeam Store. Reiterate the process of selecting your location, currency, and server region. Click the log-in portal, enter your email address as the BBID in the portal and click "Next."
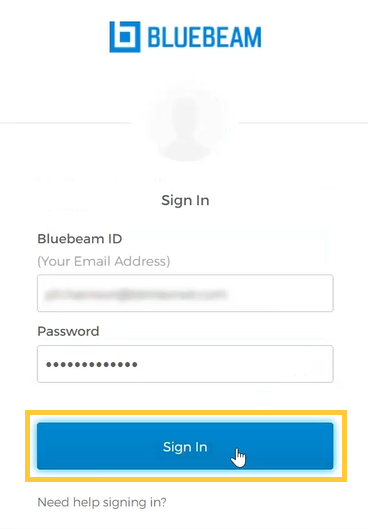
Step 11 - Sign-in
Enter your password and click "Sign-in" to access the Bluebeam Webstore.
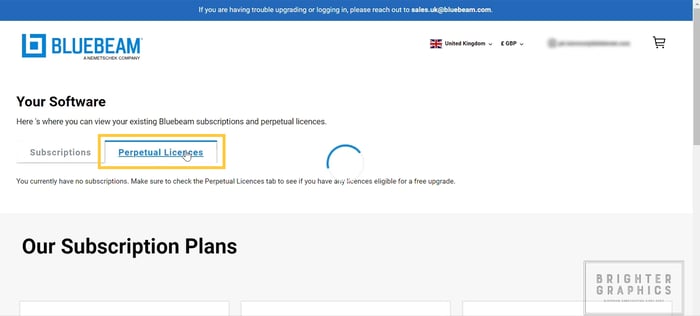
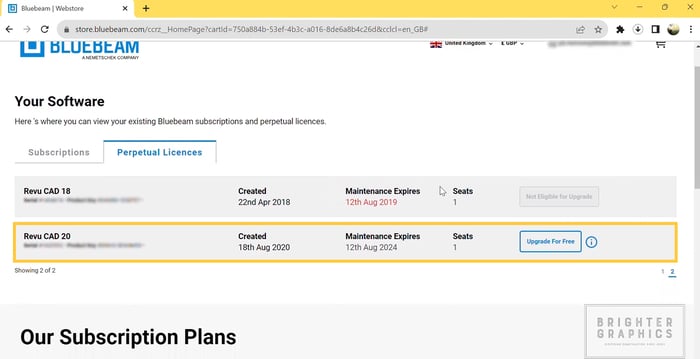
Step 12 – Go to Perpetual Licences Tab
After signing into the store, navigate to the "Perpetual Licences" tab.
Step 13 - Identify Eligible Licences
Locate the licences that qualify for an upgrade.
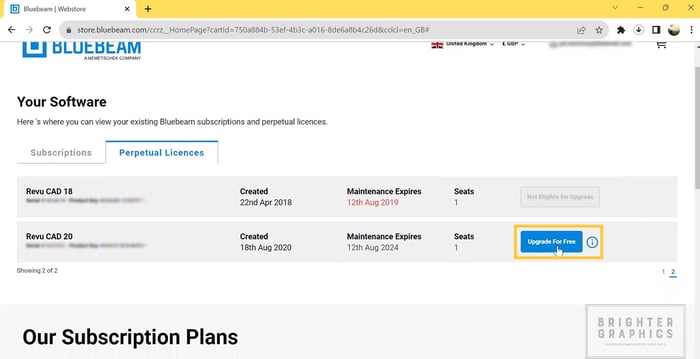
Step 14 - Upgrade Selection
Click "Upgrade for Free" for the licence you want to upgrade.
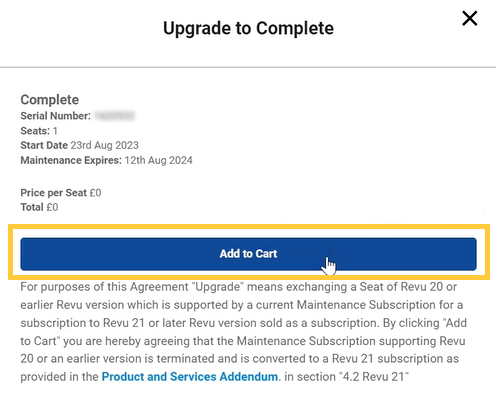
Step 15 - Verify Details and Add to Cart
In the pop-up window, double-check the licence information and select "Add to Cart."
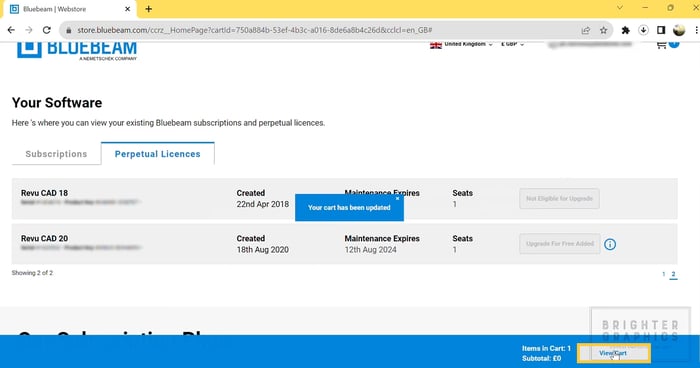
Step 16 - Review Cart
Click on the "View Cart" button positioned at the bottom-right corner of the window.
Step 17 - Confirmation Pricing Details
Confirm that the total price is zero, as you are indeed upgrading for free.

Initiate the checkout process by clicking "Checkout."
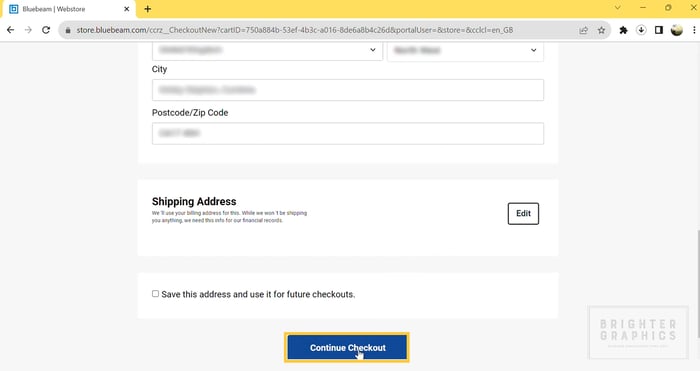
Step 18 - Billing and Additional Information
In the forthcoming step, input your billing details and any other required information. Review all entered details and click "Continue Checkout."
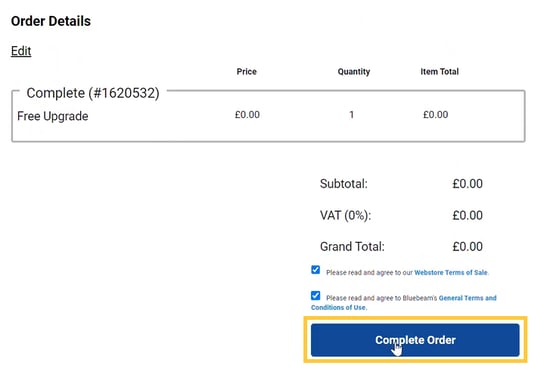
Step 19 - Agree to Terms of Sale and Use
Ensure you agree to Bluebeam's terms of sale and conditions of use by checking the respective box. To finalize the order placement, click "Complete Order."
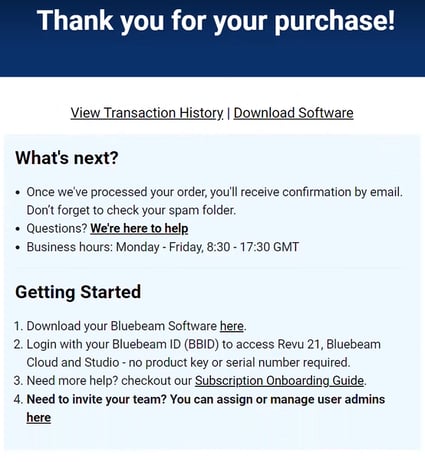
Step 20 - Confirmation and Download
Once your order is processed, you will receive two emails from Bluebeam to your email address (set as your BBID) in a moment. One email will confirm the upgrades were processed, and the other will ask you to ACCEPT INVITATION.
Stage 2 - Declare Yourself as Admin to Manage Subscriptions
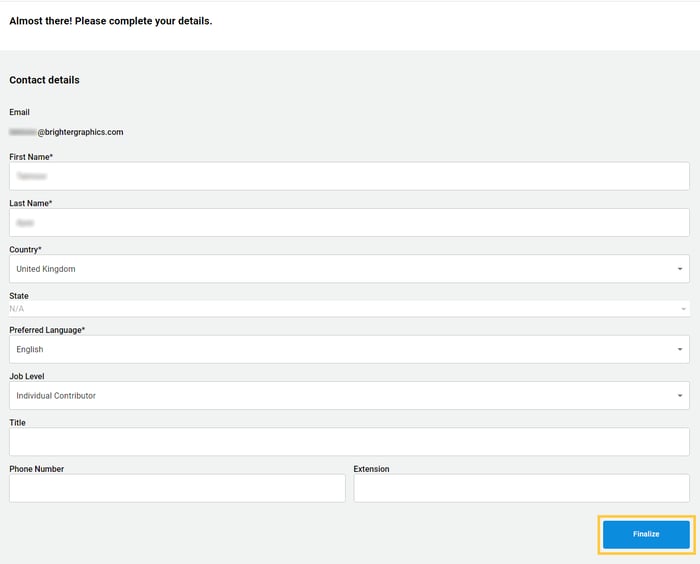
Step 1 - Go to the second email, click ACCEPT INVITATION, and you will be directed to Bluebeam’s Org Admin Portal. Sign in with your BBID. When prompted, fill in any contact information needed and click FINALIZE.
Step 2 - Look for another email confirming the Bluebeam Admin Access in your inbox. Click GET STARTED.
Step 3 - Select your server region and sign in with the same BBID.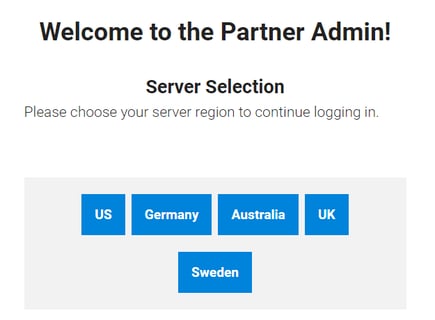
Congratulations, you can now access the Bluebeam Admin Access Portal.
Stage 3 - Inviting Your Users
Step 1 - After login into Org Admin Portal, select ACCOUNT, PRODUCT TIERS & USERS.
Step 2 - Under the ACCOUNT ADMINISTRATION section, use the ADD NEW SUBSCRIPTION USER feature to invite users using the same email verification process as we discussed above. Check out our step-by-step guide on accepting Org Admin Invitation for subscription seat allocation and sharing it with your users.
*Users can only access the new Revu 21 with all features and suits, including Bluebeam Studio and Cloud, once invited/accepted by the admin.
You can also decide on Revu 21 access for your new user as VIEW ONLY or COMPLETE. After setting up the admin, set your subscription to COMPLETE if you (Org Admin) will also use Bluebeam Revu 21. Otherwise, you cannot access all the market-leading features of your Revu 21 Complete subscription.
For any queries, feel free to contact Brighter Graphics.
To learn more about this subscription, read our detailed Bluebeam Subscription FAQs to know everything about this new transition.


