When you redraw your markups or measurements every time your workflow changes, it is time-consuming and mundane. In the older Bluebeam Revu products, it was a significant limitation for Bluebeamers, especially during design reviews, quantity takeoffs, and document revisions.
The new AI-supercharged Bluebeam Max introduced the Convert To feature as one of the three new Magic Markup tools, letting you instantly convert an existing markup or measurement into another supported type while preserving its geometry and appearance.
Whether you want to convert an Area measurement into a Volume, transform any other measurement into a Cloud markup, or reuse existing geometry for another purpose, the Convert To tool eliminates the need to recreate markups from scratch.
The new Convert To Magic Tool is available exclusively with a Bluebeam Max subscription. If you have not upgraded yet, you can request a 14-day free Bluebeam Max trial to experience AI-powered workflows and the latest Magic Markup tools in Bluebeam Revu.
In this guide, you will learn how to use the Convert To feature, adjust converted measurements, and reuse converted markups throughout your projects.
Step-by-Step Guide to Using the Convert To Magic Markup in Bluebeam Max
Follow the steps below to convert existing markups and measurements using Convert To.
Step 01: Open Your PDF Drawing
01 A: Open Bluebeam Revu 21 on your desktop (ensure you are using version 21.9 or later and have an active or trial Bluebeam Max subscription).
01 B: Go to File > Open
01 C: Open the PDF containing the markups or measurements you want to convert.
For this example, we are using a drawing that already contains several Area measurements.
Step 02: Accessing the Convert To Option
- Select any markup or measurement on your drawing.
- Right-click the selected markup.
- Choose Convert To from the context menu.
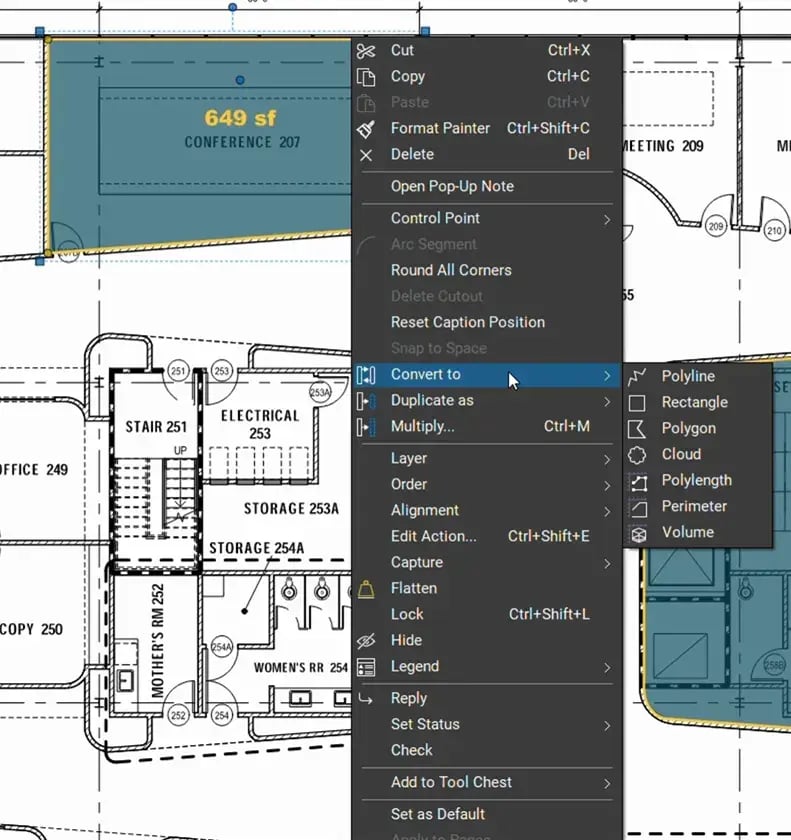
Bluebeam displays the available conversion options to other markups. Currently, Bluebeam supports conversion for the following child markups:
- Polyline
- Rectangle
- Polygon
- Cloud
- Polylength
- Perimeter
- Area
- Volume
Select the markup or measurement type you want to create.
Convert To replaces the original markup, unlike Duplicate As Magic Tool, which keeps the original markup and creates a new copy.
Step 03: Converting an Area Measurement into a Volume
For this example, we are converting our existing Area Measurement to Volume. To do this, right-click and go to Convert To > Volume.
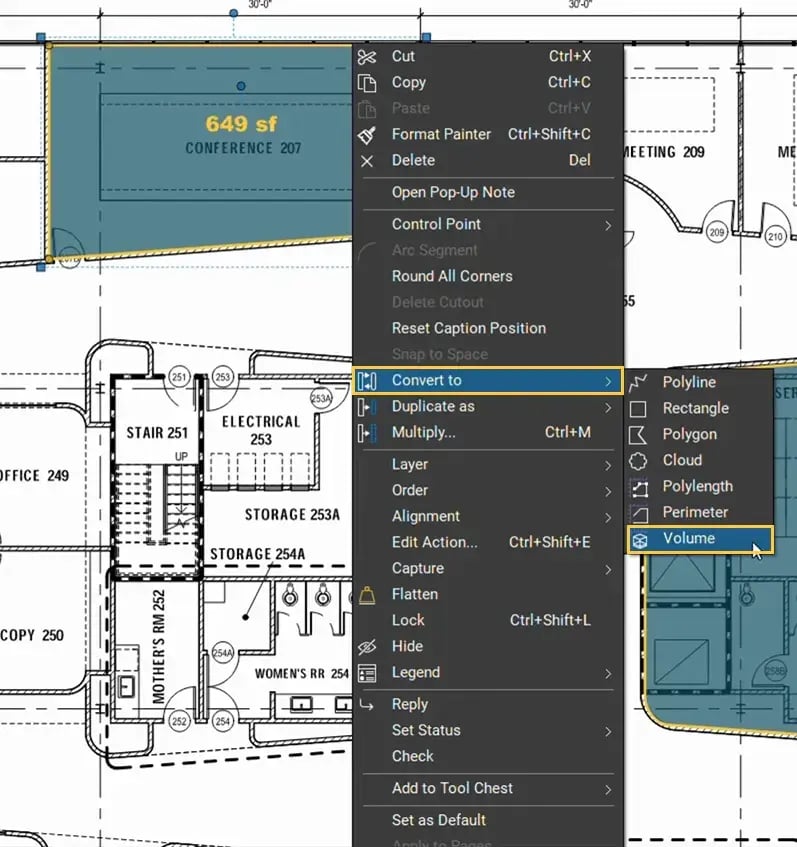
Bluebeam immediately converts the Area measurement into a Volume measurement.
Initially, the Volume will display 0 because only the two-dimensional area has been converted. Since volume is a three-dimensional measurement, a depth value must be provided before a meaningful result can be calculated.
To add depth to your volume, you can simply:
- Open the Measurements panel.
- Locate the Depth field.
- Enter the required depth and choose your desired unit.
- Press Enter.
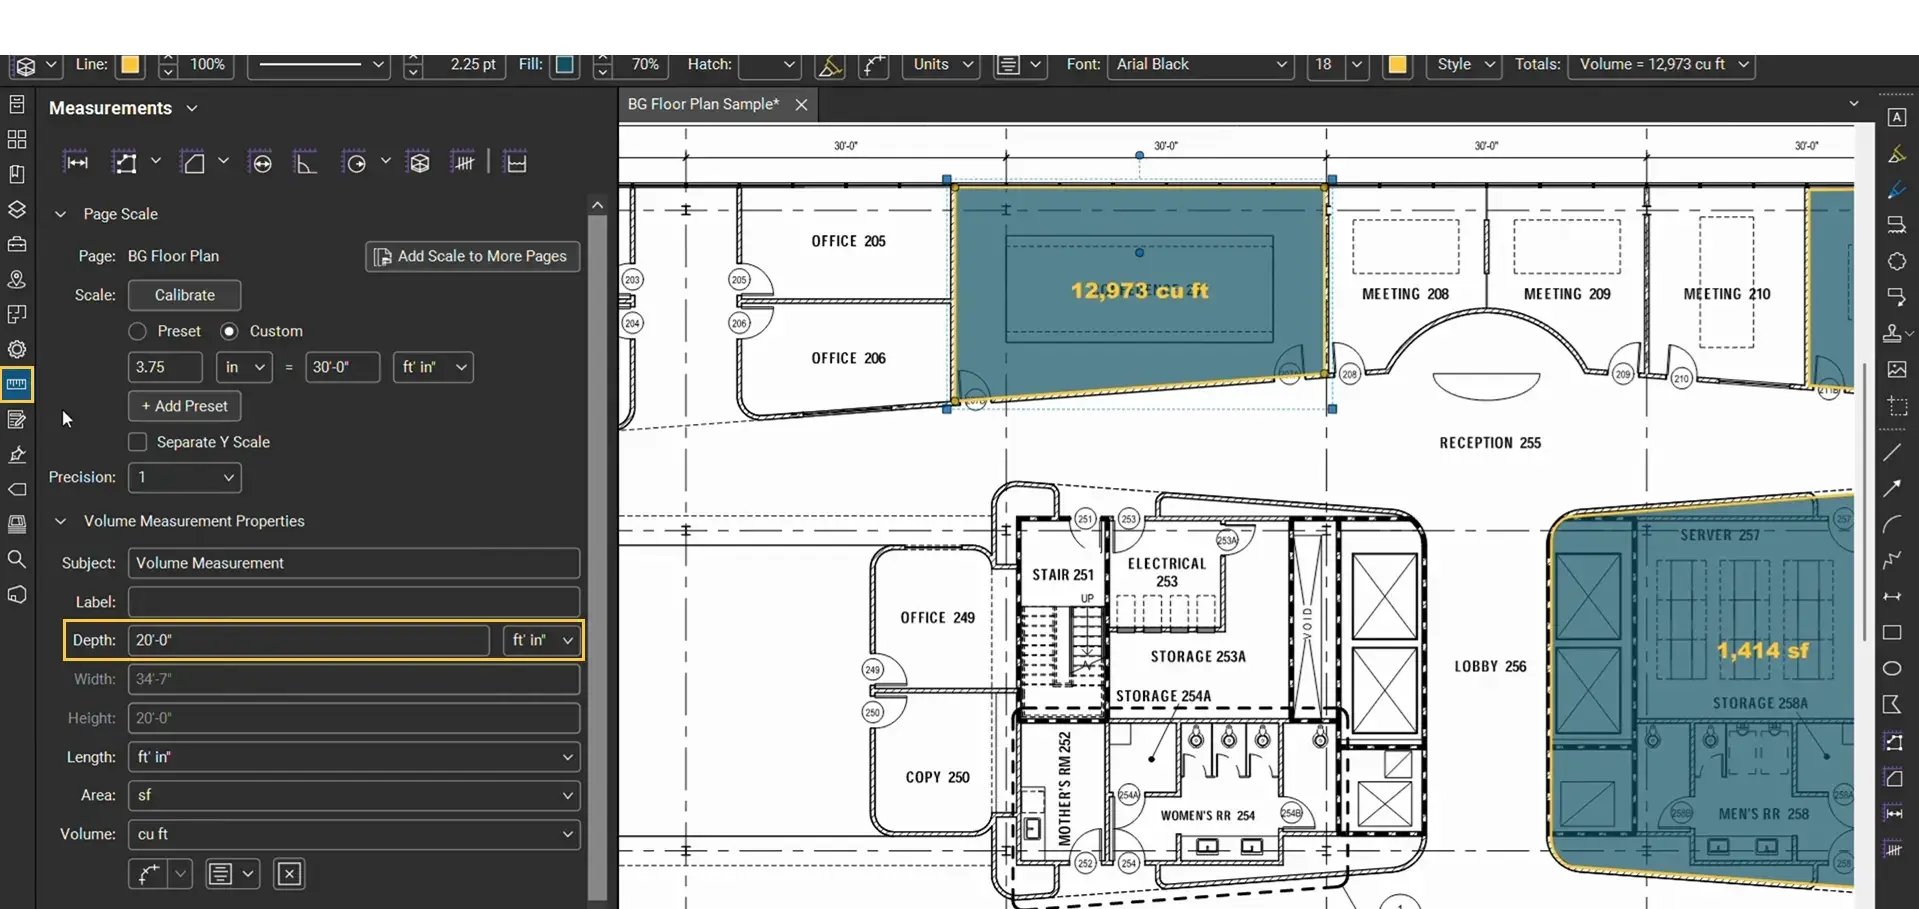
Bluebeam automatically calculates the volume by multiplying the measured area on the 2D drawing by the specified depth.
Step 04: Convert Measurements into Markups or Vice Versa
The Convert To tool also lets you convert measurements into markup. This is particularly useful when you no longer require measurement but still need annotations during review walks or team collaborations.
For example:
- Right-click your Volume measurement.
- Select Convert To > Cloud.
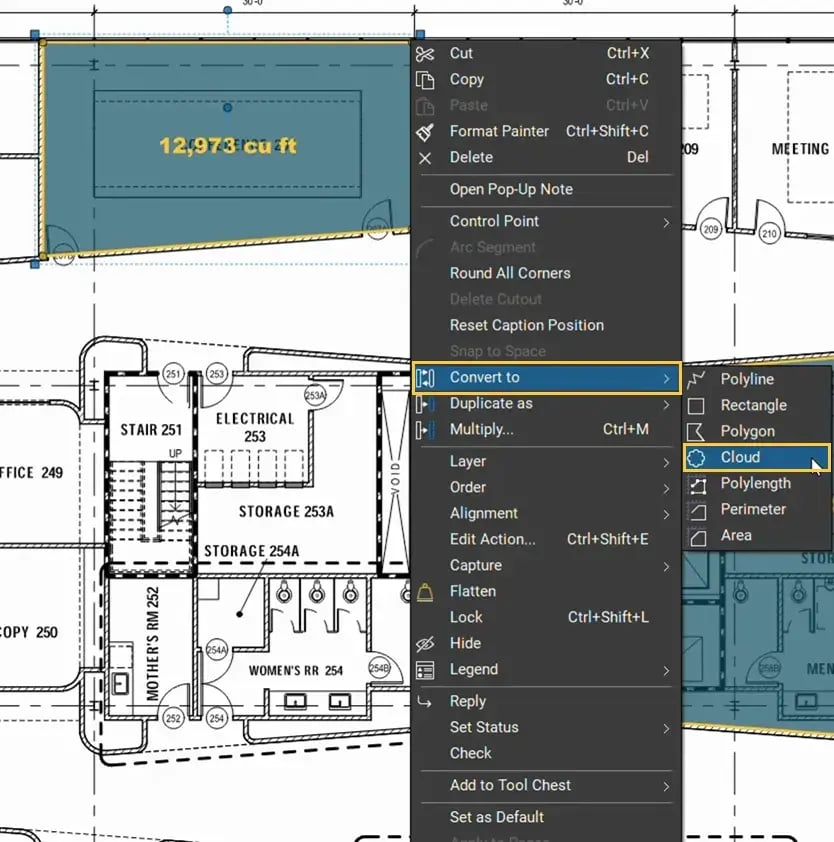
The measurement will be converted into a Cloud markup while maintaining the same dimensions. Similarly, you can convert your plain annotations to measurements for quantification of drawings.
Step 05: Save Converted Markups to the Tool Chest
Just like any other markup or measurement, you can save your converted markups and measurements to the Tool Chest so they can be reused later without having to recreate them.
To save your converted markups or measurements:
- Right-click the converted markup.
- Go to the Add to Tool Chest option.
- Select your preferred toolset.
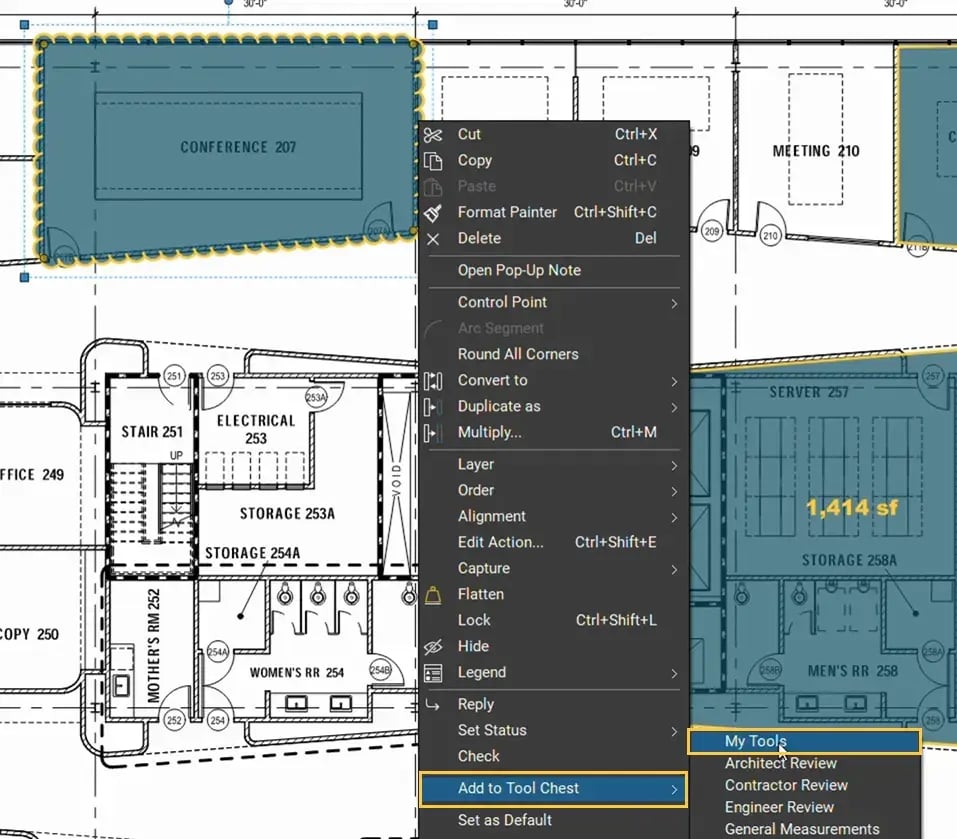
Your converted markup is now available as a reusable custom tool that you can share with other team members. You can reuse it later in either Drawing Mode or Properties Mode or share it with your team.
Read our separate guide on creating and using custom toolsets in Bluebeam Revu.
Convert to Other Supported Markup Types
You can use the Convert To Magic tool for more conversions depending on your workflow.
For example, you can:
- Convert an Area measurement into a Rectangle.
- Convert an Area measurement into a Polylength.
- Or convert any other supported markups into Clouds, Polygons, Perimeters, or Polylines.
When converting measurements that display text, such as Area or Volume, into non-text-based markups like Rectangles or Clouds, the measurement label will be removed because plain markups do not support measurement labels.
Similarly, when converting an irregular quadrilateral into a Rectangle, Bluebeam automatically extends the shortest side to complete the rectangle. If it's not a quadrilateral, it will transform it entirely and keep the overall size as close as possible to the parent markup.
You can then adjust the geometry further using the control handles.
Converted Markups in the Markups List
Every converted markup or measurement automatically updates in the Markups List just like regular markups. In the Markups List, you can:
- Track converted markups.
- Filter and sort data.
- Add comments.
- Include them in quantity takeoffs.
- Export markup information for reporting.
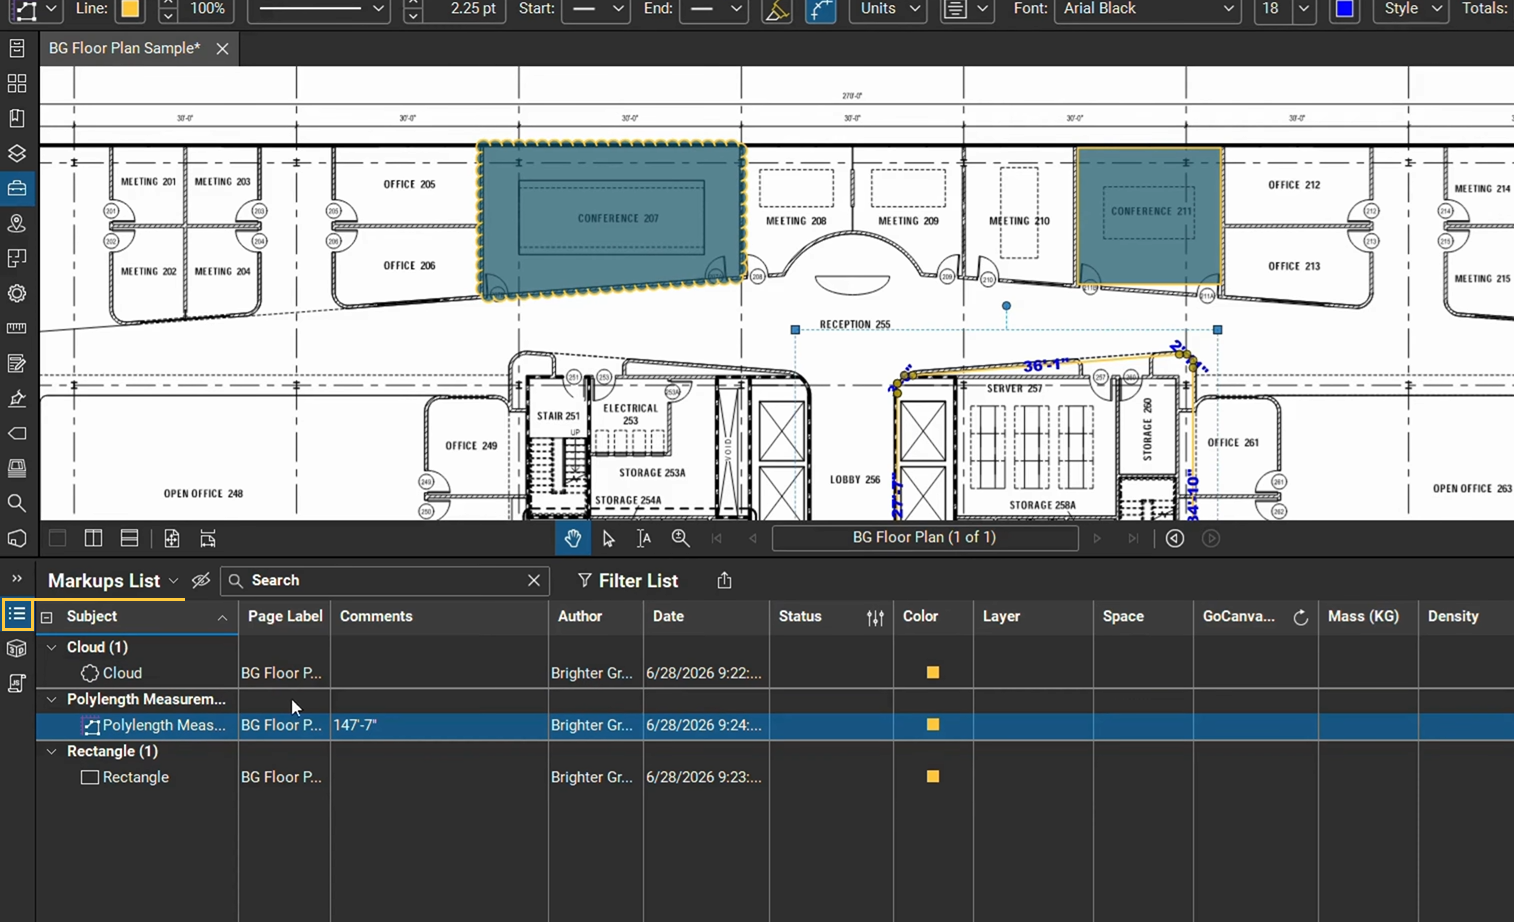
So your converted markups are not standalone annotations; they are fully integrated into your existing Bluebeam workflows just like their parent markups or measurements.
Duplicate As vs Convert To Magic Markup
Both Duplicate As and Convert To tools belong to the Magic Markups family, but they serve different purposes.
|
Feature |
Duplicate As |
Convert To |
|
Keeps original markup |
Yes |
No |
|
Creates a new markup |
Yes |
No |
|
Replaces existing markup |
No |
Yes |
|
Supports multiple markup types |
Yes |
Yes |
|
Ideal for creating reusable copies |
Yes |
No |
Use Duplicate As to preserve your original markup when creating another version.
Use Convert To when you want to change the existing markup into another type.
Try Bluebeam Max Free for 14 Days
The Convert To is one of the three new Magic Markup features available exclusively with Bluebeam Max. Request a 14-day free Bluebeam Max trial to explore other Magic Markups (Duplicate As and Offset), Smart Review, Smart Overlay, Claude integration, and many more AI-powered workflows designed to speed up your work in Bluebeam Revu.
Level Up Your Bluebeam Experience
This is how Convert To Magic Markup gives you the flexibility to repurpose existing markups and measurements without redrawing them, making design reviews, quantity takeoffs, and document revisions faster and more efficient.
To discover more Magic Markup tools and Bluebeam Max features, explore our related Bluebeam guides and stay connected with Brighter Graphics, your go-to Bluebeam partner in the UK, Europe, and the Middle East.